
Docker-compose with Let's Encrypt: TLS Challenge
![]()
Introduction
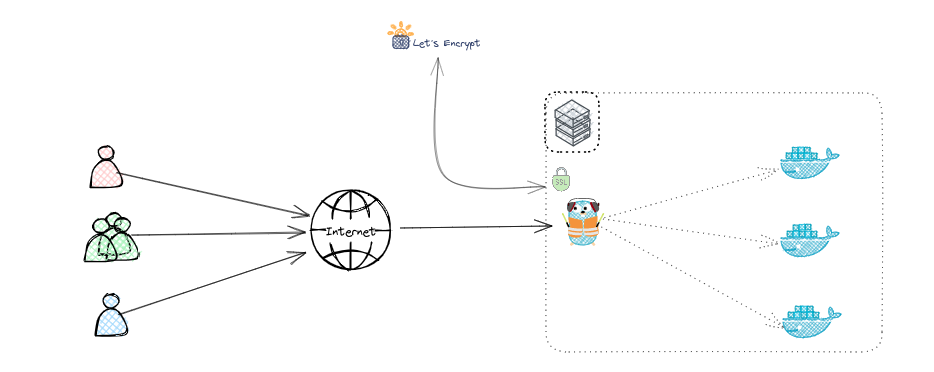
This guide provides information on how to set up a simple TLS-Challenge for Traefik to use Let's Encrypt and certify your domains/websites. We will configure Traefik to act as a reverse proxy for a simple "Whoami" application and secure the app using Let's Encrypt.
Understanding TLS: Check this guide.
Understanding Let's Encrypt: Check this guide.
Overview of TLS-Challenge
The TLS-ALPN-01 challenge is a method used by Let's Encrypt to verify domain ownership. Instead of using the HTTP challenge, it leverages the TLS handshake to validate the domain. This is especially useful for environments where port 80 is blocked or cannot be used.
Difference Between HTTP-Challenge & TLS-Challenge
The HTTP Challenge uses HTTP requests on port 80 to verify domain ownership by serving a specific file at http://your-domain/.well-known/acme-challenge/. The TLS Challenge verifies ownership during the TLS handshake on port 443 by presenting a special certificate, making it more suitable for HTTPS-only environments or when port 80 is blocked.
Prerequisite
For the TLS challenge you will need:
- A publicly accessible host allowing connections on port
443with docker & docker-compose installed. - A DNS record with the domain you want to expose pointing to this host.
Step 0: Configuring DNS Records
Before proceeding, make sure your domain name is correctly configured. Create a DNS A Record that points your domain to the public IP address of your server.
If you don't know what a DNS A Record is, check out this post from Cloudflare.
Step 1: Create ACME File
In this guide, we will use GlusterFS (only needed when using Docker Swarm) and follow my usual folder path convention. Feel free to adjust your paths as needed.
mkdir /mnt/glustermount/data/traefik_data
mkdir /mnt/glustermount/data/traefik_data/letsencrypt
touch /mnt/glustermount/data/traefik_data/letsencrypt/acme.json
chmod 600 /mnt/glustermount/data/traefik_data/letsencrypt/acme.json
Step 2: Installing and Configuring Traefik
There are multiple ways to set up your Traefik configuration—either directly in the docker-compose.yaml file or by outsourcing it to external configuration files. Find more information here.
In this step, we provide the option traefik.http.routers.traefik.middlewares=authtraefik, which is optional but highly recommended to secure your Traefik dashboard with login authentication. Check out the Traefik documentation for more information.
docker-compose.yaml
version: '3.8'
services:
  traefik:
    image: "traefik:v3.3"
    container_name: traefik
    hostname: traefik
    command:
      - --entrypoints.web.address=:80
      - --entrypoints.websecure.address=:443
      - --providers.docker
      - --providers.docker.exposedByDefault=false
      - --api
      - --certificatesresolvers.le.acme.email=your-email@example.com
      - --certificatesresolvers.le.acme.storage=/letsencrypt/acme.json
      - --certificatesresolvers.le.acme.tlschallenge=true
      - --log.level=ERROR
      - --accesslog=true
    ports:
      - 80:80
      - 443:443
    volumes:
      - "/var/run/docker.sock:/var/run/docker.sock:ro"
      - "/mnt/glustermount/data/traefik_data/letsencrypt:/letsencrypt"
    labels:
      - "traefik.enable=true"
      - "traefik.http.routers.traefik.rule=Host(traefik.example.com)"
      - "traefik.http.routers.traefik.service=api@internal"
      - "traefik.http.routers.traefik.tls=true"
      - "traefik.http.routers.traefik.tls.certresolver=le"
      - "traefik.http.routers.traefik.entrypoints=websecure"
      - "traefik.http.routers.traefik.middlewares=authtraefik"
      - "traefik.http.middlewares.authtraefik.basicauth.users=your-user:$$your-password"
    restart: unless-stopped
Replace your-email@example.com with your actual email address and traefik.example.com with your Traefik dashboard domain name.
Step 3: Integrating Let's Encrypt
You can now integrate automatic certification for your apps by adding configurations to the docker-compose.yaml file for the Whoami app:
  whoami:
    image: containous/whoami
    restart: always
    labels:
      - "traefik.enable=true"
      - "traefik.http.routers.whoami.rule=Host(whoami.example.com)"
      - "traefik.http.routers.whoami.entrypoints=websecure"
      - "traefik.http.routers.whoami.tls=true"
      - "traefik.http.routers.whoami.tls.certresolver=le"
      - "traefik.http.routers.whoami.service=whoami"
      - "traefik.http.routers.whoami.priority=100"
      - "traefik.http.services.whoami.loadbalancer.server.port=80"
Remember to replace whoami.example.com with your actual domain name.
Step 4: Starting the Services
Start the services with the following command (only works if your working directory is where your docker-compose.yaml file is saved):
docker-compose up -dYou should now be able to access your Whoami application over HTTPS, secured by a Let's Encrypt certificate.
Conclusion
In this guide, we demonstrated how to set up Traefik as a reverse proxy with Let's Encrypt TLS-Challenge to secure a simple Whoami application. By following these steps, you can easily apply the same configuration to your own services and ensure secure communication with HTTPS.