Wallos
Open-Source Personal Subscription Tracker
- Getting Started
- Overview Wallos Features & Key Concepts
- Step-by-Step Install Guide for Wallos with Traefik on Docker Swarm
- Configure
Getting Started
Overview Wallos Features & Key Concepts

 Live-Demo
User: demo / Password: demo
Introduction
Wallos is a powerful, open-source, and self-hostable web application designed to simplify personal finance management. Whether you’re an individual tracking expenses or a small business managing recurring payments, Wallos provides an intuitive interface and robust features to help you take control of your financial life. Say goodbye to complicated spreadsheets and expensive financial software – Wallos makes managing your finances a breeze.
Features
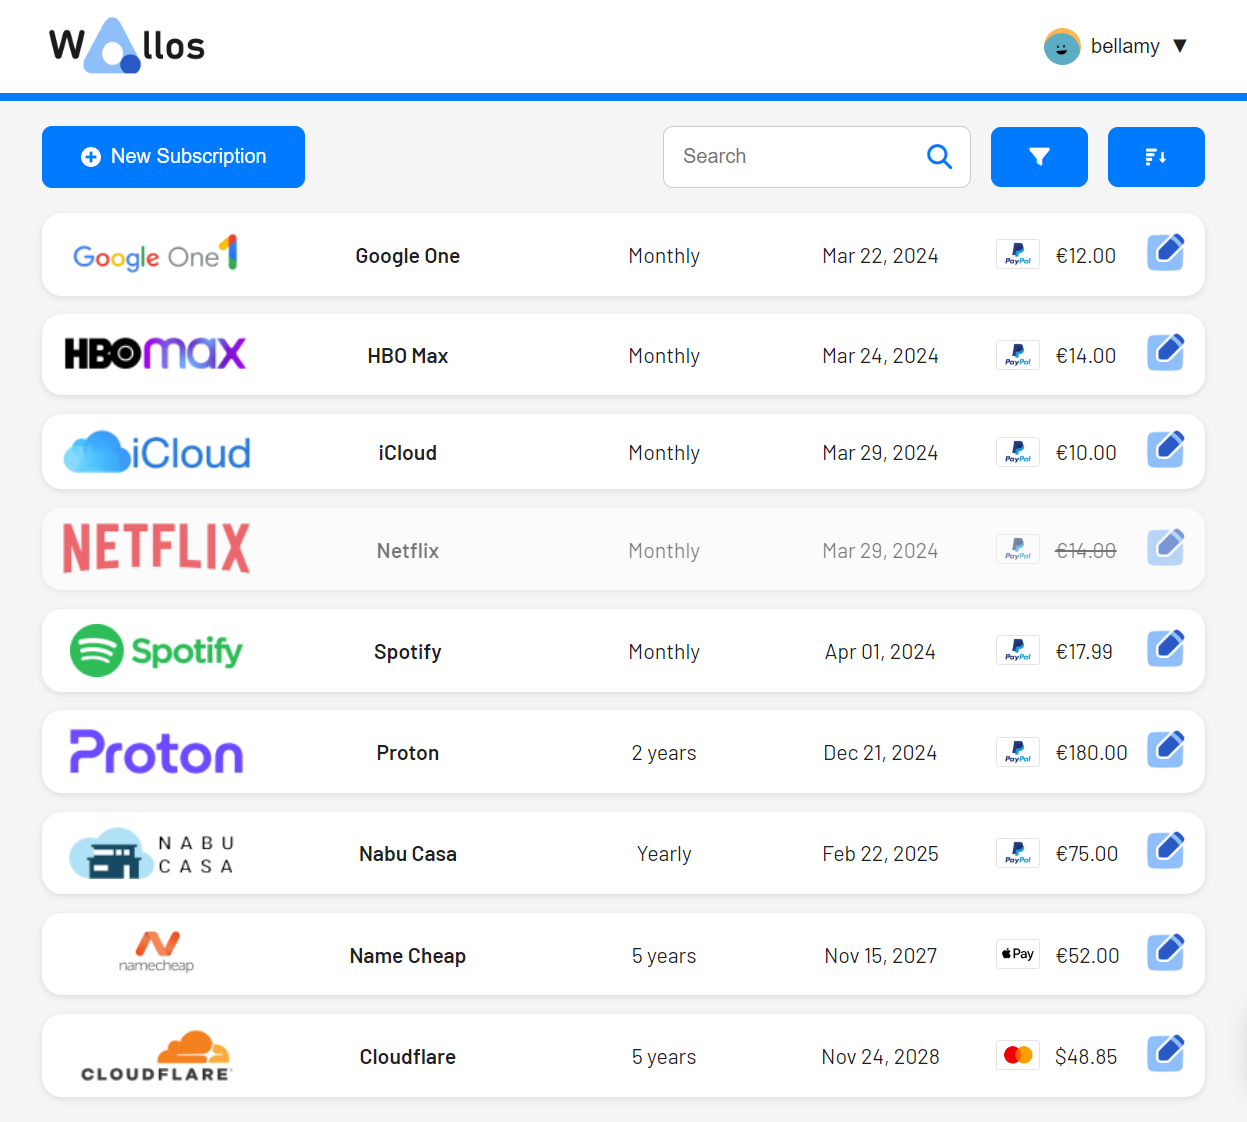
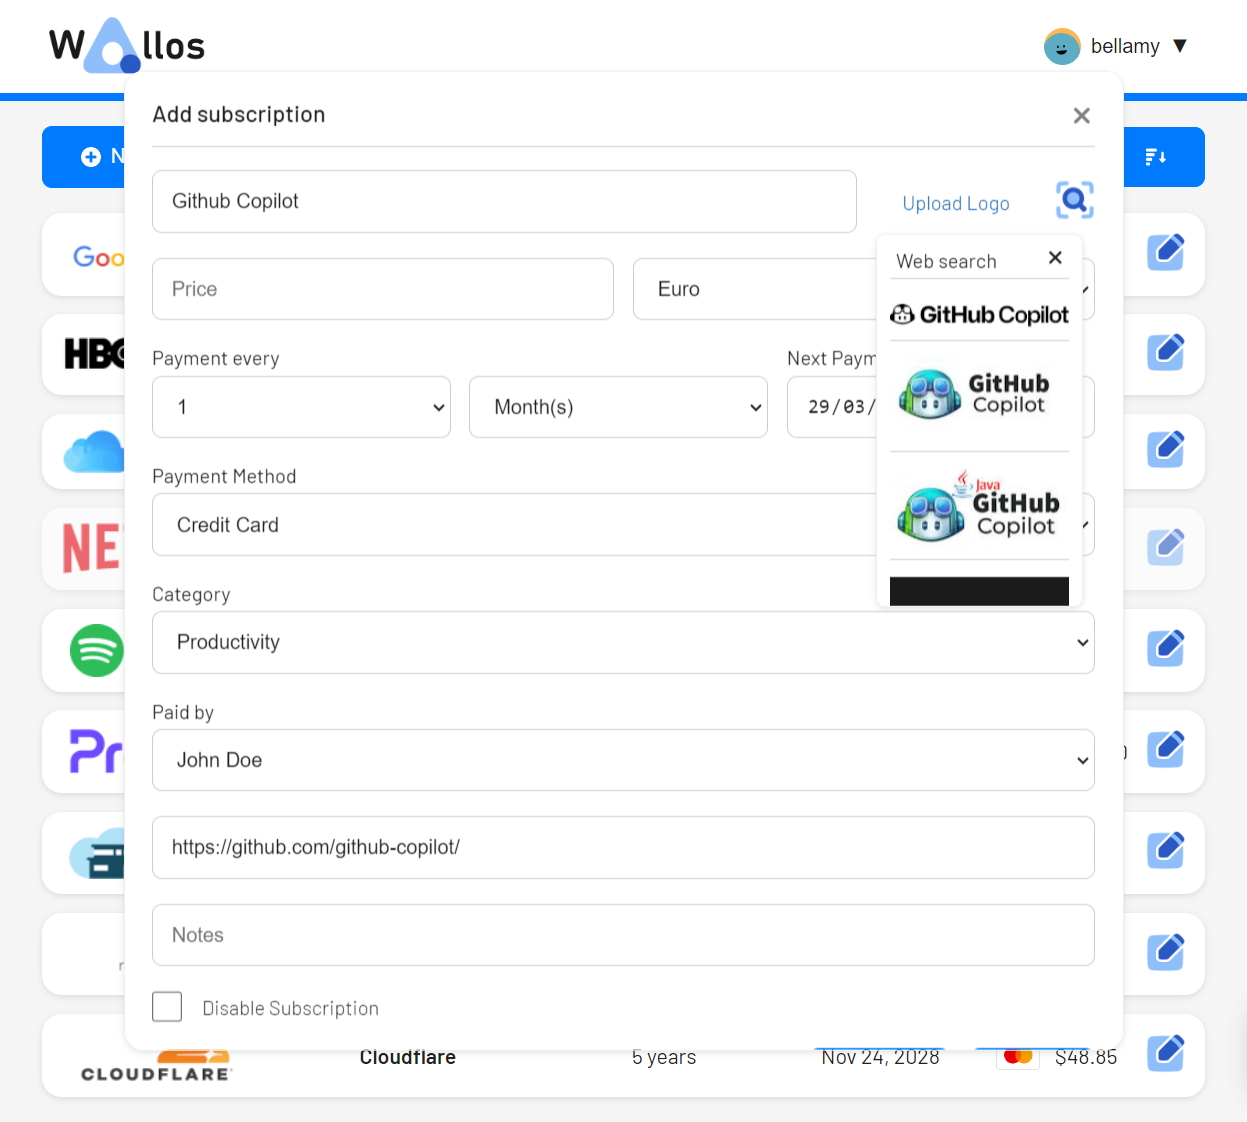
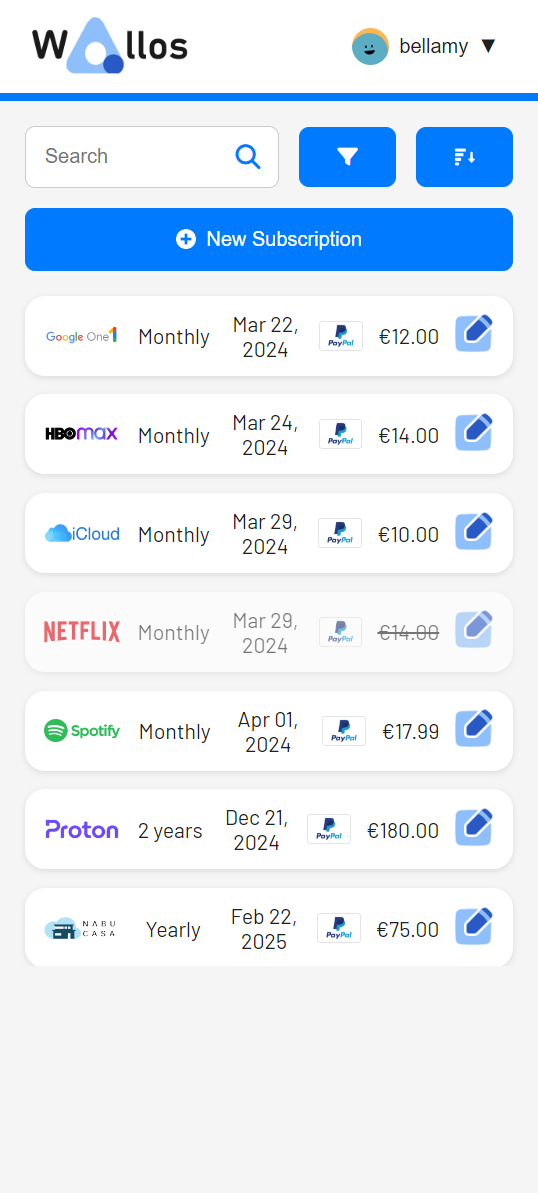
- 💳 Subscription Management: Track recurring subscriptions and payments to ensure you never miss a due date.
- 📂 Category Management: Organize expenses into customizable categories for better insights into spending habits.
- 💱 Multi-Currency Support: Manage your finances in the currency of your choice, with integrated exchange rates.
- 🔄 Currency Conversion: Integration with the Fixer API provides up-to-date exchange rates, consolidating subscriptions into a primary currency view.
- 🔒 Data Privacy: Self-hosting ensures your financial data remains secure and private on your own server.
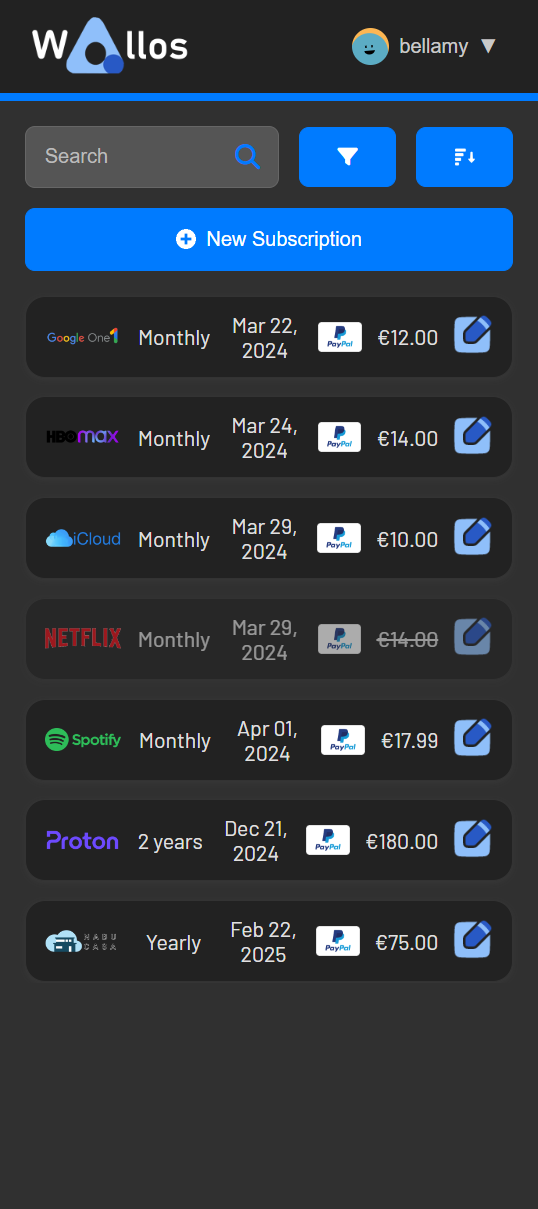
- 🎨 Customization: Tailor Wallos to your needs with customizable themes, categories, and display options.
- 🔎 Sorting Options: View and analyze subscriptions from different perspectives for deeper financial understanding.
- 🌐 Logo Search: Automatically find and apply logos for your subscriptions for a professional look.
- 📱 Mobile View: Access Wallos on the go with a responsive design that works seamlessly on all devices.
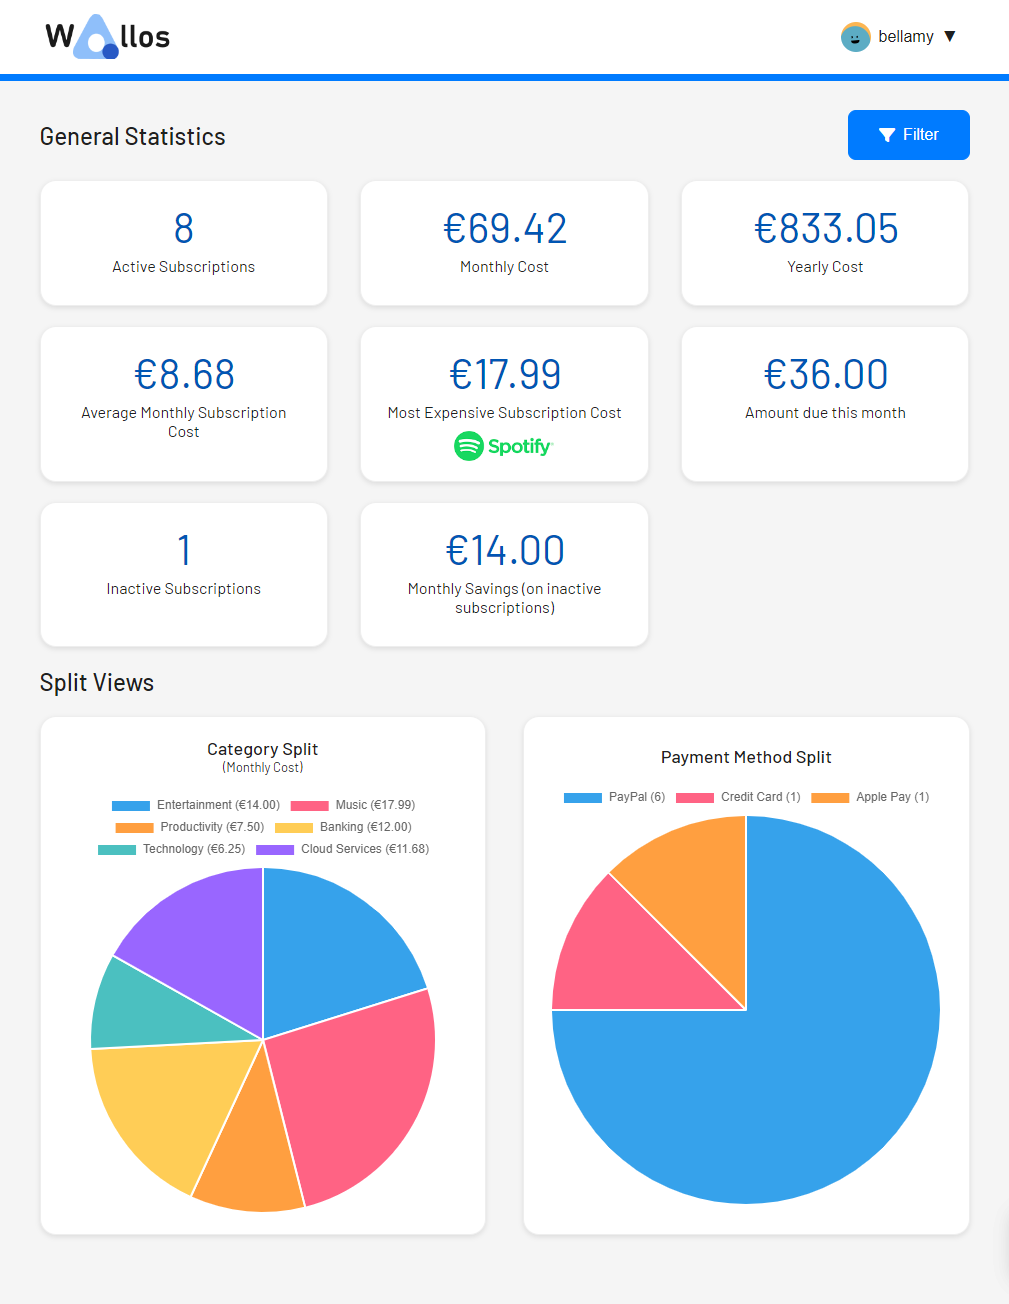
- 📊 Statistics: Visualize spending patterns and analyze financial data effectively.
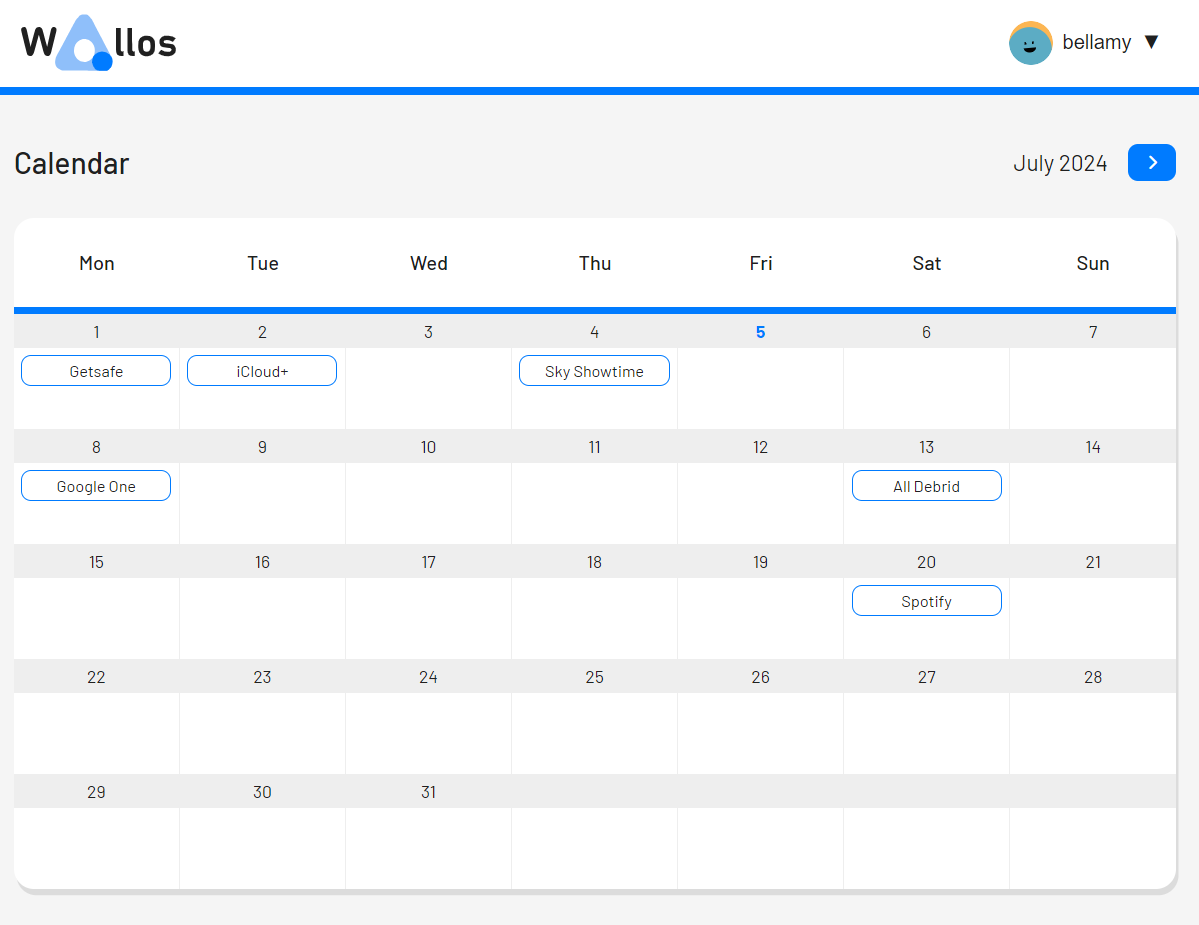
- 🔔 Notifications: Receive reminders about upcoming payments through email, Discord, Telegram, Pushover, Gotify, or custom webhooks.
- 🌍 Multi-Language Support: Use Wallos in your preferred language for an enhanced user experience.
Key Concepts
-
Financial Management Simplified: Wallos helps you track, categorize, and analyze expenses, making financial planning and tracking effortless.
-
Subscription Tracking: Keep all recurring subscriptions in one place, with notifications to remind you of upcoming payments.
-
Data Privacy: As a self-hosted solution, Wallos ensures your sensitive financial data stays within your control.
-
Customization: Adapt Wallos to fit your needs with customizable categories, themes, and multi-currency options.
-
Multi-Platform Access: Access your financial dashboard anytime, anywhere, on any device.
Screenshots
Open to Check out Screenshots
Conclusion
Wallos is a versatile, user-friendly, and secure platform for managing your finances. With features designed for individuals and small teams, Wallos streamlines the process of tracking expenses and staying on top of financial commitments. By focusing on customization, privacy, and ease of use, it provides a comprehensive solution for all your financial management needs.
Whether you're tracking personal subscriptions or managing a small business's recurring payments, Wallos is the ideal tool to help you stay organized, informed, and in control of your finances.
Step-by-Step Install Guide for Wallos with Traefik on Docker Swarm
Live-Demo
User: demo / Password: demo
Introduction
This guide provides step-by-step instructions to set up Wallos, a self-hosted subscription management application, on a Docker Swarm cluster with Traefik as a reverse proxy. Wallos can be accessed locally or through Traefik on the internet. This setup ensures persistent data using GlusterFS and reliable networking with Keepalived.
Prerequisites
- Docker Swarm is set up and running.
- Traefik is configured for reverse proxy and SSL management.
- Keepalived & GlusterFS are set up for distributed storage and high availability.
Step 1: Update System Packages
Before proceeding, ensure all Raspberry Pis and Docker installations are up to date. Run the following commands on each node:
sudo apt update && sudo apt upgrade -y
sudo apt install -y docker.io docker-compose
Step 2: Create Directories for Wallos Data
If you're running Wallos on Docker Swarm with GlusterFS, create the following directories on the shared GlusterFS mount:
mkdir -p /mnt/glustermount/data/wallos_data/db
mkdir -p /mnt/glustermount/data/wallos_data/logos
Step 3: Create the Docker Compose File
Define the Wallos service using the following docker-compose.yml file. You can create this file manually or configure it through Portainer.
version: "3.7"

services:
  wallos:
    container_name: wallos_subscription_tracker
    image: bellamy/wallos:latest
    ports:
      - "8282:80"
    environment:
      TZ: 'Europe/Zurich'
    volumes:
      - '/mnt/glustermount/data/wallos_data/db:/var/www/html/db'
      - '/mnt/glustermount/data/wallos_data/logos:/var/www/html/images/uploads/logos'
    restart: unless-stopped
    networks:
      - management_net
    deploy:
      mode: replicated
      replicas: 1
      labels:
        - "traefik.enable=true"
        - "traefik.http.services.wallos.loadbalancer.server.port=80"

networks:
  management_net:
    external: true
Explanation of Key Components:
- Replicated Mode: Ensures Wallos is deployed with multiple instances for high availability if replicas > 1.
- Traefik Labels: Enables Traefik routing and port mapping for this service. Modify the labels to match your domain and Traefik configuration.
Step 4: Deploy the Stack
Deploy the stack using Docker Swarm. Navigate to the directory containing the docker-compose.yml file and execute:
docker stack deploy -c docker-compose.yml wallosYou can also deploy your Stack in Portainer
Step 5: Access Wallos
- Access Wallos locally via
http://IP_ADDRESS:8282. - If Traefik is configured, use
https://wallos.domain.comwith the websecure entry point OR http://wallos.domain.comwith the web entry point.
Optional:
You could add a Local DNS Entry into PiHole to Access Wallos.
Additional Notes
- Persistent Data: All Wallos data is stored in GlusterFS directories, ensuring availability across all Swarm nodes.
- Traefik Configuration: Ensure Traefik is set up with SSL certificates for secure access.
- Logs and Debugging: Monitor logs using
docker logs wallos_subscription_trackerfor troubleshooting or access Portainer WebUI.
Configure
Setup fixer.io API Key
Introduction
Fixer.io is a powerful and easy-to-use API for currency exchange rates. By integrating the Fixer API Key into your Wallos instance, you can unlock features such as multi-currency support, detailed statistics, and sorting options for subscriptions. This is particularly useful if you manage subscriptions in different currencies and want a consolidated financial overview.
Prerequisites
- Complete Wallos Setup on Docker Swarm with Traefik.
- Register an account at Fixer.io.
Step 1: Register at Fixer.io
Visit Fixer.io and create an account. Registration is free and gives you access to their API services for currency exchange rates.
Step 2: Get Your API Key
Log in to your Fixer.io account and navigate to your Fixer.io Dashboard. Copy the provided API Key, which will be used to integrate Fixer with Wallos.
Step 3: Add API Key to Wallos
To configure the Fixer API Key in Wallos:
- Log in to your Wallos instance.
- Navigate to the Settings page.
- Locate the Fixer API Key section.
- Paste your API Key into the designated field.
- Select "fixer.io" as the provider from the dropdown menu.
- Click Save.
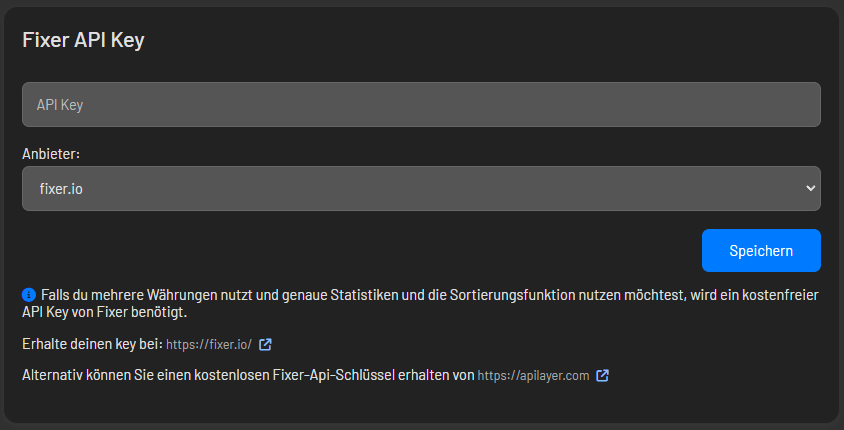
Your Wallos instance is now configured to use the Fixer API for currency conversions and enhanced financial tracking.
Notes
- If you experience issues with the API Key, ensure your Fixer.io account is active and you are using the correct key.
- For additional API Key options, visit apilayer.com.