Traefik Reverse Proxy for Docker & Swarm
Setting Up your own Reverse Proxy!
- Getting Started
- Overview of Traefik Reverse Proxy 3.0 & Key Concepts
- Beginner-Guide: Traefik & Docker Swarm
- Beginner-Guide: Traefik & Docker Standalone Engine
- Configuration
- Providers
- HTTPS & TLS
- Overview HTTPS & TLS
- How SSL Certificates Work: A Breakdown
- Let's Encrypt: How does it Work? & More
- TLS: How does it Work? & More
- Setting up Self-Signed Multiple FQDN Certificates for Local Services in Traefik
- Practical Guides: HTTPS with Let's Encrypt
- Docker-compose with Let's Encrypt: TLS Challenge
- Docker-compose with Let's Encrypt: DNS Challenge & Cloudflare (Recommended)
- Docker-compose with Let's Encrypt : HTTP Challenge
- Middlewares
- Plugins
- Observability
Getting Started
Overview of Traefik Reverse Proxy 3.0 & Key Concepts
 Introduction
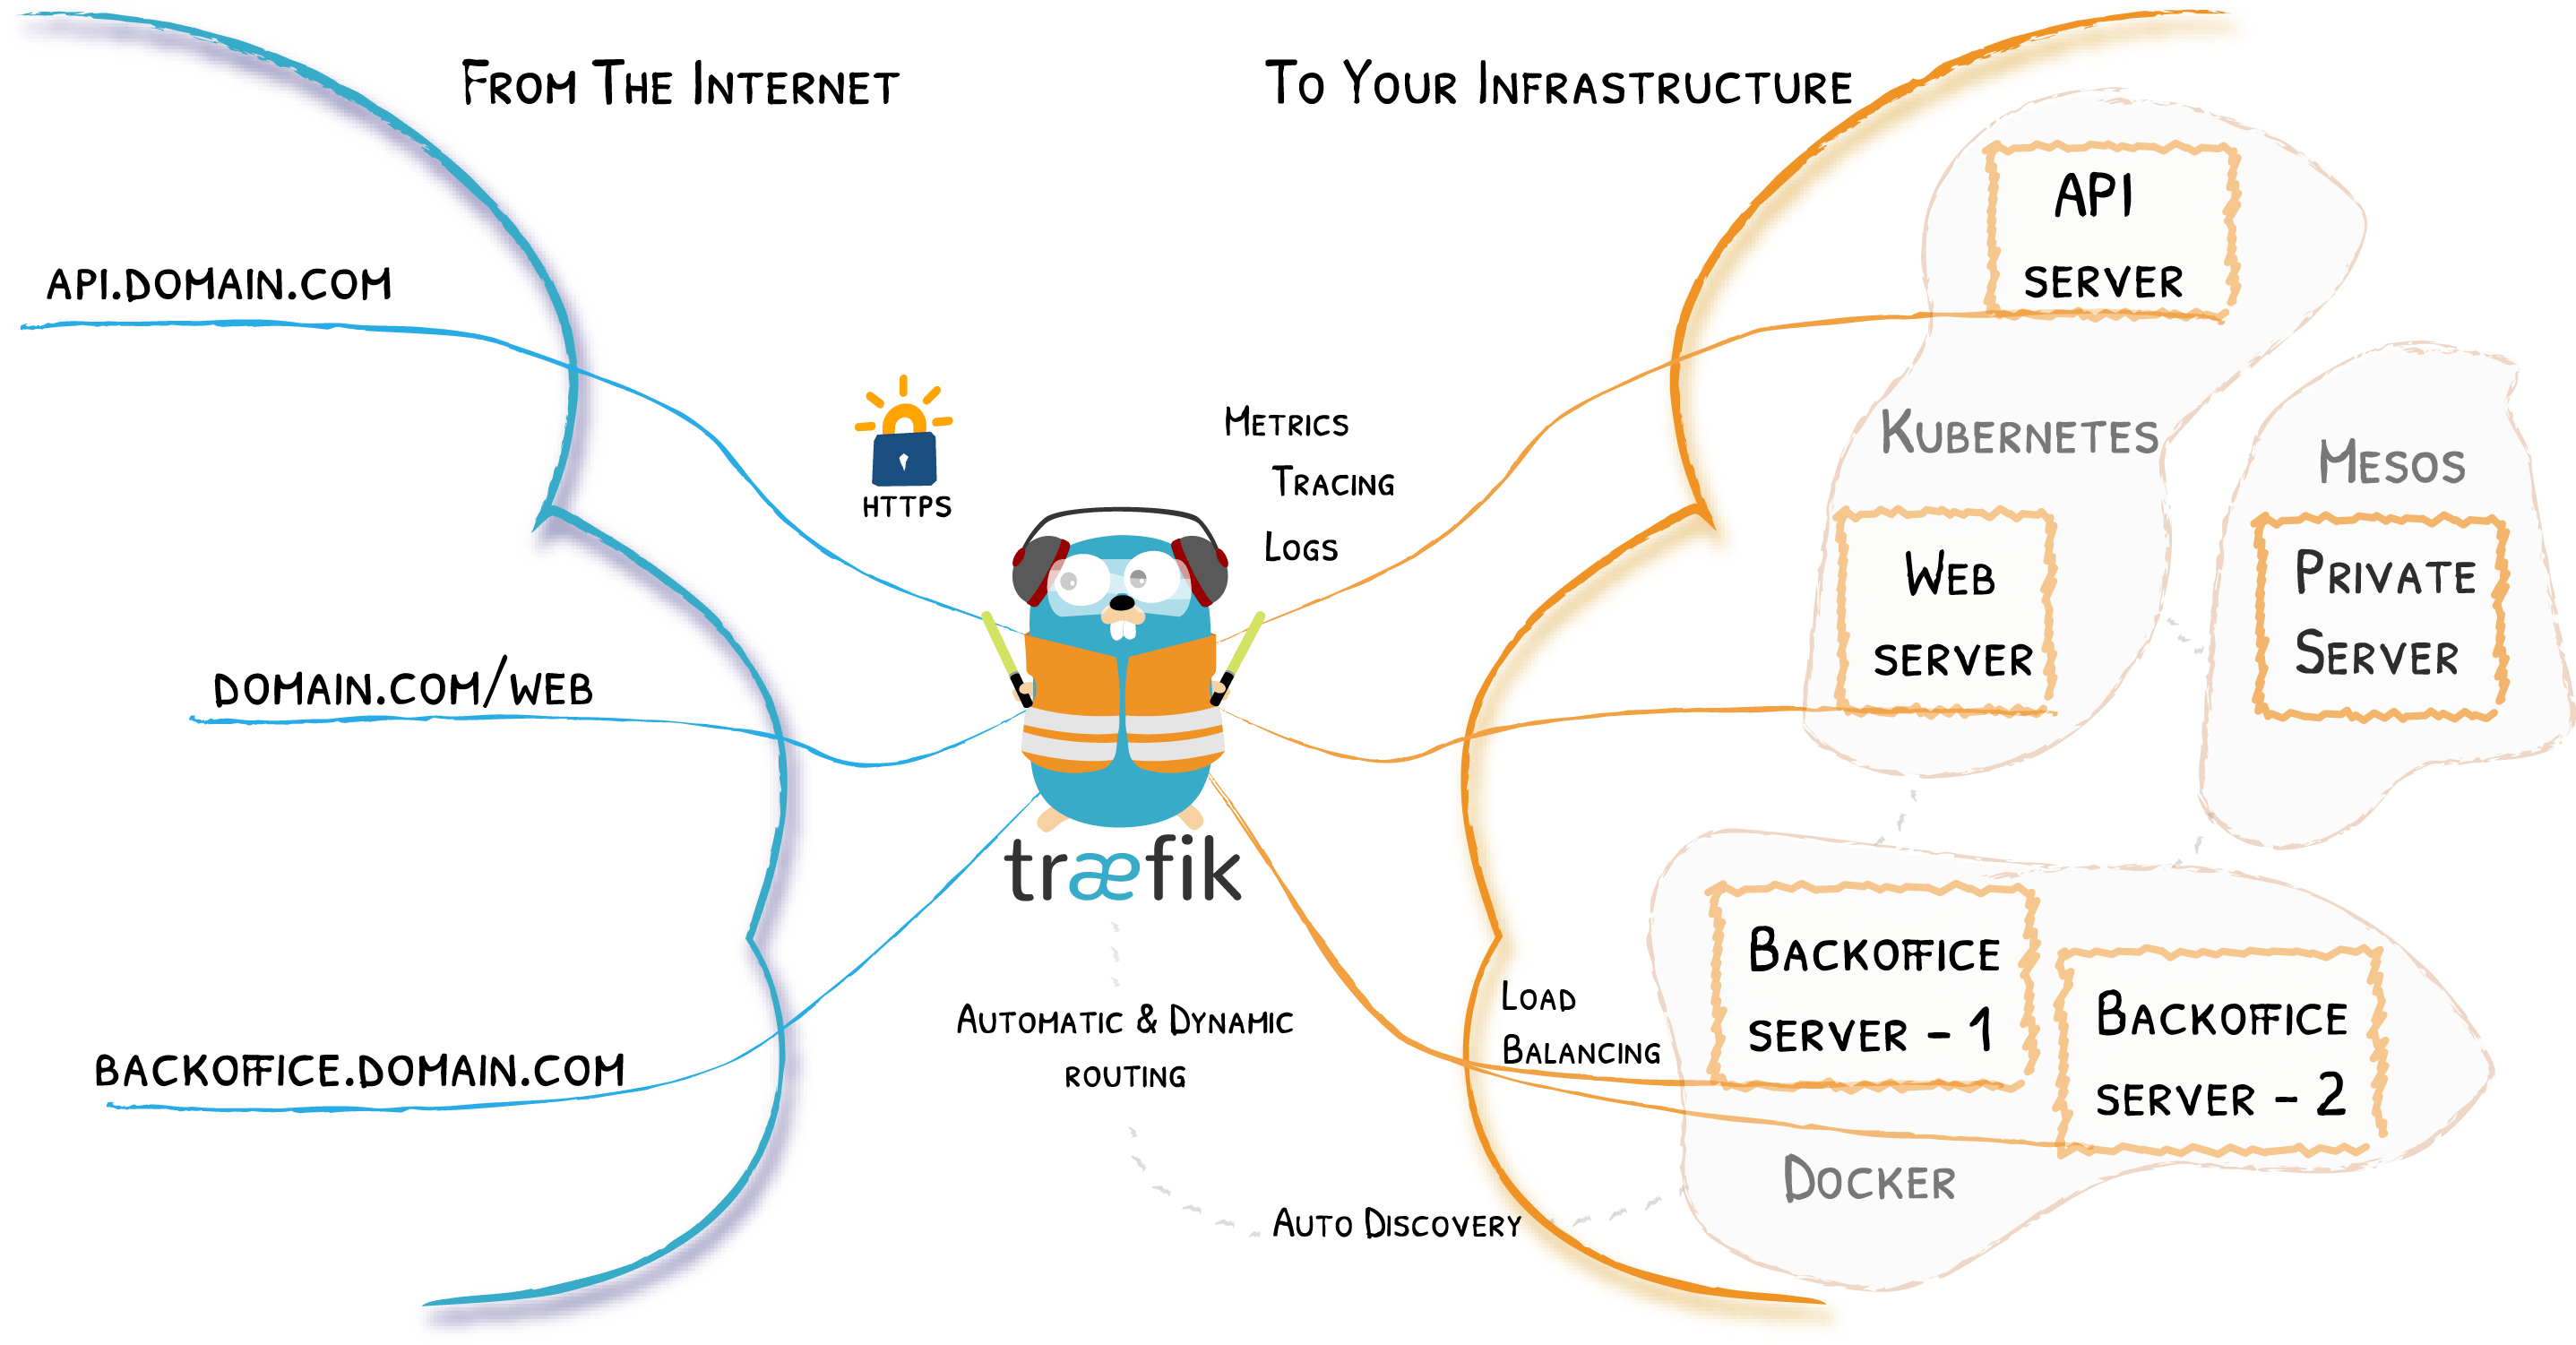
Traefik is an open-source Application Proxy that simplifies the process of exposing and managing services in your infrastructure. It acts as the gateway to your platform, receiving incoming requests and securely routing them to the appropriate services. Traefik is highly flexible and supports dynamic service discovery, automatic routing, and can handle complex routing configurations without requiring manual intervention.
Traefik is based on key concepts like EntryPoints, Routers, Middlewares, and Services, which work together to manage traffic and make your infrastructure more efficient and easier to scale.
Key Concepts in Traefik
-
EntryPoints: These define how traffic enters Traefik. Each EntryPoint specifies a port and whether to listen for TCP or UDP traffic.
-
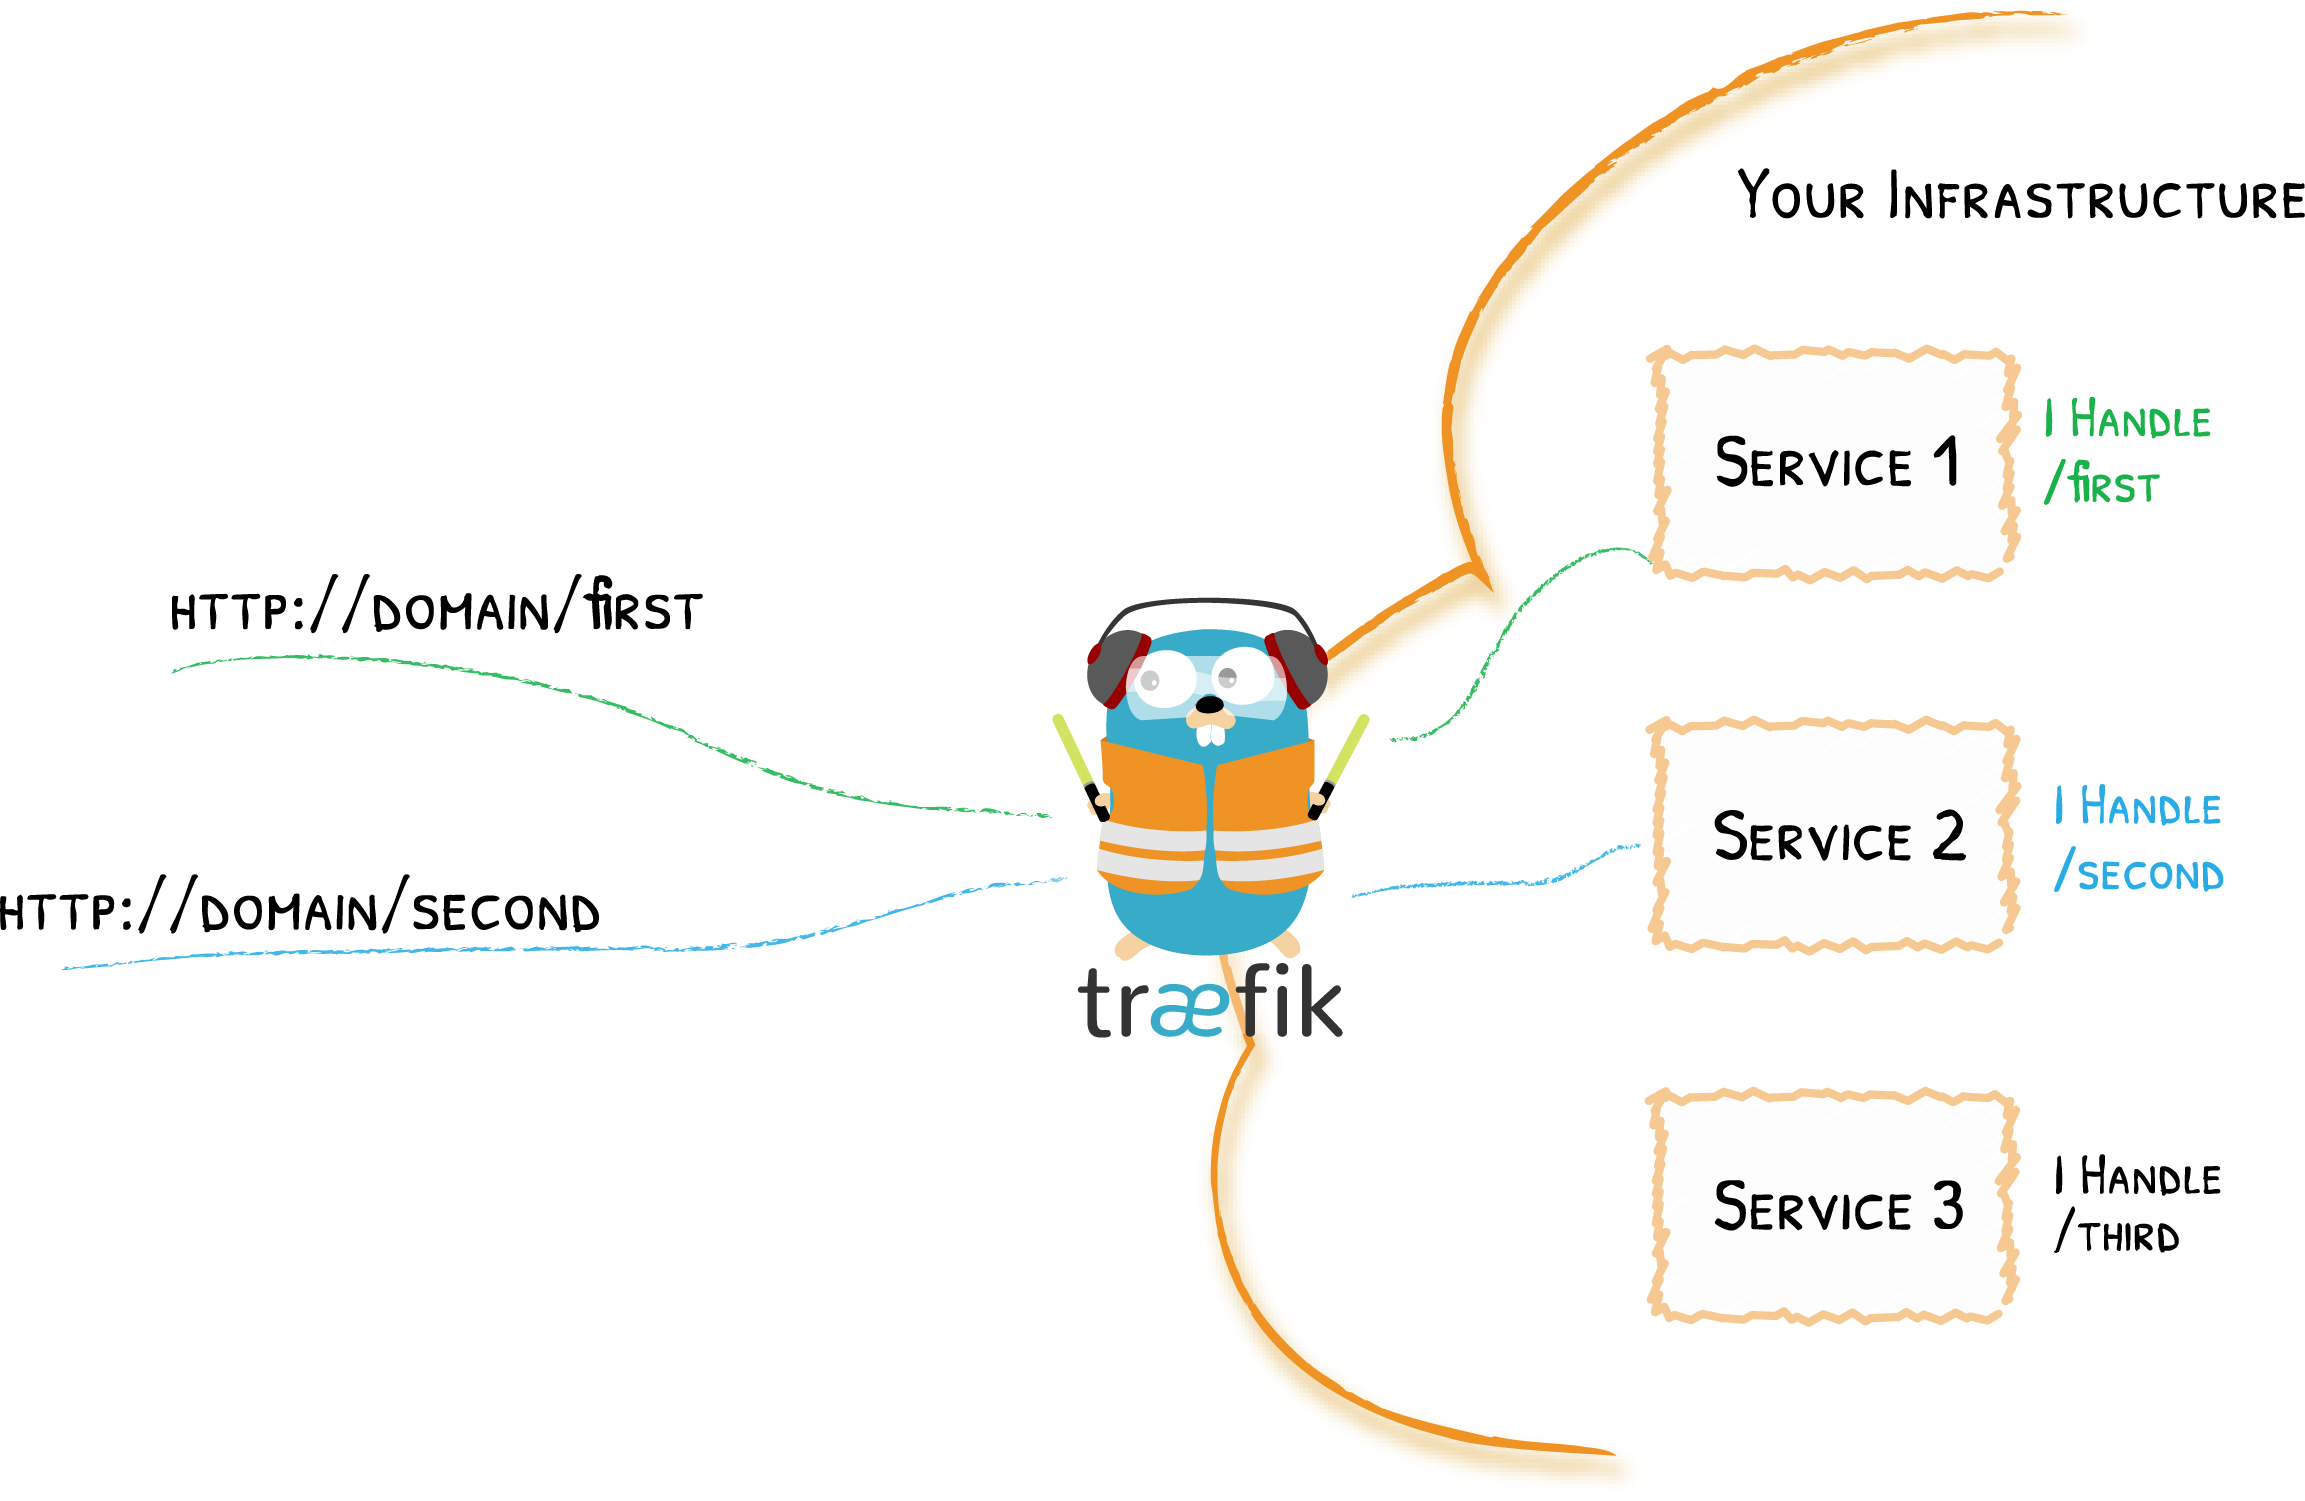
Routers: Routers match incoming requests with services based on rules like the request's host, path, or headers. Routers act as a bridge between incoming requests and the appropriate service.
-
Middlewares: Middlewares allow you to modify requests and responses as they pass through Traefik. You can apply Middlewares to Routers to add functionality like authentication, rate-limiting, or header modification.
-
Services: Services define how to reach the backend applications that will handle the requests. Traefik forwards the requests to these Services, whether they are running on Docker, Kubernetes, or other platforms.
Traefik as an Edge Router
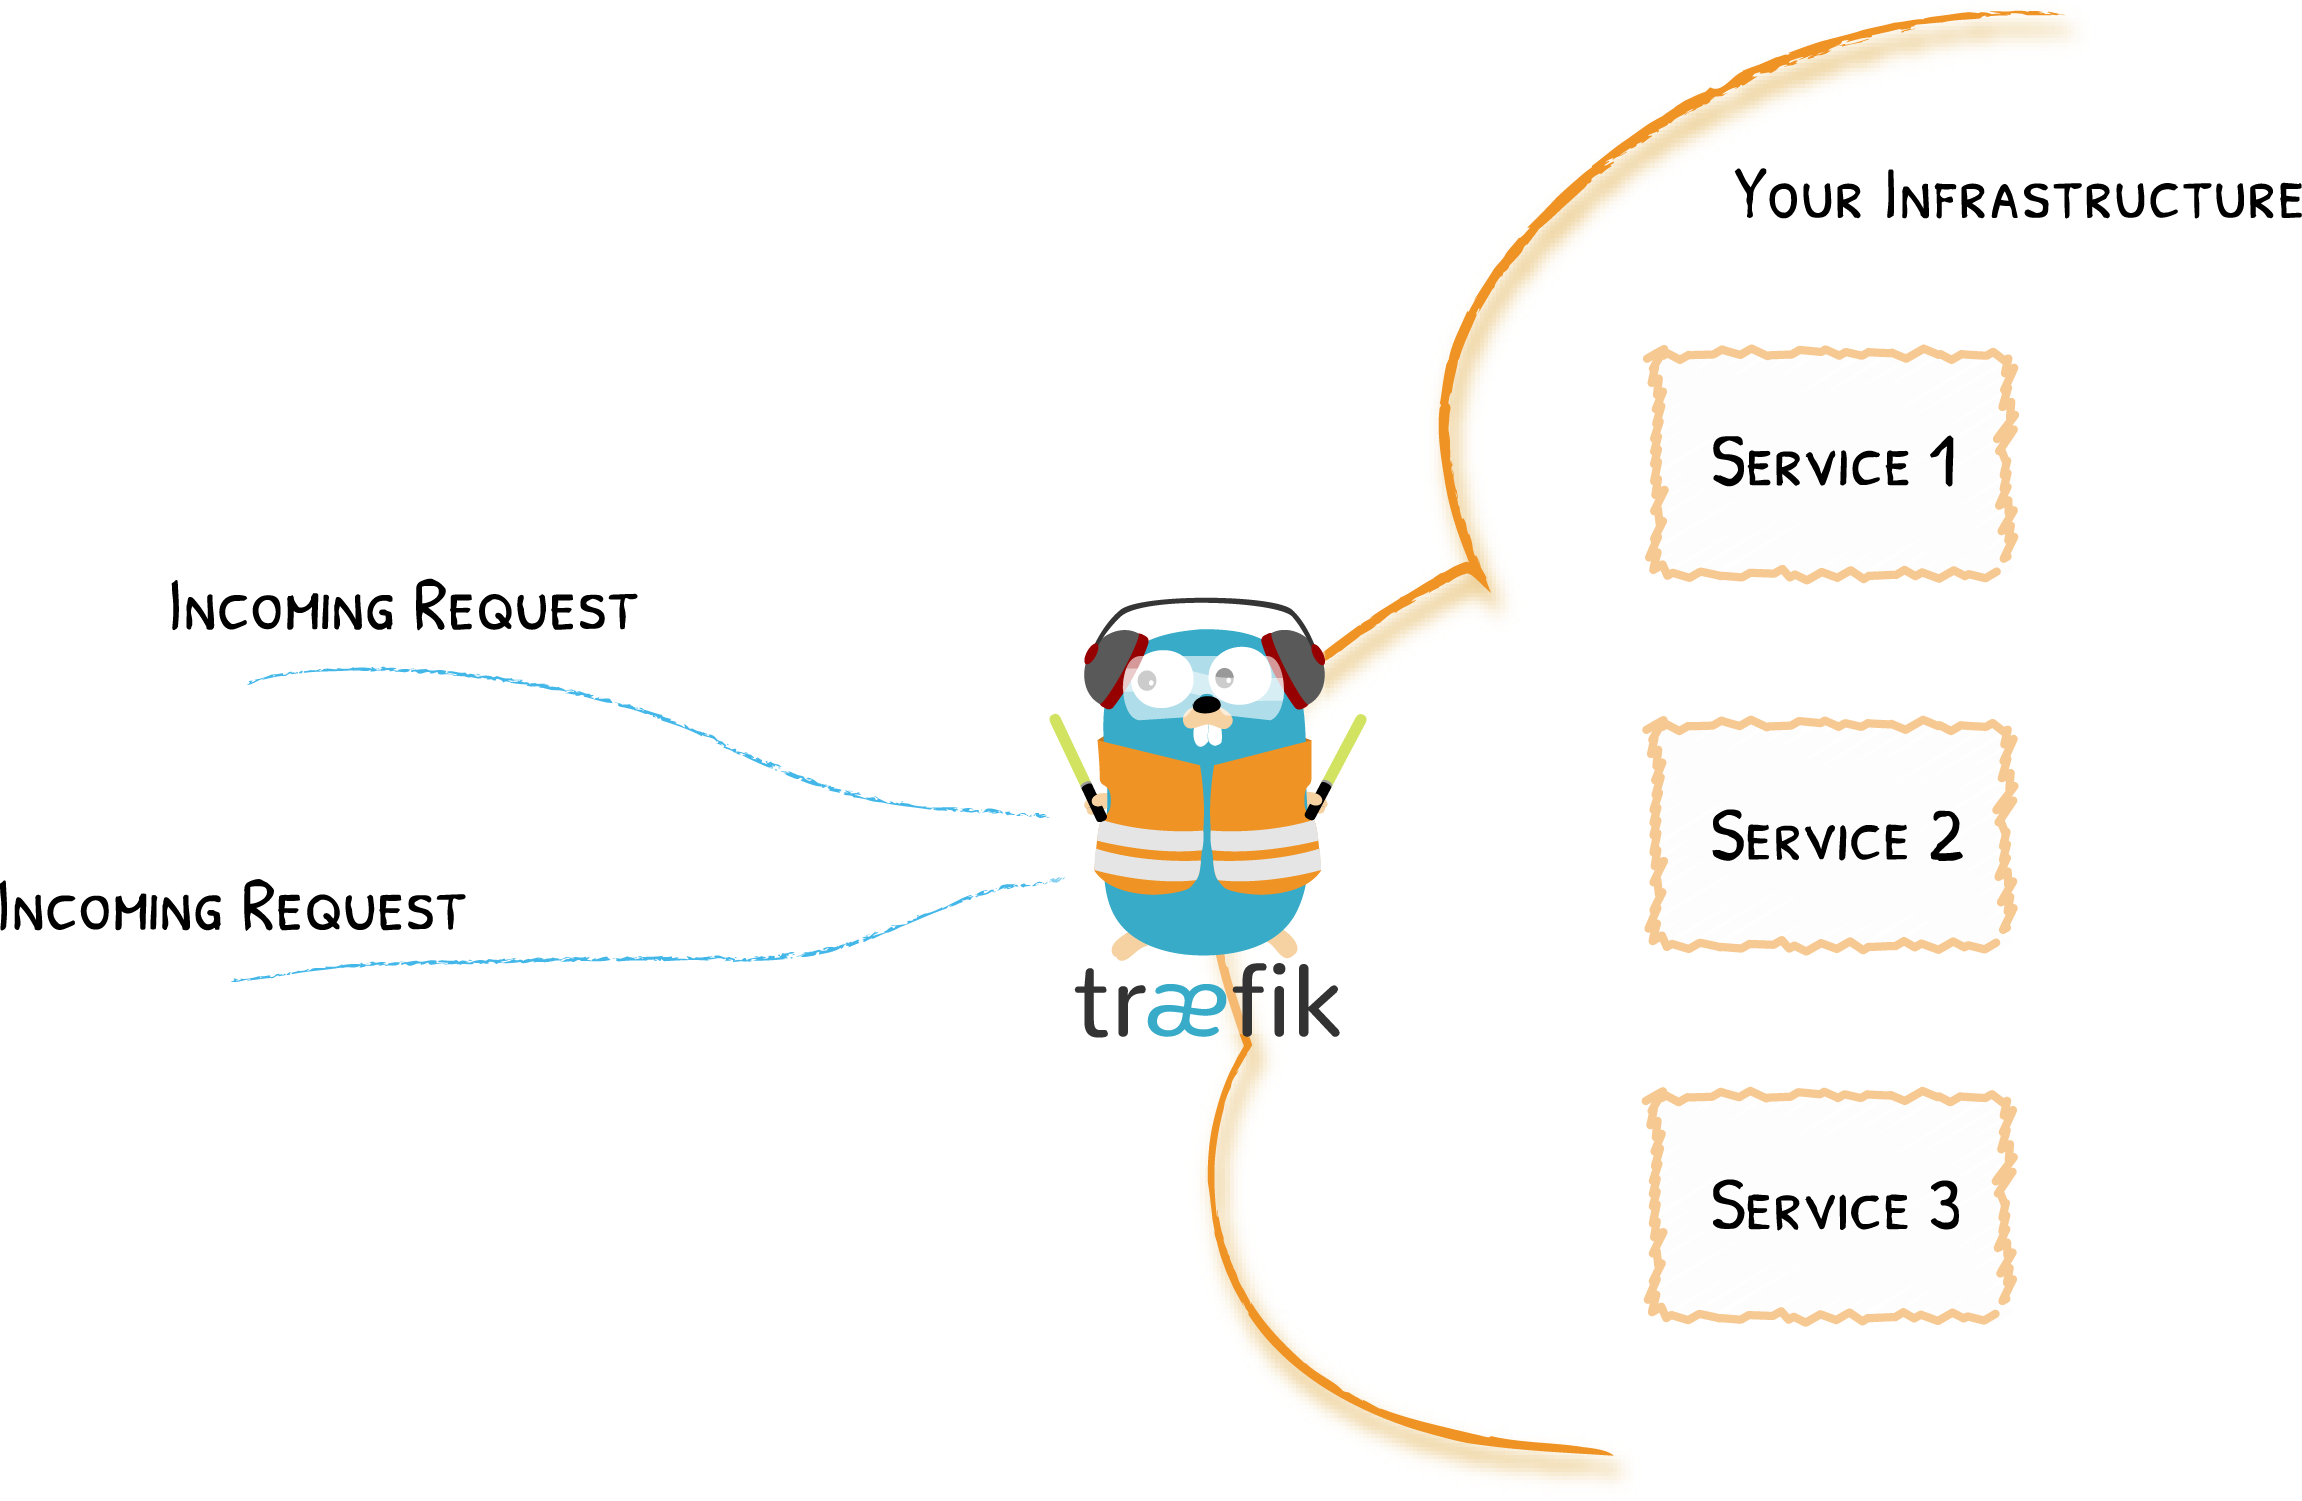
As an Edge Router, Traefik manages all incoming requests, applying routing logic to determine which service should handle a given request. It can route traffic based on a variety of criteria, such as URL paths, hostnames, headers, and more. This makes Traefik highly effective as the entry point to your infrastructure.
Automatic Service Discovery
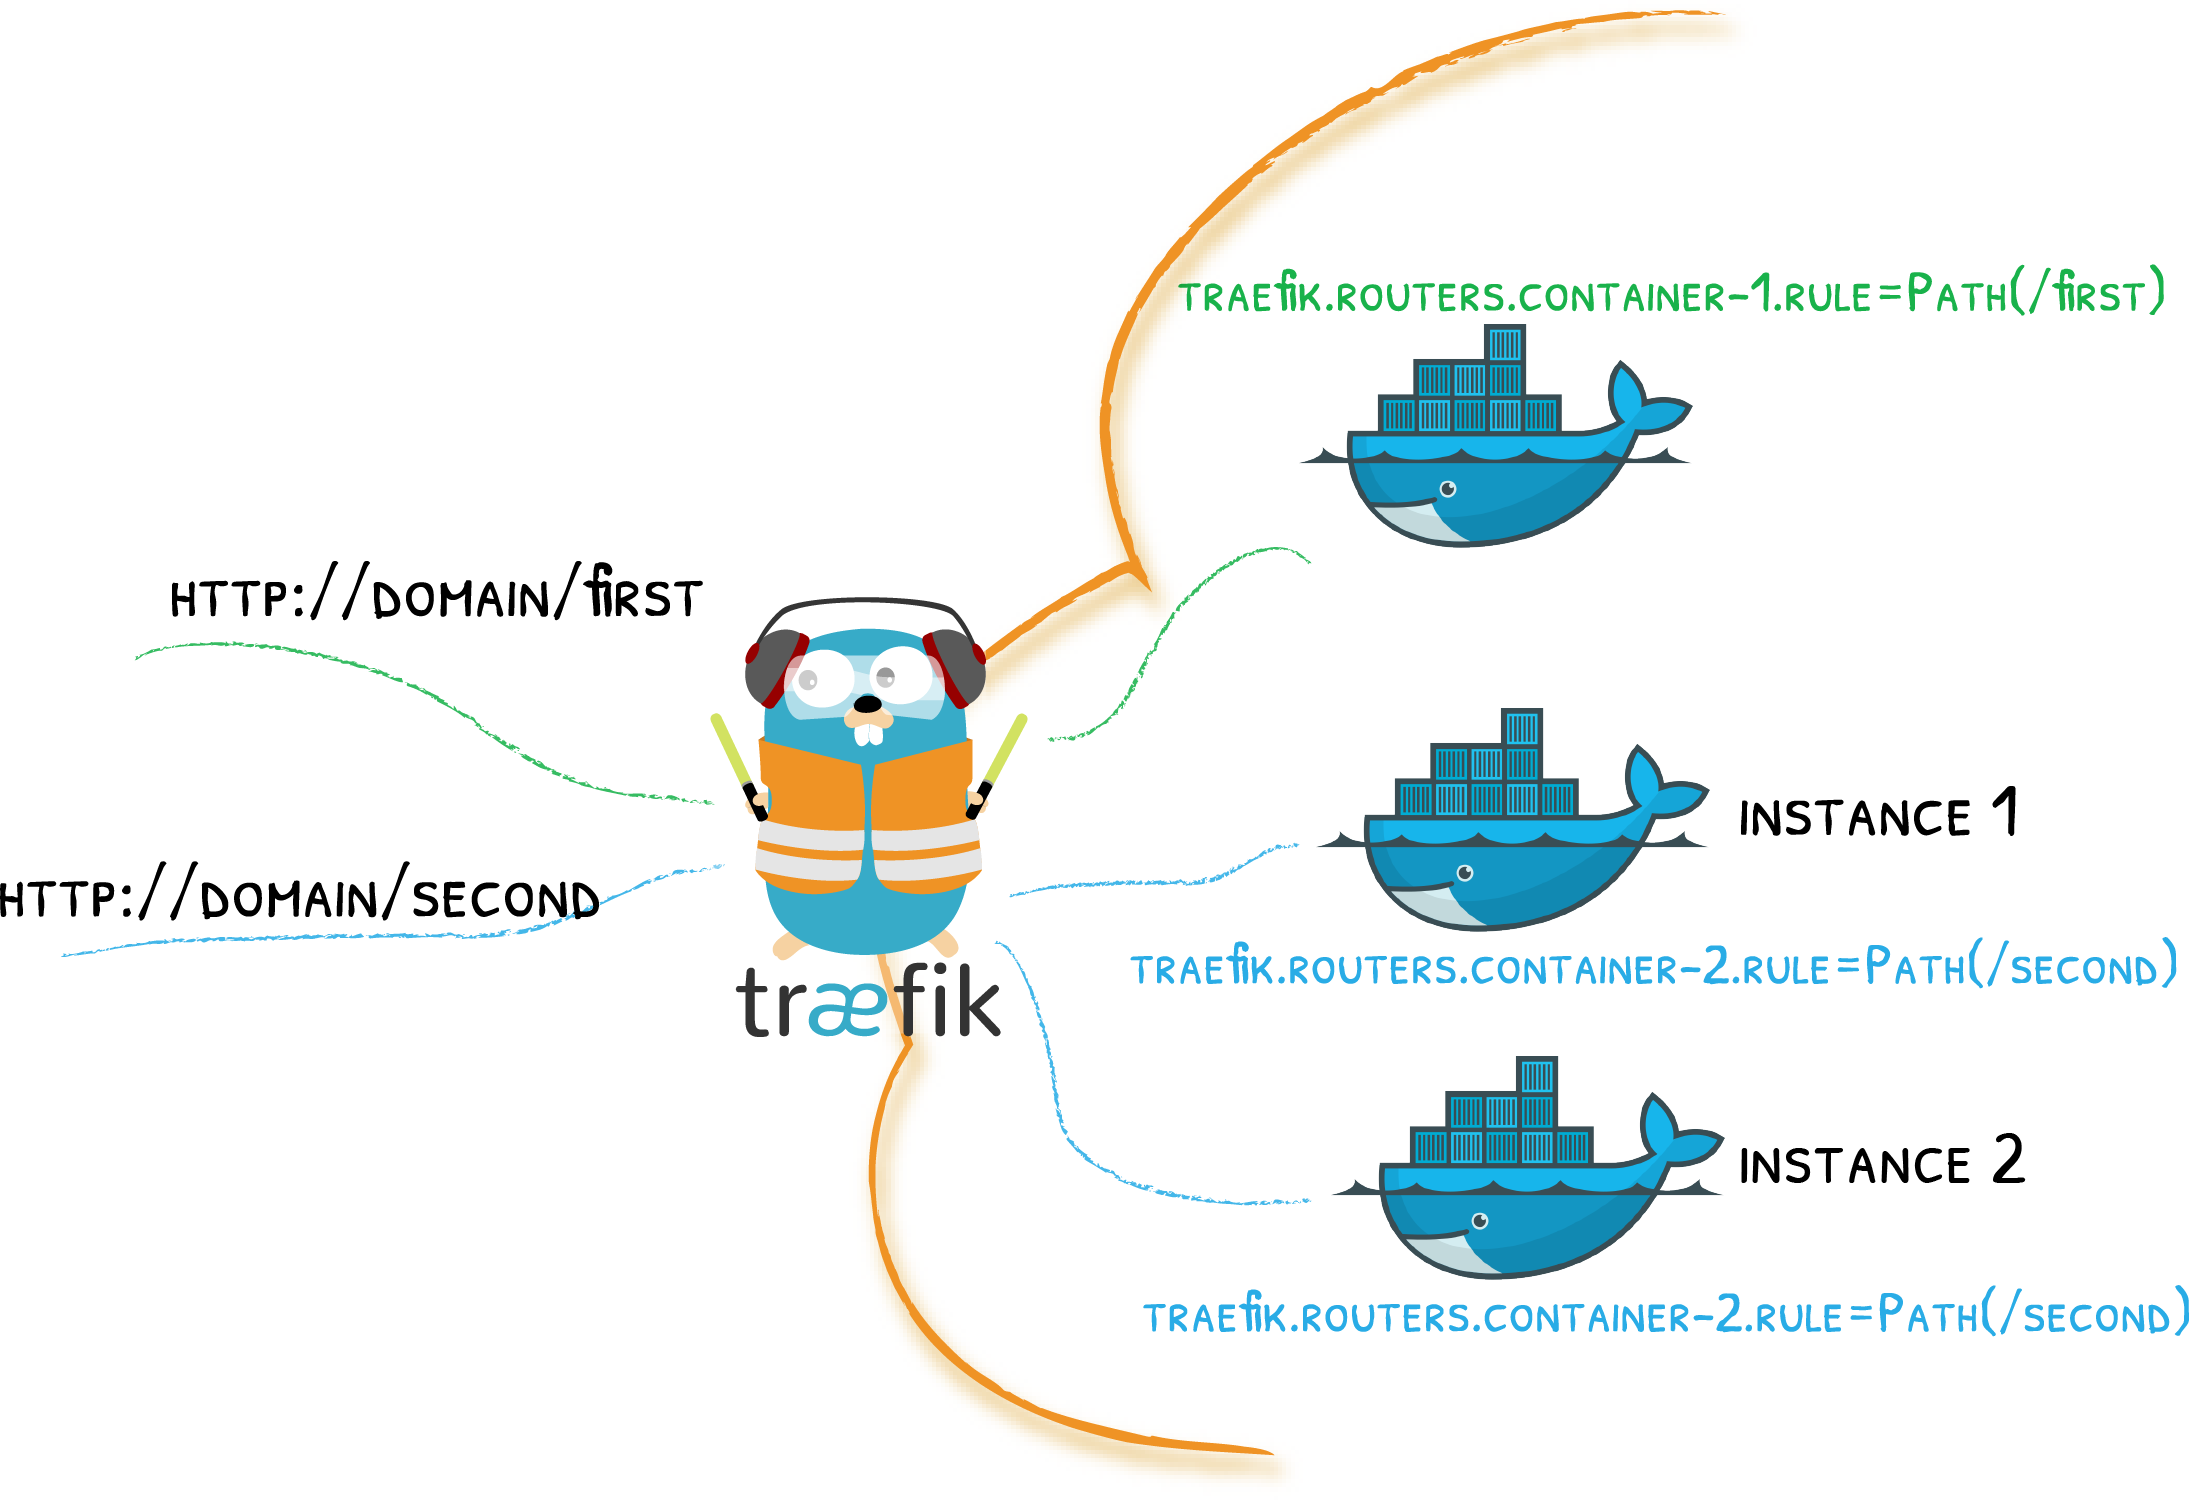
One of the standout features of Traefik is its ability to perform automatic service discovery. Traditional reverse proxies require you to maintain a configuration file that lists all possible routes and services. With Traefik, this process is fully automated. Traefik continuously scans your infrastructure for new or updated services, automatically configuring itself in real time without any need for manual updates.
When a service is deployed, Traefik detects it immediately and updates its routing rules. If a service is removed, Traefik dynamically removes the associated route, ensuring that your routing configuration is always accurate and up to date.
Decentralized Configuration
With Traefik, configuration is decentralized, meaning services themselves provide the necessary information for routing. This eliminates the need to manually update and synchronize configuration files across multiple nodes or platforms. Traefik ensures that routing rules reflect the current state of your infrastructure at all times.
Traefik in Multi-Platform Environments
Traefik supports seamless integration with a variety of container orchestration platforms and cloud services, such as:
- Kubernetes
- Docker Swarm
- AWS
- Azure
- Google Cloud
It can handle multiple backends simultaneously, allowing you to manage modern microservices alongside legacy applications running on bare metal.
Conclusion
Traefik Reverse Proxy 3.0 provides a robust and flexible solution for handling routing, load balancing, and service discovery across modern and legacy infrastructure. Whether you're managing containerized microservices, cloud-based services, or traditional applications, Traefik makes routing and service discovery a seamless experience.
Beginner-Guide: Traefik & Docker Swarm

How Traefik Works with Docker Swarm
Traefik integrates tightly with Docker Swarm, using the Docker API to automatically discover services. In Swarm Mode, Traefik watches for service-level labels rather than container-level labels (which are used in standalone Docker mode). This allows Traefik to dynamically adapt as services are created, updated, or removed.
Benefits of Using Traefik with Docker Swarm:
- Dynamic Service Discovery: Traefik automatically finds and configures services based on Docker labels, which eliminates the need for manually updating configuration files.
- Scalability: Traefik automatically adjusts routing as new instances of services are scaled up or down.
- Real-Time Updates: As services are added or removed in Swarm, Traefik updates routing rules without needing restarts or manual intervention.
Example: Deploying Traefik with Docker Swarm
Let’s walk through an example where we deploy Traefik as a reverse proxy in a Docker Swarm environment. We’ll expose a simple web service and configure routing with labels.
1. Setting Up Traefik in Docker Swarm
First, we need to deploy Traefik as a service in the Docker Swarm cluster. Traefik requires access to the Docker socket to monitor the containers and services. Here's how to deploy Traefik with Docker Swarm using Docker Compose:
version: '3.7'
services:
  traefik:
    image: traefik:v3.0
    command:
      - "--api.insecure=true"  # Exposes Traefik's dashboard
      - "--providers.docker=true"  # Enables Docker as the provider
      - "--entrypoints.web.address=:80"  # Defines an HTTP EntryPoint on port 80
    ports:
      - "80:80"       # Expose Traefik's HTTP EntryPoint
      - "8080:8080"   # Expose the Traefik Dashboard
    volumes:
      - "/var/run/docker.sock:/var/run/docker.sock"  # Access Docker API
    deploy:
      placement:
        constraints:
- node.role == manager # Only run on Swarm manager nodesExplanation:
providers.docker=true: Enables Traefik to use Docker as a provider.entrypoints.web.address=:80: Defines an HTTP EntryPoint listening on port 80.api.insecure=true: Enables Traefik's web dashboard (only for demonstration purposes, not recommended in production).
2. Deploying a Service with Routing Labels
Next, let’s deploy a simple web service, such as Nginx, and attach routing labels so that Traefik can automatically route traffic to it.
version: '3.7'
services:
  nginx:
    image: nginx
    deploy:
      labels:
        - "traefik.enable=true"
        - "traefik.http.routers.nginx.rule=Host(`nginx.local`)"
- "traefik.http.services.nginx.loadbalancer.server.port=80"Explanation:
traefik.enable=true: Tells Traefik to expose this service.traefik.http.routers.nginx.rule=Host('nginx.local'): Defines a routing rule that routes requests with theHostheadernginx.localto this service.traefik.http.services.nginx.loadbalancer.server.port=80: Specifies the internal port for Nginx.
Now, you can deploy this configuration in your Swarm cluster with:docker stack deploy -c docker-compose.yml my-stack
Or you can run the Stack in Portainer :)
Understanding Key Configuration Elements
Port Detection in Docker Swarm
Traefik does not automatically detect ports in Docker Swarm mode. You must explicitly set the port label (traefik.http.services.<service_name>.loadbalancer.server.port) to tell Traefik which port to use for the service. This ensures that Traefik can properly route requests to the service.
Host Networking with Traefik
If you are exposing containers configured with host networking, Traefik resolves the host IP based on the following priorities:
host.docker.internalhost.containers.internal- If both fail, it falls back to
127.0.0.1.
IPv4 and IPv6
By default, Traefik prioritizes the IPv4 address of a container, even in an IPv6-enabled Docker stack. If you want Traefik to use the IPv6 address, make sure your Docker configuration supports IPv6 routing.
Scheduling Traefik on Swarm Nodes
In Docker Swarm mode, only manager nodes can access the Docker Swarm API, which Traefik needs to dynamically discover services. Therefore, you must schedule Traefik on manager nodes. Here’s how to do it:
Example for Docker Compose:
services:
  traefik:
    image: traefik:v3.0
    deploy:
      placement:
        constraints:
          - "node.role == manager"
Docker API Access and Security Considerations
Since Traefik requires access to the Docker API via the docker.sock socket, this raises potential security risks. Anyone with access to Traefik can also gain access to the Docker API and, by extension, the underlying host. To mitigate this risk:
- Only expose the Docker socket to trusted services.
- Consider securing the Docker socket with a TLS connection.
Here’s an example of a secure Docker API configuration with TLS:
providers:
  swarm:
    tls:
      cert: "/path/to/cert.crt"
      key: "/path/to/key.key"
      ca: "/path/to/ca.crt"
This configuration ensures that the Docker API connection is secured using TLS.
Conclusion
Traefik’s integration with Docker Swarm provides a powerful, dynamic solution for managing services at scale. By using labels on services, Traefik can automatically discover, configure, and route traffic without the need for manual intervention. It’s particularly useful for dynamic environments where services are frequently added or removed, as Traefik handles these changes in real time.
This beginner-friendly overview of Traefik with Docker Swarm should give you a solid foundation for deploying and routing your services dynamically. As you become more familiar, you can explore advanced configurations such as load balancing strategies, security features, and using external providers like Kubernetes.
Beginner-Guide: Traefik & Docker Standalone Engine
Step 1: Install Docker
Before setting up Traefik, make sure Docker is installed on your system. You can follow My Dockerengine Guide for instructions on installing Docker Engine.
Step 2: Setting Up Traefik
Create a docker-compose.yml file to define the Traefik service and its basic configuration.
Example docker-compose.yml:
version: "3.7"

services:
  traefik:
    image: traefik:v3.0
    container_name: traefik
    command:
      - "--api.insecure=true"  # Enable Traefik dashboard (insecure mode, disable in production)
      - "--providers.docker=true"  # Enable Docker as a provider
      - "--entrypoints.web.address=:80"  # Define HTTP EntryPoint
      - "--entrypoints.websecure.address=:443"  # Define HTTPS EntryPoint
    ports:
      - "80:80"       # Expose Traefik on port 80 (HTTP)
      - "443:443"     # Expose Traefik on port 443 (HTTPS)
      - "8080:8080"   # Traefik Dashboard
    volumes:
      - "/var/run/docker.sock:/var/run/docker.sock:ro"  # Allow Traefik to access Docker API
    networks:
      - traefik-net

networks:
  traefik-net:
driver: bridgeExplanation:
- Docker Provider (
--providers.docker=true): Enables Traefik to watch Docker containers for routing configuration. - EntryPoints: Define which ports Traefik listens to. We use port 80 for HTTP and port 443 for HTTPS traffic.
- Let’s Encrypt Configuration: Automatically issues SSL certificates using the Let’s Encrypt ACME protocol.
- Docker Socket (
/var/run/docker.sock): Traefik uses the Docker socket to monitor container changes and apply routing rules dynamically. - Dashboard: Exposes Traefik’s dashboard on port
8080for monitoring purposes.
Step 3: Run Traefik
To start Traefik, run the following command in the directory containing the docker-compose.yml file:
docker-compose up -dThis command will start Traefik in detached mode. You can check if Traefik is running by visiting http://localhost:8080. You should see the Traefik dashboard.
Step 4: Exposing a Service via Traefik
Now that Traefik is up and running, let’s deploy a simple service, such as an Nginx container, and configure it to route traffic through Traefik.
Create a new docker-compose.yml for the Nginx service:
version: "3.7"

services:
  nginx:
    image: nginx
    container_name: nginx
    labels:
      - "traefik.enable=true"  # Enable Traefik routing for this container
      - "traefik.http.routers.nginx.rule=Host(`nginx.local`)"  # Route traffic based on hostname
      - "traefik.http.services.nginx.loadbalancer.server.port=80"  # Nginx runs on port 80
    networks:
      - traefik-net

networks:
  traefik-net:
external: trueExplanation:
- Labels: Labels are key to telling Traefik how to route traffic.
traefik.enable=true: Enables Traefik for this service.traefik.http.routers.nginx.rule=Host('nginx.local'): Configures a routing rule where requests with theHostheadernginx.localwill be routed to this service.traefik.http.services.nginx.loadbalancer.server.port=80: Defines the port where Nginx listens for incoming traffic.
- Shared Network: The
nginxservice needs to be in the same Docker network as Traefik to allow communication.
Run the following command to deploy the Nginx service:
docker-compose up -dAt this point, Traefik should automatically detect the Nginx service and route traffic based on the hostname nginx.local. To test this setup locally, you can add the following line to your /etc/hosts file:
127.0.0.1 nginx.localNow, visiting http://nginx.local should display the Nginx default welcome page.
Step 5: Routing Configuration with Labels
In Traefik, labels define how traffic is routed to services. These labels are attached to the Docker containers and can configure anything from simple routing rules to advanced load balancing configurations.
Here are some useful labels you can apply to your containers:
- Basic Routing:
traefik.enable=true: Enable routing for the container.traefik.http.routers.<router_name>.rule=Host('example.com'): Routes requests toexample.comto the container.
- Load Balancing:
traefik.http.services.<service_name>.loadbalancer.server.port=<port>: Defines the internal port where the container listens.traefik.http.services.<service_name>.loadbalancer.sticky=true: Enable sticky sessions to ensure a user connects to the same container during a session.
- Middleware (for modifying requests/responses):
traefik.http.middlewares.<middleware_name>.addPrefix.prefix=/api: Adds/apito the beginning of every request.traefik.http.routers.<router_name>.middlewares=<middleware_name>: Applies middleware to the router.
- SSL/TLS: (Check Out This Post for More Informations)
traefik.http.routers.<router_name>.tls=true: Enables TLS for a router (required for HTTPS).traefik.http.routers.<router_name>.tls.certresolver=myresolver: Uses the Let’s Encrypt resolver to obtain SSL certificates.
Port Detection
By default, Traefik automatically detects which port to use based on the ports exposed by the Docker container:
- Single Port: If the container exposes only one port, Traefik will use it.
- Multiple Ports: If multiple ports are exposed, Traefik will select the lowest numbered port. For example, if ports
80and8080are exposed, Traefik will select port80.
If Traefik cannot determine the correct port, you can manually define the port using the label:
labels:
  - "traefik.http.services.my-service.loadbalancer.server.port=8080"
Security Considerations
When running Traefik with Docker, there are a few important security considerations:
-
Docker API Access: Traefik requires access to the Docker socket (
/var/run/docker.sock) to monitor container events and retrieve routing configuration. This can expose your Docker environment to potential security risks. Ensure only trusted services have access to the Docker API. -
TLS/SSL: Enable SSL certificates for your services by configuring Let’s Encrypt or using your own certificate. Traefik’s ACME integration with Let’s Encrypt allows for automatic certificate management. Check out This Guide for HTTPS.
-
Secure the Dashboard: By default, the Traefik dashboard is exposed on port
8080in insecure mode. In production environments, disable the insecure API or secure the dashboard with authentication.
Conclusion
Traefik makes it incredibly easy to manage traffic and load balancing for your Docker containers. With its dynamic service discovery, routing rules based on labels, and automatic SSL management, Traefik can simplify your Docker environment and reduce the complexity of traditional reverse proxy setups.
By following this guide, you should have a basic understanding of how to set up Traefik with Docker, configure routing with labels, and expose services dynamically. As you gain more experience, you can explore advanced features such as middlewares, sticky sessions, and custom SSL configurations.
Traefik is a powerful tool for anyone looking to manage traffic in a Docker environment, whether you're running a few containers or managing a large-scale microservices architecture.
Configuration
Configuration Introduction
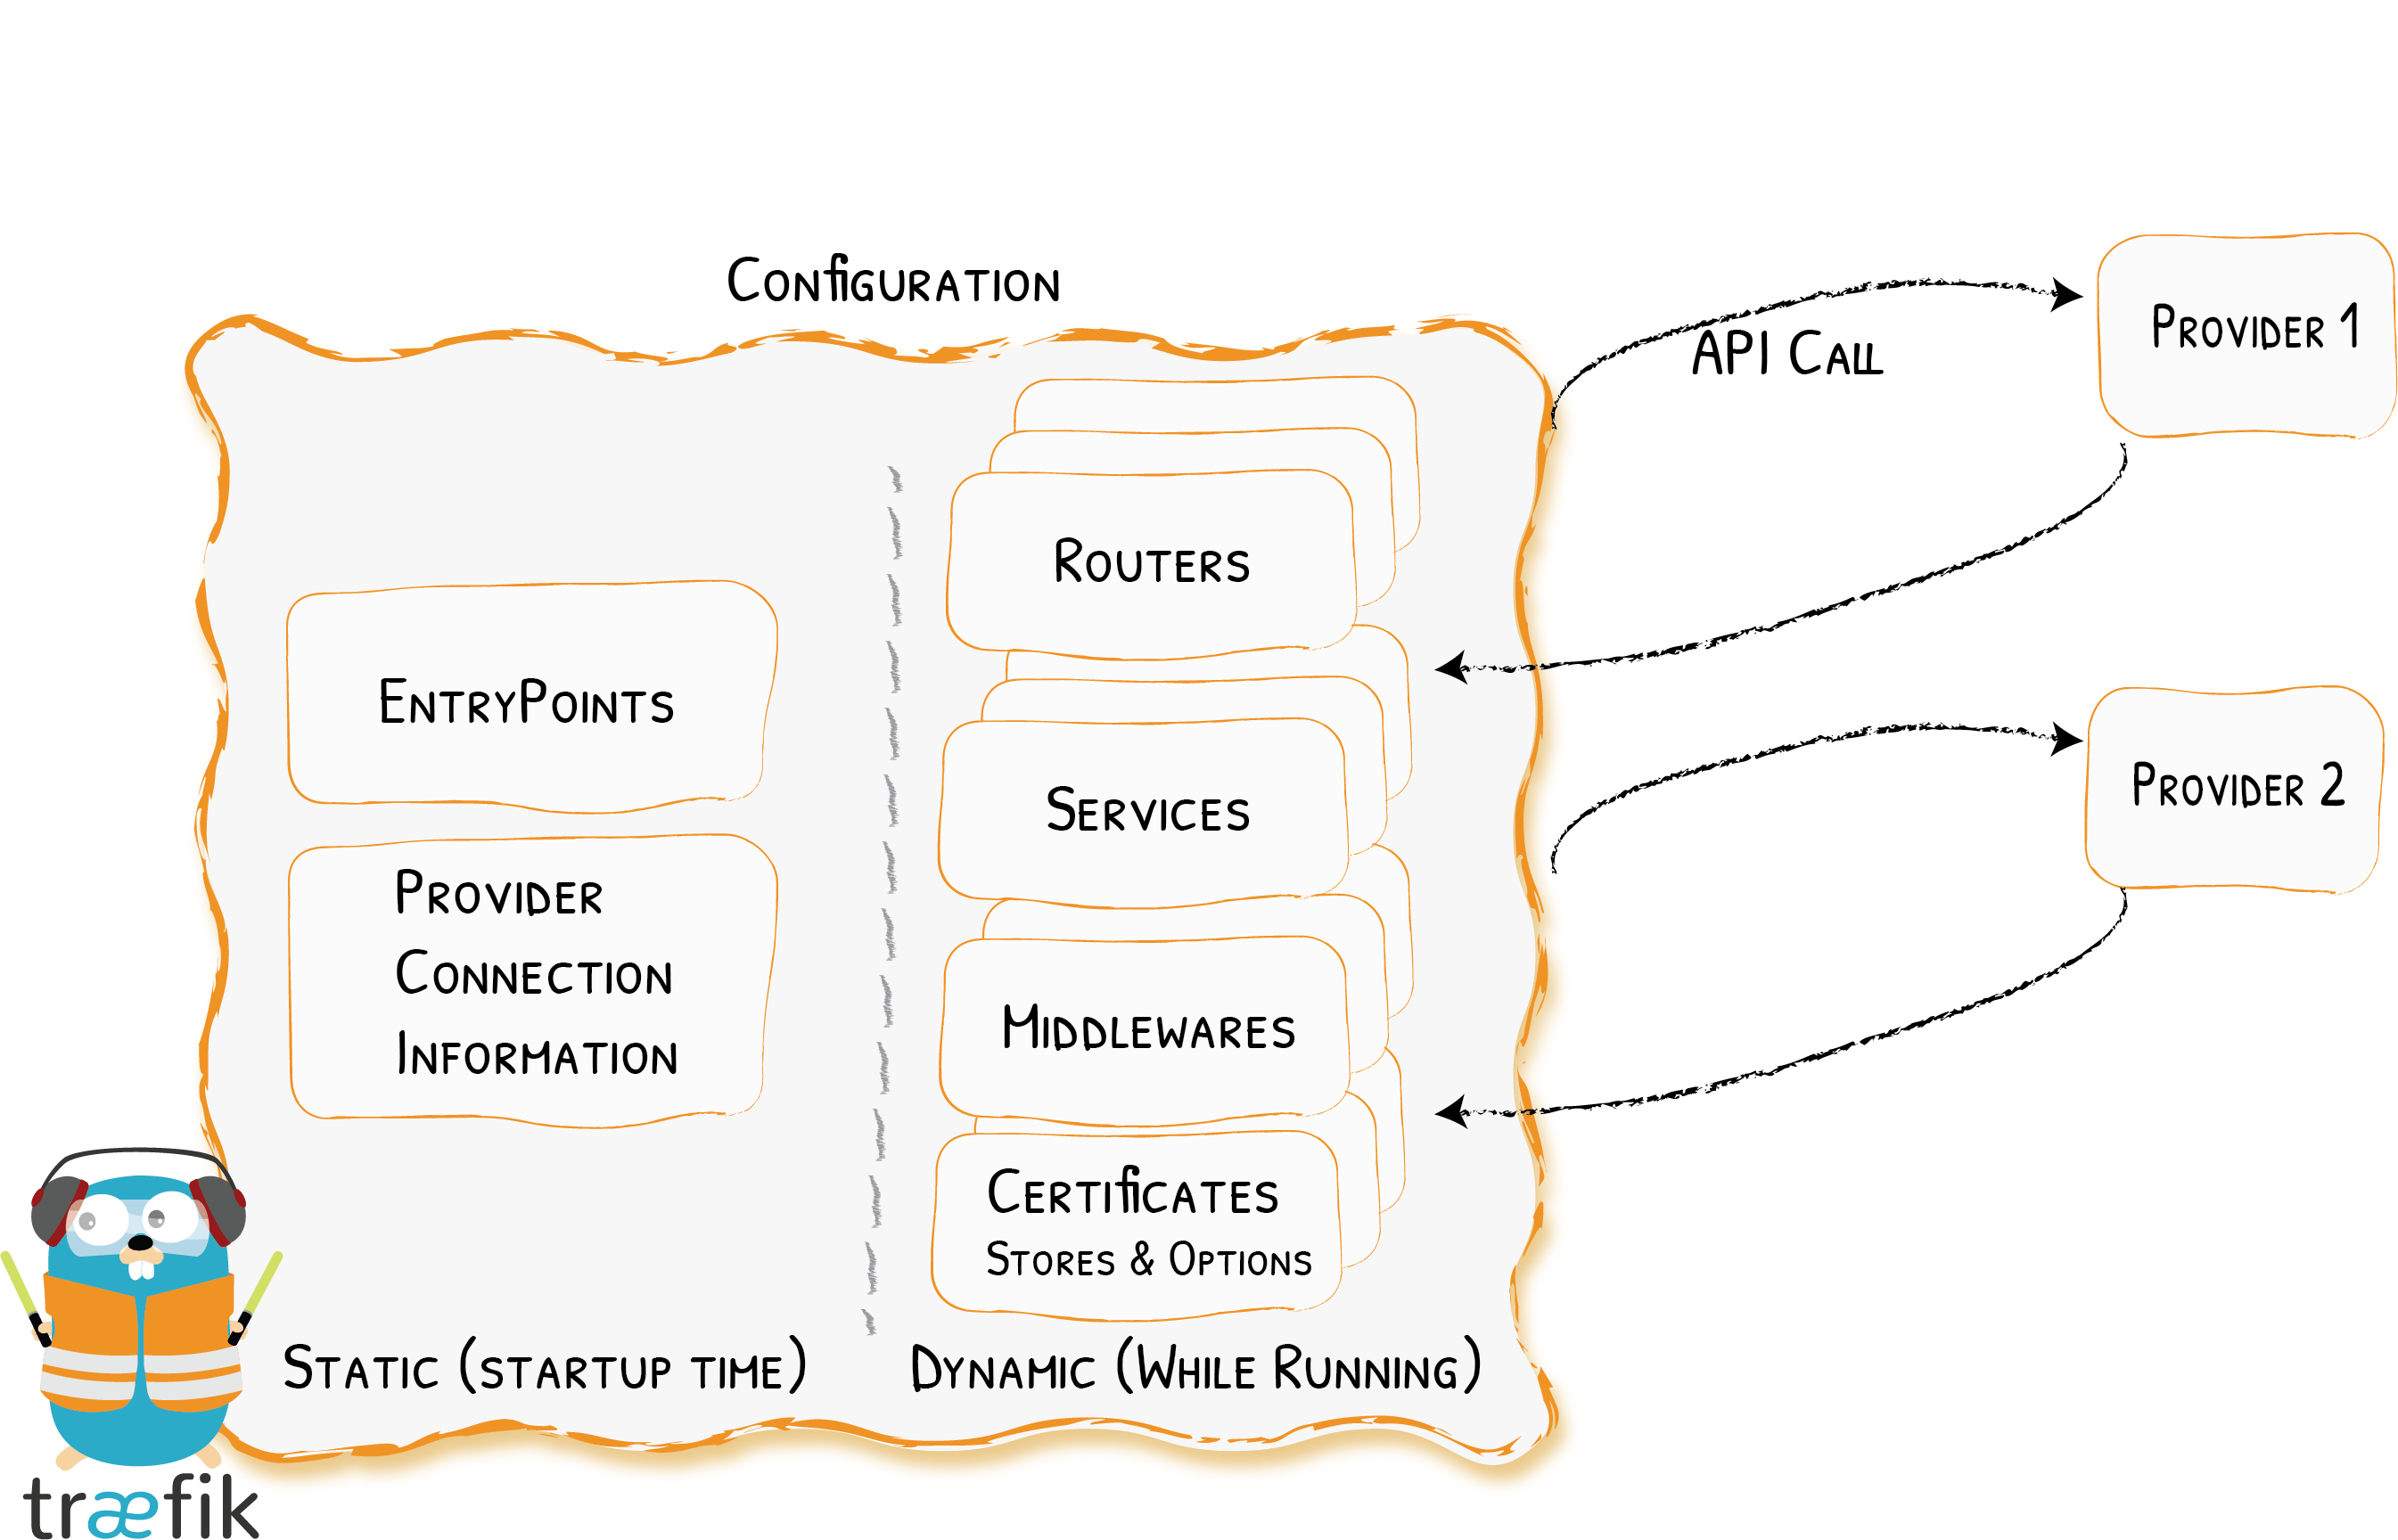
Configuration in Traefik can refer to two different things:
- The fully dynamic routing configuration (referred to as the dynamic configuration)
- The startup configuration (referred to as the static configuration)
Elements in the static configuration set up connections to providers and define the entrypoints Traefik will listen to (these elements don't change often).
The dynamic configuration contains everything that defines how the requests are handled by your system. This configuration can change and is seamlessly hot-reloaded, without any request interruption or connection loss.
Incompatible Configuration
Please be aware that the old configurations for Traefik v1.x are NOT compatible with the v2.x config as of now. If you are running v2, please ensure you are using a v2 configuration. Old configurations fro Traefik v2.x are NOT compatible.
The Static Configuration
There are three different, mutually exclusive (i.e. you can use only one at the same time), ways to define static configuration options in Traefik:
- In a configuration file
- In the command-line arguments
- As environment variables
These ways are evaluated in the order listed above.
If no value was provided for a given option, a default value applies. Moreover, if an option has sub-options, and any of these sub-options is not specified, a default value will apply as well.
For example, the --providers.docker option is enough by itself to enable the docker provider, even though sub-options like --providers.docker.endpoint exist. Once positioned, this option sets (and resets) all the default values of the sub-options of --providers.docker.
See More about configuring the Static Config in this Wiki Post: Static Configuration File
See More about configuring the Static Config in this Wiki Post: Static Configuration File
The Dynamic Configuration
Traefik gets its dynamic configuration from providers: whether an orchestrator, a service registry, or a plain old configuration file.
Since this configuration is specific to your infrastructure choices, we invite you to refer to the dedicated section of this documentation.
Configuring Your Routers, Middlewares etc can be done in multiple ways. Either you can add Traefik Labels directly into your Application Docker Compose files Like this Format (- 'traefik.http.routers.bookstack.entrypoints=websecure') But they also can also be configured in Dynamic files. It's a Choice of what you prefer.
See More about configuring the Dynamic Config in this Wiki Post: Dynamic Configuration Files
See More about configuring the Dynamic Config in this Wiki Post: Dynamic Configuration Files
HTTPS Certificates also belong to the dynamic configuration.
You can add / update / remove them without restarting your Traefik instance like mentioned in the beginning of this Post.
Static Configuration File
There are three different, mutually exclusive (i.e., you can use only one at the same time), ways to define static configuration options in Traefik:
- In a configuration file
- In the command-line arguments
- As environment variables
These ways are evaluated in the order listed above. If no value is provided for a given option, a default value applies. Moreover, if an option has sub-options and any of these sub-options are not specified, a default value will apply as well.
I Prefer the YAML Format after working with TOML for 6 months because YAML is more intuitive for beginners.
How Traefik Loads the Static Configuration File
At startup, Traefik searches for static configuration in a file named traefik.yml (or traefik.yaml or traefik.toml) in:
/etc/traefik/$XDG_CONFIG_HOME/$HOME/.config/.(the working directory).
Applying This Knowledge to Your Traefik Setup
Traefik will look for files named traefik.yml, traefik.yaml, or traefik.toml at the startup of the container. You need to mount the static configuration file into your Traefik container. Below is basic information on how to apply it in Docker Compose. For more details, refer to this post: Bind Mounts.
static.yaml" so it is clear what is meant.Examples of How to Apply
volumes:
  # Example 1
  - '/path/to/your/static.yml:/traefik.yml:ro'
  # Example 2
  - '/path/to/your/static.yaml:/traefik.yaml:ro'
  # Example 3
  - '/path/to/your/static.toml:/traefik.toml:ro'
Minimum Required Information Recommended in Your Static.yaml Example:
# Configuration for Traefik v3.3 by aeoneros

global:
  checkNewVersion: true
  sendAnonymousUsage: true

entryPoints:
  web:
    address: ":80"
    http:
      redirections:
        entryPoint:
          to: websecure
          scheme: https
          permanent: true

  websecure:
    address: ":443"
    http:
      tls:
        certResolver: "leresolver"
        domains:
          - main: 'yourdomain.com'
            sans:
              - '*.yourdomain.com'

tls:
  certificates:
    - stores: ["default"]
  stores:
    default:
      defaultCertificate: {}

log:
  filePath: "/traefik.log"
  level: "DEBUG"

accessLog:
  filePath: "/access.log"
  addInternals: true
  format: "json"
  bufferingSize: 200
  fields:
    defaultMode: "keep"
    headers:
      defaultMode: "keep"
      names:
        X-Forwarded-For: "keep"

api:
  dashboard: false
  insecure: false

providers:
  docker:
    exposedByDefault: false
    network: "your_traefik_network"
  swarm:
    network: "your_traefik_network"
  file:
    watch: true
    directory: "/dynamic/"

certificatesResolvers:
  leresolver:
    acme:
      email: 'your-email@domain.com'
      storage: '/acme.json'
      caServer: 'https://acme-v02.api.letsencrypt.org/directory'
      dnsChallenge:
        provider: 'cloudflare'
        delayBeforeCheck: '0'
        resolvers:
          - '1.1.1.1:53'
          - '1.0.0.1:53'
          - '8.8.8.8:53'
For more about dynamic configuration, see: Dynamic Configuration Files.
Dynamic Configuration File/s
The dynamic configuration contains everything that defines how the requests are handled by your system. This configuration can change and is seamlessly hot-reloaded, without any request interruption or connection loss.
How Traefik Loads the Dynamic Config File/s
Refer to the Static Configuration Post for context. Traefik loads the static.yaml, and within that file, the dynamic file(s) are referenced for loading.
To load your dynamic configurations, you can set them up in two ways. Either write all your dynamic content into a single file or split it into multiple files for better organization.
Example: Loading Configuration in One File
Needs to be set up in static.yaml. The /dynamic.yaml is the path inside the container and must be mounted using Docker Compose:
volumes:
  # Dynamic Configuration File
  - '/path/on/your/linuxhost/dynamic:/dynamic.yaml'
Example static.yaml:
providers:
  docker:
    exposedByDefault: false
    network: "management_net"
  swarm:
    network: "management_net"
  file:
    watch: true
    file: "/dynamic.yaml"
Example: Loading Multiple Configuration Files
This setup loads every file in the specified directory with the YAML format. The /dynamic/ path is the path inside the container and must be mounted using Docker Compose:
volumes:
  # Dynamic Configuration Folder
  - '/path/on/your/linuxhost/dynamic:/dynamic/'
Example static.yaml:
providers:
  docker:
    exposedByDefault: false
    network: "management_net"
  swarm:
    network: "management_net"
  file:
    watch: true
    directory: "/dynamic/"
Splitting Dynamic Files
Create multiple paths in your Traefik data folder. Assuming your base Traefik data folder is /mnt/glustermount/data/traefik_data, you can structure it like this:
mkdir -p /mnt/glustermount/data/traefik_data/dynamic
touch /mnt/glustermount/data/traefik_data/dynamic/http.middlewares.yaml
touch /mnt/glustermount/data/traefik_data/dynamic/http.routers.yaml
touch /mnt/glustermount/data/traefik_data/dynamic/http.services.yaml
touch /mnt/glustermount/data/traefik_data/dynamic/tls.options.yaml
Then you can write configurations into these files. Below are examples for each:
Example: http.middlewares.yaml
http:
  middlewares:
    my-secure-headers:
      headers:
        sslRedirect: true
        stsSeconds: 31536000
        stsIncludeSubdomains: true
        stsPreload: true
Example: http.routers.yaml
http:
  routers:
    my-router:
      rule: "Host(`example.com`)"
      entryPoints:
        - websecure
      service: my-service
      tls: {}
Example: http.services.yaml
http:
  services:
    my-service:
      loadBalancer:
        servers:
          - url: "http://192.168.1.10:8080"
Example: tls.options.yaml
tls:
  options:
    default:
      minVersion: VersionTLS12
      cipherSuites:
        - TLS_ECDHE_RSA_WITH_AES_128_GCM_SHA256
        - TLS_ECDHE_RSA_WITH_AES_256_GCM_SHA384
Providers
Overview Providers
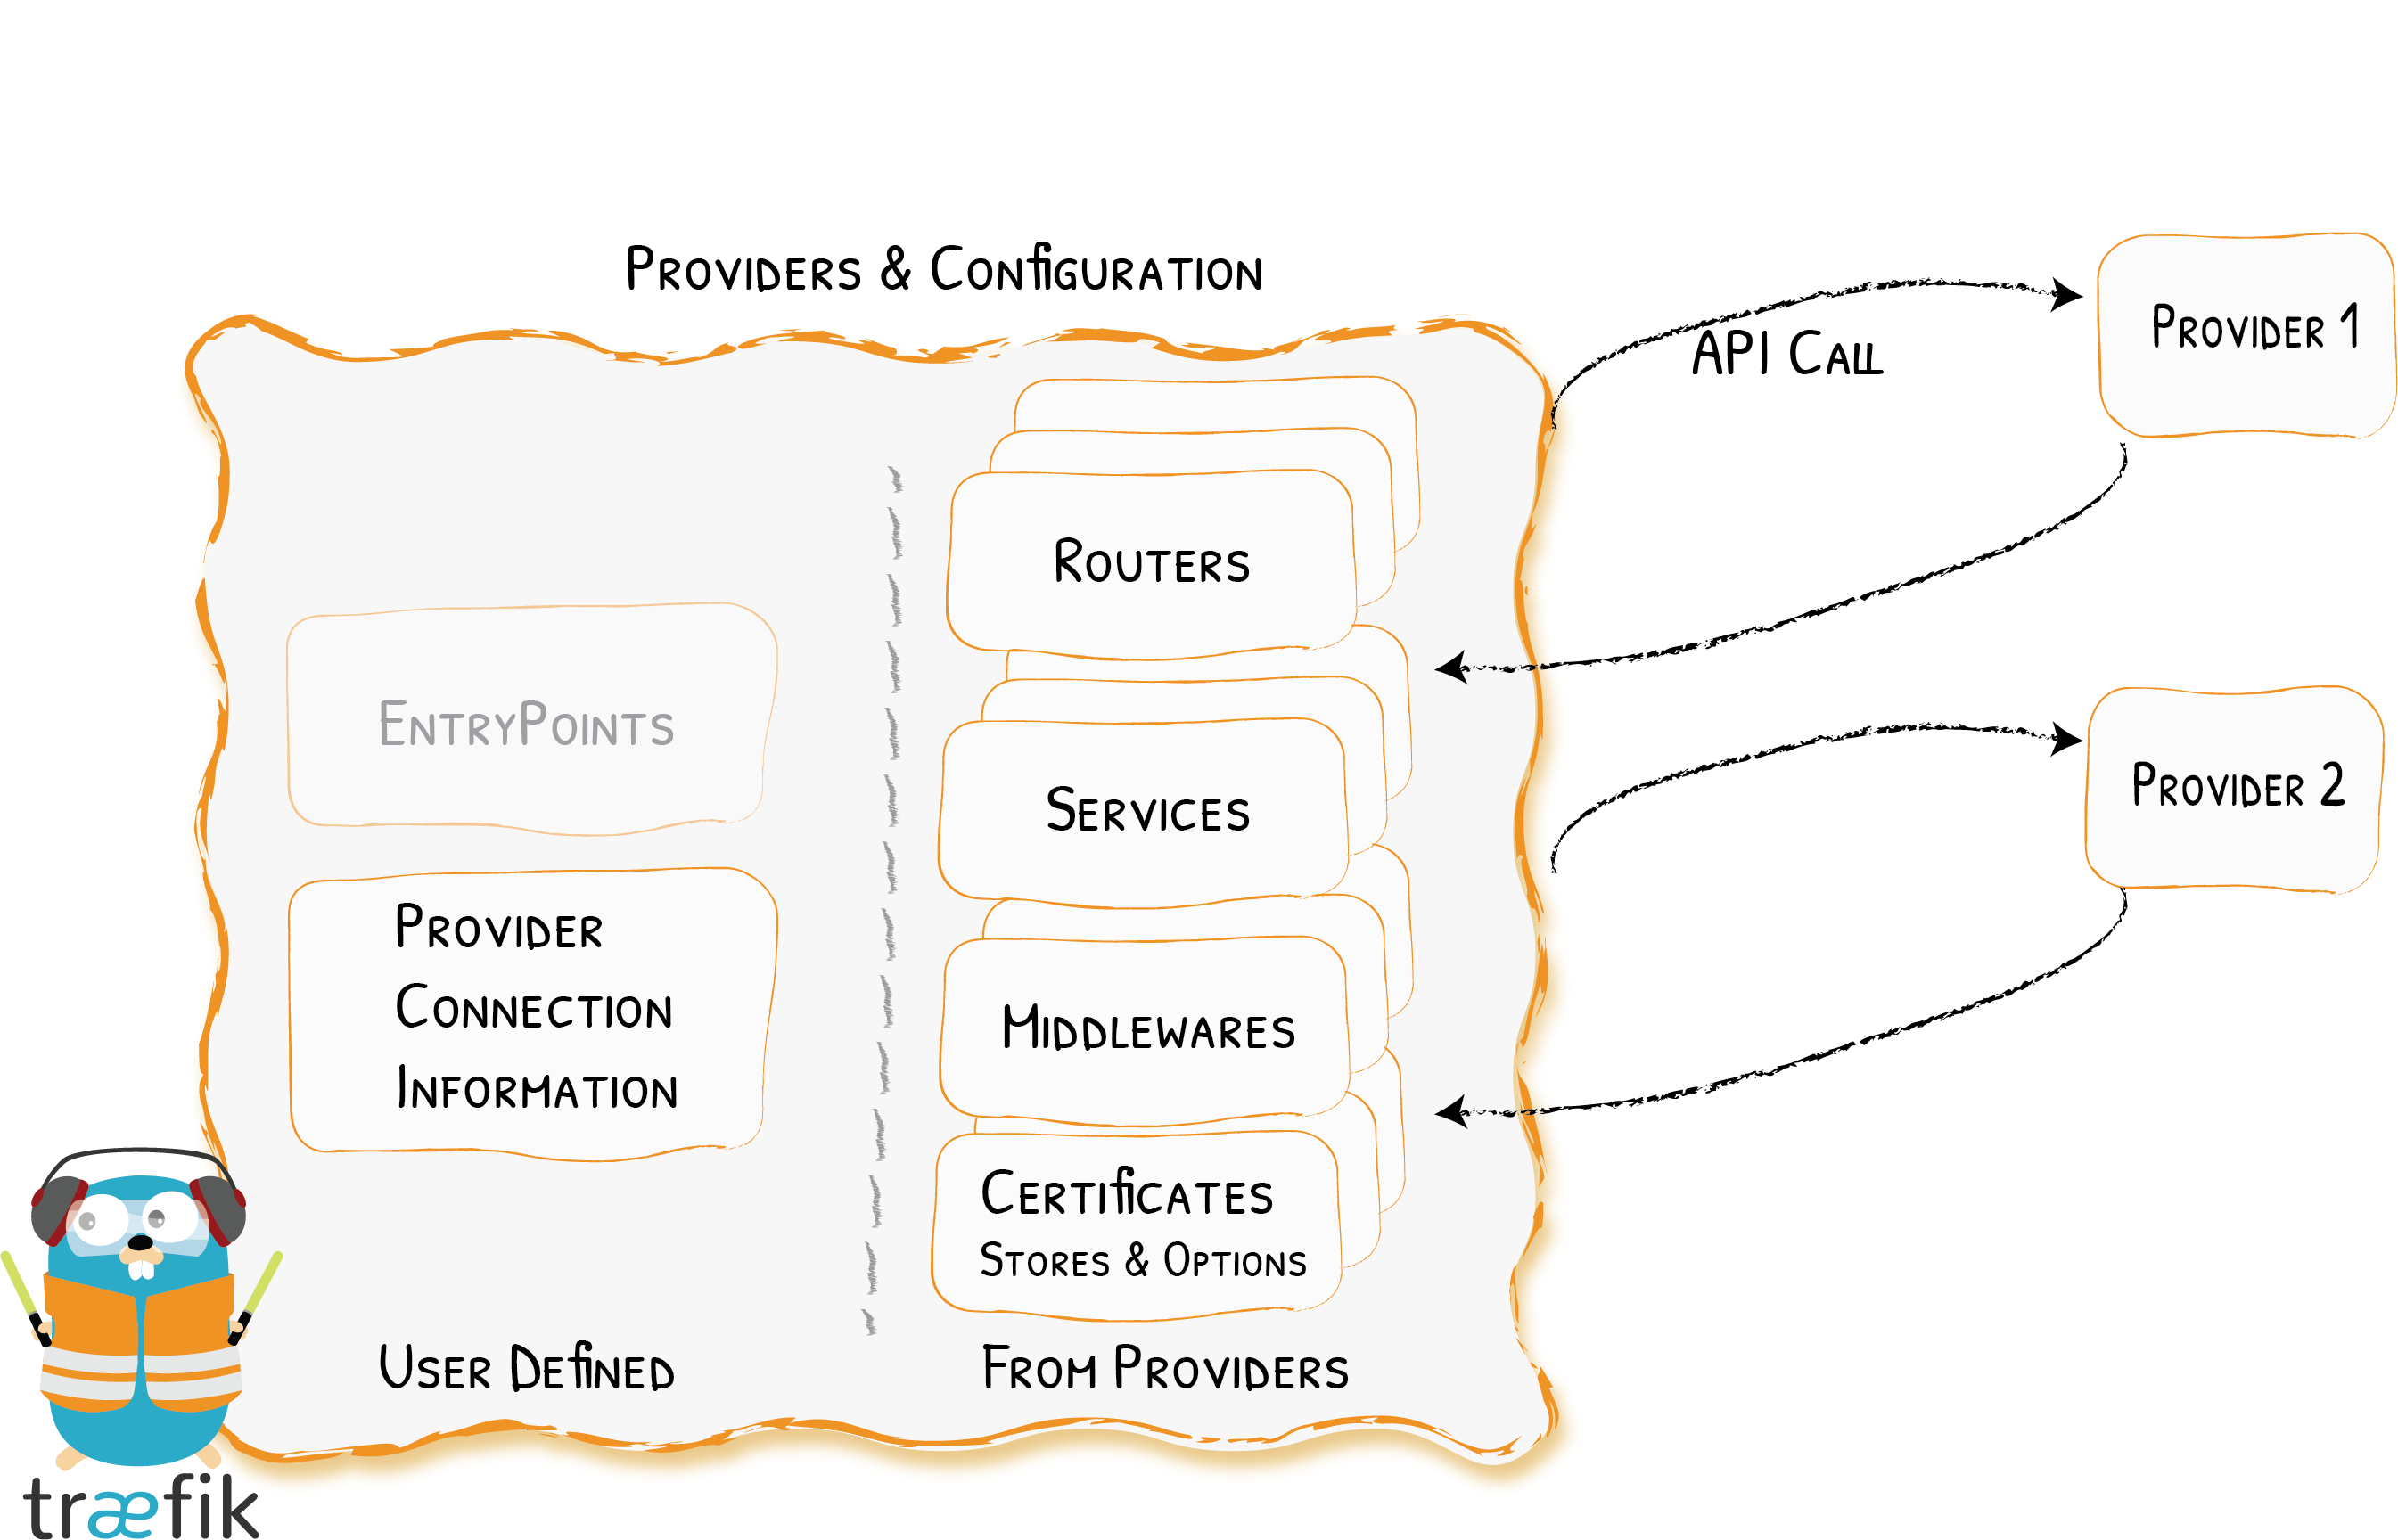
Configuration discovery in Traefik is achieved through Providers.
The providers are infrastructure components, whether orchestrators, container engines, cloud providers, or key-value stores. The idea is that Traefik queries the provider APIs in order to find relevant information about routing, and when Traefik detects a change, it dynamically updates the routes.
Find out More about Providers here.
Supported Providers
Below is the list of the currently supported providers in Traefik.
| Provider | Type | Configuration Type | Provider Name |
| Docker | Orchestrator | Label | docker |
| Kubernetes IngressRoute | Orchestrator | Custom Resource | kubernetescrd |
| Kubernetes Ingress | Orchestrator | Ingress | kubernetes |
| Kubernetes Gateway API | Orchestrator | Gateway API Resource | kubernetesgateway |
| Consul Catalog | Orchestrator | Label | consulcatalog |
| Nomad | Orchestrator | Label | nomad |
| ECS | Orchestrator | Label | ecs |
| File | Manual | YAML/TOML format | file |
| Consul | KV | KV | consul |
| Etcd | KV | KV | etcd |
| ZooKeeper | KV | KV | zookeeper |
| Redis | KV | KV | redis |
| HTTP | Manual | JSON format | http |
HTTPS & TLS
Overview HTTPS & TLS
Traefik supports HTTPS & TLS, which concerns roughly two parts of the configuration:
- Routers: Define how HTTPS traffic is handled.
- TLS Connection: Manage certificates and TLS-specific settings.
For Automated Certification Check this post:
https://wiki.aeoneros.com/books/traefik-reverse-proxy-for-docker-swarm/page/lets-encrypt
Configuring HTTPS in Routers
When a router needs to handle HTTPS traffic, it should include a tls field in its definition. For detailed instructions, refer to the TLS section of the routers documentation.
Managing TLS Connections
To configure the TLS connection itself, you need to:
- Obtain TLS Certificates: This can be done either through:
- Dynamic Configuration: Define certificates directly in your dynamic configuration files.
- Let’s Encrypt (ACME): Automate certificate generation and renewal. Refer to Let’s Encrypt (ACME) Wiki Post for more details.
- Configure TLS Options: Set security policies like minimum TLS version and cipher suites.
- Manage Certificate Stores: Store and retrieve certificates used in TLS connections.
Example: Configuring HTTPS in a Router
http:
  routers:
    secure-router:
      rule: "Host(`example.com`)"
      entryPoints:
        - websecure
      service: my-service
      tls:
        certResolver: "myresolver"
Example: Defining Certificates in Dynamic Configuration
tls:
  certificates:
    - certFile: "/path/to/cert.crt"
      keyFile: "/path/to/cert.key"
Example: Using Let’s Encrypt with ACME
certificatesResolvers:
  myresolver:
    acme:
      email: "your-email@domain.com"
      storage: "/acme.json"
      httpChallenge:
        entryPoint: "web"
TLS Options Example
tls:
  options:
    default:
      minVersion: VersionTLS12
      cipherSuites:
        - TLS_ECDHE_RSA_WITH_AES_128_GCM_SHA256
        - TLS_ECDHE_RSA_WITH_AES_256_GCM_SHA384
For a deeper dive into certificate management, TLS options, and other HTTPS configurations, see the official Traefik documentation.
How SSL Certificates Work: A Breakdown

What is SSL?
SSL stands for Secure Sockets Layer, a protocol for encrypting, securing, and authenticating communications on the Internet. Although SSL has been replaced by TLS (Transport Layer Security), the term "SSL" is still widely used to describe this technology.
Primary Use Cases
- Securing communications between a client and a server (e.g., web browsers and websites)
- Securing email, VoIP, and other communications over unsecured networks
How does SSL/TLS work?
SSL/TLS operates based on several key principles:
- A secure connection begins with a TLS handshake, where the client and server exchange public keys and establish a secure session.
- Session keys are generated during the handshake and used to encrypt/decrypt all communications within the session.
- Each session uses unique session keys.
- TLS authenticates the server's identity to ensure it is legitimate.
- Data integrity is ensured using a message authentication code (MAC).
The TLS Handshake
The TLS handshake is the process by which two parties establish a secure connection. This involves:
- Asymmetric encryption: Public and private keys are used for secure communication during the handshake.
- Session keys: Generated during the handshake and used for symmetric encryption for the remainder of the session.
Symmetric Encryption
After the handshake, both parties use the same session key for encryption. These keys are temporary and unique to each session, ensuring high levels of security.
Authenticating the Origin Server
TLS communications include a digital signature (MAC) that authenticates the server and prevents data alteration during transmission.
What is an SSL Certificate?
An SSL certificate is a data file installed on a website's server. It contains:
- The public key
- The identity of the website owner
- Other identifying information
SSL certificates are essential for enabling encrypted communications using TLS.
Self-Signed Certificates
Website owners can create self-signed certificates, but these are not as trusted as certificates issued by a certificate authority (CA).
Obtaining an SSL Certificate
SSL certificates are issued by certificate authorities (CAs) after verifying the website owner’s identity. The CA maintains a copy of the certificates they issue.
Free SSL Certificates
Many CAs charge for SSL certificates, but some, like Cloudflare, offer them for free to encourage secure Internet practices.
HTTP vs. HTTPS
HTTPS is HTTP with SSL/TLS encryption. A website using HTTPS:
- Has a valid SSL certificate issued by a CA
- Encrypts all traffic to and from the website
- Ensures data authenticity and integrity
Modern browsers mark HTTP websites as "not secure," making HTTPS essential for trust and security.
For further details on SSL/TLS, visit the official Traefik documentation.
Let's Encrypt: How does it Work? & More
Overview
Traefik can automatically generate and renew TLS certificates using an ACME provider, such as Let’s Encrypt. This simplifies certificate management while ensuring secure HTTPS connections.
How does Let's Encrypt Work?
Let's Encrypt is a free, automated, and open Certificate Authority that provides SSL/TLS certificates to enable encrypted connections to websites. Its mission is to create a more secure and privacy-respecting web by promoting the widespread adoption of HTTPS.
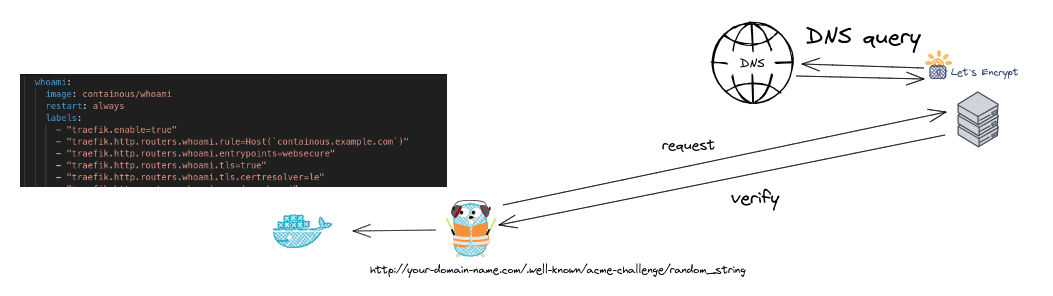
Let's Encrypt follows a protocol called ACME (Automated Certificate Management Environment) for the issuance and renewal of certificates. Here's a simplified version of how it works:
Step 1: Domain Ownership Verification
To ensure that the certificate isn't provided to malicious entities, Let's Encrypt needs to confirm that the entity controlling the domain is the one requesting the certificate. This is achieved through a challenge-response protocol.
In our example with Traefik, we're using the HTTP challenge method, where Traefik will be asked to put a specific file at a known location on your site, like http://your-domain.com/.well-known/acme-challenge/random_string. Let's Encrypt then verifies the file's presence, thus confirming domain ownership.
Step 2: Certificate Issuance and Installation
Once domain ownership is confirmed, Let's Encrypt issues a certificate that can be installed on your server. Traefik automates this step by pulling the issued certificate and storing it locally, then using it whenever an HTTPS connection is initiated.
Step 3: Automatic Renewal
Let's Encrypt certificates are valid for 90 days, but you don't have to worry about the expiration date because Traefik will automatically renew the certificates before they expire, as long as the ACME configuration is correct.
By automating the process of issuing, installing, and renewing certificates, Let's Encrypt has significantly lowered the complexity of setting up and maintaining HTTPS on a website.
If you want to Setup your Own TLS-Challenge go check out this Guide: Docker-compose with Let's Encrypt: TLS Challenge
More about Lets Encrypt & Traefik
Let’s Encrypt and Rate Limiting
Let’s Encrypt imposes rate limits for API requests, which last up to one week and cannot be overridden. To avoid reaching these limits:
- Persist the
acme.jsonfile across container restarts to prevent Traefik from requesting new certificates unnecessarily. - Use the Let’s Encrypt staging server with the
caServerconfiguration option for testing.
Certificate Resolvers
Certificate resolvers are defined in the static configuration and retrieve certificates from an ACME server. Each router that requires a certificate must reference a resolver explicitly using the tls.certresolver option.
Configuration Reference
- Domain Definition: Certificates are requested for domain names specified in the router’s dynamic configuration. Multiple domain names are supported, with one acting as the main domain and others as Subject Alternative Names (SANs).
- ACME Challenges: Each resolver must define an ACME challenge type: HTTP-01, DNS-01, or TLS-ALPN-01.
Configuration Examples
Enable ACME
# Static configuration
entryPoints:
  web:
    address: ":80"
  websecure:
    address: ":443"

certificatesResolvers:
  myresolver:
    acme:
      email: your-email@example.com
      storage: acme.json
      httpChallenge:
        entryPoint: web
Single Domain from Router’s Rule
# Dynamic configuration
labels:
  - traefik.http.routers.blog.rule=Host(`example.com`) && Path(`/blog`)
  - traefik.http.routers.blog.tls=true
  - traefik.http.routers.blog.tls.certresolver=myresolver
Multiple Domains from Router’s Rule
# Dynamic configuration
labels:
  - traefik.http.routers.blog.rule=(Host(`example.com`) && Path(`/blog`)) || Host(`blog.example.org`)
  - traefik.http.routers.blog.tls=true
  - traefik.http.routers.blog.tls.certresolver=myresolver
Multiple Domains from Router’s tls.domain
# Dynamic configuration
labels:
  - traefik.http.routers.blog.rule=Host(`example.com`) && Path(`/blog`)
  - traefik.http.routers.blog.tls=true
  - traefik.http.routers.blog.tls.certresolver=myresolver
  - traefik.http.routers.blog.tls.domains[0].main=example.com
  - traefik.http.routers.blog.tls.domains[0].sans=*.example.org
ACME Challenges
HTTP-01 Challenge
# Static configuration
entryPoints:
  web:
    address: ":80"
  websecure:
    address: ":443"

certificatesResolvers:
  myresolver:
    acme:
      httpChallenge:
        entryPoint: web
DNS-01 Challenge
# Static configuration
certificatesResolvers:
  myresolver:
    acme:
      dnsChallenge:
        provider: digitalocean
        delayBeforeCheck: 0
        resolvers:
          - "1.1.1.1:53"
          - "8.8.8.8:53"
TLS-ALPN-01 Challenge
# Static configuration
certificatesResolvers:
  myresolver:
    acme:
      tlsChallenge: {}
Automatic Renewals
Traefik manages 90-day certificates and renews them automatically 30 days before expiry. For resolvers issuing custom-duration certificates, configure the renewal duration with the certificatesDuration option.
For more details, refer to the official Traefik documentation.
TLS: How does it Work? & More
Automated Certification via Let’s Encrypt
For automated TLS certificate management, Traefik integrates with Let’s Encrypt. See detailed instructions in this Let’s Encrypt Post.
If you want to Setup your Own TLS-Challenge go check out this Guide: Docker-compose with Let's Encrypt: TLS Challenge
What is TLS and How Does It Work?
TLS (Transport Layer Security) is a cryptographic protocol designed to provide secure communication over a network. It is the successor to SSL and ensures that data transmitted between a client and server is encrypted and authenticated, protecting it from eavesdropping and tampering.
When a client (such as a browser) connects to a server via HTTPS, the following steps occur:
- Handshake: The client and server exchange information to establish a secure connection, agreeing on encryption protocols and verifying identities using certificates.
- Encryption: Once the handshake is complete, all subsequent communication is encrypted to protect the data from being intercepted.
- Data Integrity: TLS ensures that the transmitted data has not been altered during transfer.
TLS is crucial for securing sensitive information like login credentials, credit card numbers, and personal data. Traefik makes it easy to manage TLS certificates, either through Let’s Encrypt or user-defined certificates.
More about TLS-Options for Traefik
User-Defined Certificates
To add or remove TLS certificates dynamically, define them in the tls.certificates section of the dynamic configuration:
File (YAML)
# Dynamic configuration
tls:
  certificates:
    - certFile: /path/to/domain.cert
      keyFile: /path/to/domain.key
    - certFile: /path/to/other-domain.cert
      keyFile: /path/to/other-domain.key
File (TOML)
Note: In Kubernetes, certificates must be provided as secrets instead of using the file provider.
Certificates Stores
In Traefik, certificates are grouped in certificate stores:
File (YAML)
# Dynamic configuration
tls:
  stores:
    default: {}
By default, all certificates are stored in the default store. Any additional store definitions are ignored.
File (YAML): Specifying Certificate Stores
# Dynamic configuration
tls:
  certificates:
    - certFile: /path/to/domain.cert
      keyFile: /path/to/domain.key
      stores:
        - default
    - certFile: /path/to/other-domain.cert
      keyFile: /path/to/other-domain.key
Default Certificate
Traefik can use a default certificate for connections without SNI or matching domains. Define the default certificate in a TLS store:
File (YAML)
# Dynamic configuration
tls:
  stores:
    default:
      defaultCertificate:
        certFile: /path/to/cert.crt
        keyFile: /path/to/cert.key
ACME Default Certificate: Traefik can also generate a default certificate using an ACME provider:
File (YAML)
# Dynamic configuration
tls:
  stores:
    default:
      defaultGeneratedCert:
        resolver: myresolver
        domain:
          main: example.org
          sans:
            - foo.example.org
            - bar.example.org
TLS Options
The TLS options allow you to configure parameters of the TLS connection:
Default TLS Option
# Dynamic configuration
tls:
  options:
    default:
      minVersion: VersionTLS12
Minimum and Maximum TLS Version
# Dynamic configuration
tls:
  options:
    default:
      minVersion: VersionTLS12
      maxVersion: VersionTLS13
Cipher Suites
# Dynamic configuration
tls:
  options:
    default:
      cipherSuites:
        - TLS_ECDHE_RSA_WITH_AES_128_GCM_SHA256
For more information, refer to the official Traefik documentation.
Setting up Self-Signed Multiple FQDN Certificates for Local Services in Traefik
Overview
In this article, we will walk through creating a self-signed certificate for multiple local services (e.g., Portainer and Pi-hole) using OpenSSL. We'll also configure Traefik to use this certificate in Docker Swarm. Additionally, we will explain how SSL certificates work, the role of key components like the private key, public key, and Certification Authority (CA). We'll use the provided image for understanding these concepts.
Prerequisites
- You already have Traefik, Portainer, Pi-hole, and Docker Swarm set up.
- You have a local DNS setup using Pi-hole to resolve local domain names such as
portainer.localandpihole.local.
Whats FQDN?
FQDN (Fully Qualified Domain Name) is the complete domain name of a specific host within the internet or a local network. It includes both the hostname and the domain name, ensuring the address is globally unique. An FQDN typically follows this format: hostname.domain.tld (e.g., www.example.com). For local networks, it can be something like portainer.local or pihole.local. The FQDN provides a precise location for a resource in the DNS hierarchy, making it essential for properly identifying services across networks.
Step 1: Create a Multiple FQDN Certificate with OpenSSL
-
Generate a private key for the certificate:
openssl genrsa -out local.key 4096 - Create a Certificate Signing Request (CSR) for multiple FQDNs. First, create a configuration file
san.cnf:
touch /mnt/glustermount/data/certs/san.cnf
[req] # Request options default_bits = 4096 # Size of the encryption key prompt = no # No prompts, all values are provided in the config file default_md = sha256 # Use SHA256 for the certificate distinguished_name = dn # Use the 'dn' section for distinguished names req_extensions = req_ext # Use 'req_ext' for additional extensions like SAN (Subject Alternative Name) [dn] # Distinguished Name section CN = portainer.local # Common Name (CN) for the certificate (primary domain) [req_ext] # Extensions for the certificate request subjectAltName = @alt_names # Use alternative names (SAN) [alt_names] # Alternative domain names DNS.1 = portainer.local # First DNS name (alternative domain) DNS.2 = pihole.local # Second DNS name (alternative domain) - Generate the CSR using the configuration file:
openssl req -new -key local.key -out local.csr -config san.cnf - Generate a self-signed certificate for 1 year (365 days):
openssl x509 -req -in local.csr -signkey local.key -out local.crt -days 365 -extfile san.cnf -extensions req_ext - Move the certificate and key to a shared directory accessible by Docker Swarm:
(If you need help to understand how the Nodes of the Docker Swarm Cluster are sharing the synced Files - Check this Article)
mkdir -p /mnt/glustermount/data/certs
mv local.crt local.key /mnt/glustermount/data/certs/
Step 2: Understanding the san.cnf File
The san.cnf file helps OpenSSL create a certificate with multiple domain names (FQDNs). Here’s a breakdown of the file:
- [req]: Specifies the general options for generating the certificate request, such as key size, hashing algorithm (SHA256), and the distinguished name section.
- [dn]: Defines the common name (CN), which in this case is the primary domain (
portainer.local). - [req_ext]: Specifies the Subject Alternative Names (SANs), which allow the certificate to be valid for additional domain names (e.g.,
pihole.local). - [alt_names]: Lists the additional domain names (
DNS.1,DNS.2, etc.) that will be included in the certificate.
This setup creates a certificate that can be used for both portainer.local and pihole.local, ensuring secure access over HTTPS. You can add any other Local DNS Entry to the List. Just make sure to add the Entry to your Pihole under the "Local DNS - DNS Records" Section.
Step 3: Add the Certificate to Traefik's Static Configuration (TOML)
Edit your traefik.toml file to include the certificate you generated:
[entryPoints]
  [entryPoints.websecure]
    address = ":443"

[tls]
  [[tls.certificates]]
    certFile = "/mnt/glustermount/data/certs/local.crt"
    keyFile  = "/mnt/glustermount/data/certs/local.key"
    stores = ["default"]

[tls.stores]
  [tls.stores.default]
    [tls.stores.default.defaultCertificate]
      certFile = "/mnt/glustermount/data/certs/local.crt"
      keyFile  = "/mnt/glustermount/data/certs/local.key"
This configuration tells Traefik to use the multiple FQDN certificate (local.crt) for requests matching portainer.local and pihole.local.
Step 4: Assign the Self-Signed Certificate to Specific Services
Now, configure the dynamic behavior of Traefik using the dynamic.toml file:
[http]
  [http.routers]
    [http.routers.portainer-secure]
      rule = "Host(`portainer.local`)"
      service = "portainer"
      entryPoints = ["websecure"]
      tls = { certResolver = "self-signed" }

    [http.routers.pihole-secure]
      rule = "Host(`pihole.local`)"
      service = "pihole"
      entryPoints = ["websecure"]
      tls = { certResolver = "self-signed" }

  [http.services]
    [http.services.portainer.loadBalancer]
      [[http.services.portainer.loadBalancer.servers]]
        url = "http://portainer:9443"

    [http.services.pihole.loadBalancer]
      [[http.services.pihole.loadBalancer.servers]]
        url = "http://pihole:888"
Step 5: Adjust the Pi-hole Docker Compose Configuration
Here’s the Pi-hole docker-compose.yml adjusted to match the certificate and Traefik settings:
version: '3'

services:
  pihole:
    networks:
      - management_net  # For management via Traefik
    image: pihole/pihole:latest
    ports:
      - "53:53/tcp"
      - "53:53/udp"
      - "888:80"
    environment:
      TZ: 'Europe/Zurich'
      WEBPASSWORD: '${PIHOLE_PASSWORD}'
    volumes:
      - '/mnt/glustermount/data/pihole_data/etc:/etc/pihole'
      - '/mnt/glustermount/data/pihole_data/dns:/etc/dnsmasq.d'
    restart: unless-stopped
    deploy:
      mode: replicated
      replicas: 1
      placement:
        constraints: [node.platform.os == linux]
      labels:
        - 'traefik.enable=true'
        - "traefik.http.routers.pihole-secure.rule=Host(`pihole.local`)"
        - "traefik.http.routers.pihole-secure.entrypoints=websecure"
        - "traefik.http.routers.pihole-secure.tls=true"
        - "traefik.http.services.pihole.loadbalancer.server.port=80"

networks:
  management_net:
    external: true
Step 6: Deploy the Updated Stack
Run the following command to apply the updated stack configuration:
(You can also use Portainer running the Stack)
docker stack deploy -c docker-compose.yml your_stack_nameStep 7: Test the Setup
-
Add the self-signed certificate to your trusted sources on your machine. This can be done by importing the
.crtfile into your browser or system's trusted certificates store. -
Verify the secure connections:
- Access
https://portainer.local:9443 - Access
https://pihole.local:888
- Access
Both should now use your self-signed certificate with proper encryption.
Practical Guides: HTTPS with Let's Encrypt
Docker-compose with Let's Encrypt: TLS Challenge
Introduction
This guide provides information on how to set up a simple TLS-Challenge for Traefik to use Let's Encrypt and certify your domains/websites. We will configure Traefik to act as a reverse proxy for a simple "Whoami" application and secure the app using Let's Encrypt.
Understanding TLS: Check this guide.
Understanding Let's Encrypt: Check this guide.
Overview of TLS-Challenge
The TLS-ALPN-01 challenge is a method used by Let's Encrypt to verify domain ownership. Instead of using the HTTP challenge, it leverages the TLS handshake to validate the domain. This is especially useful for environments where port 80 is blocked or cannot be used.
Difference Between HTTP-Challenge & TLS-Challenge
The HTTP Challenge uses HTTP requests on port 80 to verify domain ownership by serving a specific file at http://your-domain/.well-known/acme-challenge/. The TLS Challenge verifies ownership during the TLS handshake on port 443 by presenting a special certificate, making it more suitable for HTTPS-only environments or when port 80 is blocked.
Prerequisite
For the TLS challenge you will need:
- A publicly accessible host allowing connections on port
443with docker & docker-compose installed. - A DNS record with the domain you want to expose pointing to this host.
Step 0: Configuring DNS Records
Before proceeding, make sure your domain name is correctly configured. Create a DNS A Record that points your domain to the public IP address of your server.
If you don't know what a DNS A Record is, check out this post from Cloudflare.
Step 1: Create ACME File
In this guide, we will use GlusterFS (only needed when using Docker Swarm).
Feel free to adjust your paths as needed.
mkdir ./letsencrypt
touch ./letsencrypt/acme.json
chmod 600 ./letsencrypt/acme.json
Step 2: Installing and Configuring Traefik
There are multiple ways to set up your Traefik configuration—either directly in the docker-compose.yaml file or by outsourcing it to external configuration files. Find more information here.
In this step, we provide the option traefik.http.routers.traefik.middlewares=authtraefik, which is optional but highly recommended to secure your Traefik dashboard with login authentication. Check out the Traefik documentation for more information.
docker-compose.yaml
version: '3.8'
services:
  traefik:
    image: "traefik:v3.3"
    container_name: traefik
    hostname: traefik
    command:
      - --entrypoints.web.address=:80
      - --entrypoints.websecure.address=:443
      - --providers.docker
      - --providers.docker.exposedByDefault=false
      - --api
      - --certificatesresolvers.le.acme.email=your-email@example.com
      - --certificatesresolvers.le.acme.storage=/letsencrypt/acme.json
      - --certificatesresolvers.le.acme.tlschallenge=true
      - --log.level=ERROR
      - --accesslog=true
    ports:
      - 80:80
      - 443:443
    volumes:
      - "/var/run/docker.sock:/var/run/docker.sock:ro"
      - "./letsencrypt:/letsencrypt"
    labels:
      - "traefik.enable=true"
      - "traefik.http.routers.traefik.rule=Host(traefik.example.com)"
      - "traefik.http.routers.traefik.service=api@internal"
      - "traefik.http.routers.traefik.tls=true"
      - "traefik.http.routers.traefik.tls.certresolver=le"
      - "traefik.http.routers.traefik.entrypoints=websecure"
      - "traefik.http.routers.traefik.middlewares=authtraefik"
      - "traefik.http.middlewares.authtraefik.basicauth.users=your-user:$$your-password"
    restart: unless-stopped
Replace your-email@example.com with your actual email address and traefik.example.com with your Traefik dashboard domain name.
Step 3: Integrating Let's Encrypt
You can now integrate automatic certification for your apps by adding configurations to the docker-compose.yaml file for the Whoami app:
  whoami:
    image: containous/whoami
    restart: always
    labels:
      - "traefik.enable=true"
      - "traefik.http.routers.whoami.rule=Host(whoami.example.com)"
      - "traefik.http.routers.whoami.entrypoints=websecure"
      - "traefik.http.routers.whoami.tls=true"
      - "traefik.http.routers.whoami.tls.certresolver=le"
      - "traefik.http.routers.whoami.service=whoami"
      - "traefik.http.routers.whoami.priority=100"
      - "traefik.http.services.whoami.loadbalancer.server.port=80"
Remember to replace whoami.example.com with your actual domain name.
Step 4: Starting the Services
Start the services with the following command (only works if your working directory is where your docker-compose.yaml file is saved):
docker-compose up -dYou should now be able to access your Whoami application over HTTPS, secured by a Let's Encrypt certificate.
Conclusion
In this guide, we demonstrated how to set up Traefik as a reverse proxy with Let's Encrypt TLS-Challenge to secure a simple Whoami application. By following these steps, you can easily apply the same configuration to your own services and ensure secure communication with HTTPS.
Docker-compose with Let's Encrypt: DNS Challenge & Cloudflare (Recommended)
Introduction
This guide aims to demonstrate how to create a certificate with the Let's Encrypt DNS-01 Challenge to use HTTPS on a simple service exposed with Traefik.
Why Use DNS-01 Challenge Instead of TLS?
Using the DNS-01 Challenge instead of TLS-ALPN-01 provides several advantages:
- Wildcard Certificates: DNS-01 is the only challenge type that supports wildcard domains (e.g.,
*.example.com), simplifying the management of multiple subdomains. - No Open Ports Required: Unlike TLS-ALPN, DNS-01 doesn’t rely on ports 443 or 80 being open, offering better security and flexibility for non-web services.
- Multi-Server and Complex Setups: DNS-01 works in distributed or multi-server environments without requiring direct communication from Let's Encrypt to each server.
- Behind Proxies or Firewalls: Ideal for servers behind NAT, private networks, or reverse proxies where direct access to the server is limited.
Overview of DNS-01 Challenge
The DNS-01 Challenge is a method used by Let's Encrypt to verify domain ownership by creating a specific DNS TXT record for the domain. This challenge is particularly useful for issuing wildcard certificates (*.example.com), securing services that are not publicly accessible, and environments where direct access to ports 80 or 443 is not possible. It provides flexibility and higher security, especially when combined with automated DNS providers like Cloudflare.
Prerequisite
- A publicly accessible host allowing connections on port
443with Docker and Docker Compose installed. - A working DNS provider (e.g., Cloudflare) with credentials to create and remove DNS records.
- If you use a 3rd-party hosting provider, make sure your domain uses Cloudflare's nameservers. Learn more about changing nameservers in this guide.
Step 0: Add Domain to Cloudflare
To add your domain to the Cloudflare dashboard, follow Cloudflare's full setup guide: Cloudflare Guide.
Step 1: Change Nameservers to Cloudflare
Log in to your hosting provider's control panel and change your domain's nameservers to Cloudflare's. This process may take up to 24 hours to propagate. For more information or an Example, check this guide.
When changing the NS, most Hosting Providers take up to 24h to update them.
Make Sure to ask your Hoster for more Informations
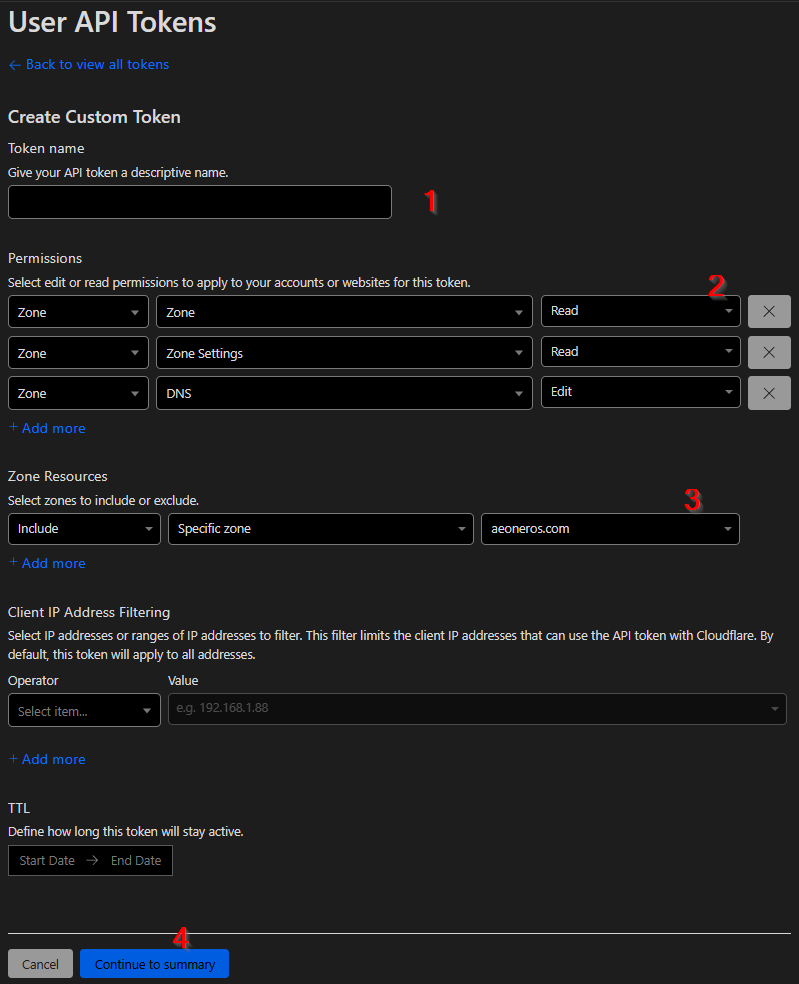
Step 2: Create a Custom Cloudflare API Token
Log in to Cloudflare and navigate to API Tokens. Click "Create Token".

Steps to create the token:
- Give your token a descriptive name (e.g., "Homelab Traefik API-Token").
- Set the permissions as shown in the example image (Zone → Zone [Read], Zone → Zone Settings [Read], Zone → DNS [Edit]).
- Select your domain.
- Click "Continue to Summary" and create the token.
What Does These Permissions do?
Zone → Zone (Read):
Allows read-only access to basic information about the specified zone (e.g., DNS records, configuration, status, etc.).
Zone → Zone Settings (Read):
Grants read-only access to view the zone’s settings (e.g., SSL/TLS settings, security settings, and performance configurations).
Zone → DNS (Edit):
Allows full control over DNS records in the specified zone. This means you can create, edit, and delete DNS records.
Step 3: Create a Local API Token File
In This Step you could also Work with Docker Secrets. I did not get it Working with the Docker Secret, that why i put it in a File. If you want to use a Docker Secret, please visit Official Docker Docs: https://docs.docker.com/compose/how-tos/use-secrets/
Go to your Traefik folder and create a file to store your Cloudflare API token securely:
nano ./traefik_data/cloudflare_api_tokenPaste your token in the file, then save and close it (CTRL+O, CTRL+X).
Step 4: Create the ACME.json File
The acme.json file stores Let's Encrypt certificates, keys, and account information in JSON format for Traefik's ACME integration.
Ensure the file is created and secured with the Rights 600:
mkdir ./letsencrypt
touch ./letsencrypt/acme.json
chmod 600 ./letsencrypt/acme.json
Step 5: Adjust Your Traefik Docker-Compose File
In This Step you could also Work with Docker Secrets. I did not get it Working with the Docker Secret, that why i put it in a File. If you want to use a Docker Secret, please visit Official Docker Docs: https://docs.docker.com/compose/how-tos/use-secrets/
Mount your Cloudflare API token file and set the appropriate environment variables:
Example Docker Compose Configuration:
services:
  traefik:
    image: "traefik:v3.3"
    volumes:
      - "./traefik_data/cloudflare_api_token:/cloudflare_api_token:ro"
      - "./letsencrypt:/letsencrypt"
    environment:
      - TZ=Europe/Zurich
      - CF_API_EMAIL=yourmail@example.com
      - CF_DNS_API_TOKEN_FILE=/cloudflare_api_token
Step 6: Adjust your Traefik Config
You can also use a static.yaml or static.toml file for this configuration. Check out this guide for more information.
You can Change the Value "leresolver" to your own Resolvername. Make sure to adjust your Traefik Router Labels/Settings.
Make Sure to Adjust the Variable "yourmail@example.com" to your actual Email.
Example for Traefik CLI:
    command:
      - --certificatesresolvers.leresovler.acme.email=yourmail@example.com
      - --certificatesresolvers.leresovler.acme.storage=/letsencrypt/acme.json
      - --certificatesresolvers.myresolver.acme.caserver=https://acme-v02.api.letsencrypt.org/directory
      - --certificatesresolvers.myresolver.acme.dnschallenge.provider=cloudflare
      - --certificatesresolvers.leresovler.acme.dnschallenge.delaybeforecheck=0
      - --certificatesresolvers.leresovler.acme.dnschallenge.resolvers=1.1.1.1:53,1.0.0.1:53,8.8.8.8:53
Example for a static.yaml:
certificatesResolvers:
  leresovler:
    acme:
      email: 'yourmail@example.com'
      storage: '/letsencrypt/acme.json'
      caServer: 'https://acme-v02.api.letsencrypt.org/directory'
      dnsChallenge:
        provider: 'cloudflare'
        delayBeforeCheck: '0'
        resolvers:
          - '1.1.1.1:53'
          - '1.0.0.1:53'
          - '8.8.8.8:53'
Example for static.toml:
[certificatesResolvers.leresolver.acme]
  email = "yourmail@example.com"
  storage = "/letsencrypt/acme.json"
  caServer = "https://acme-v02.api.letsencrypt.org/directory"

  [certificatesResolvers.leresolver.acme.dnsChallenge]
    provider = "cloudflare"
    delayBeforeCheck = 0
    resolvers = ["1.1.1.1:53", "1.0.0.1:53", "8.8.8.8:53"]
Step 7: Restart Traefik
Restart Traefik and make sure your application routers are configured to use the leresolver for certificate generation.
Have fun Troubbleshooting. You can Change your Traefik-Log-Level to DEBUG for further Troubbleshooting.
Additional Tips
To improve security, you can add a plugin to allow only Cloudflare traffic to access your services. Check out this guide.
Docker-compose with Let's Encrypt : HTTP Challenge
Introduction
This guide provides information on how to set up a simple HTTP-Challenge for Traefik to use Let's Encrypt and certify your domains/websites. We will configure Traefik to act as a reverse proxy for a simple "Whoami" application and secure the app using Let's Encrypt.
Understanding Let's Encrypt: Check this guide.
Overview of HTTP-Challenge
The HTTP-01 challenge is a method used by Let's Encrypt to verify domain ownership. Let's Encrypt requests a specific file to be available at http://your-domain/.well-known/acme-challenge/. Traefik serves this file, and Let's Encrypt verifies its presence to confirm domain ownership.
Difference Between HTTP-Challenge & TLS-Challenge
The HTTP Challenge uses HTTP requests on port 80 to verify domain ownership by serving a specific file at http://your-domain/.well-known/acme-challenge/. The TLS Challenge verifies ownership during the TLS handshake on port 443 by presenting a special certificate, making it more suitable for HTTPS-only environments or when port 80 is blocked.
Prerequisite
For the HTTP challenge you will need:
- A publicly accessible host allowing connections on port
80with Docker and Docker Compose installed. - A DNS record with the domain you want to expose pointing to this host.
Step 0: Configuring DNS Records
Before proceeding, make sure your domain name is correctly configured. Create a DNS A Record that points your domain to the public IP address of your server.
If you don't know what a DNS A Record is, check out this post from Cloudflare.
Step 1: Create ACME File
In this guide, we will store the ACME data in a letsencrypt directory within the folder containing your Docker Compose file. This folder will store your certificates.
mkdir ./letsencrypt
touch ./letsencrypt/acme.json
chmod 600 ./letsencrypt/acme.json
Step 2: Installing and Configuring Traefik
There are multiple ways to set up your Traefik configuration—either directly in the docker-compose.yaml file or by outsourcing it to external configuration files. Find more information here.
In this setup, we will configure the HTTP challenge for Let's Encrypt directly in the docker-compose.yaml file.
docker-compose.yaml
version: "3.3"
services:
  traefik:
    image: "traefik:v3.3"
    container_name: "traefik"
    command:
      - "--api.insecure=true"
      - "--providers.docker=true"
      - "--providers.docker.exposedbydefault=false"
      - "--entryPoints.web.address=:80"
      - "--entryPoints.websecure.address=:443"
      - "--certificatesresolvers.myresolver.acme.httpchallenge=true"
      - "--certificatesresolvers.myresolver.acme.httpchallenge.entrypoint=web"
      - "--certificatesresolvers.myresolver.acme.email=yourmail@example.com"
      - "--certificatesresolvers.myresolver.acme.storage=/letsencrypt/acme.json"
    ports:
      - "80:80"
      - "443:443"
      - "8080:8080"
    volumes:
      - "./letsencrypt:/letsencrypt"
      - "/var/run/docker.sock:/var/run/docker.sock:ro"
Replace yourmail@example.com with your actual email address and whoami.example.com with your domain name.
Step 3: Integrating Let's Encrypt
You can now integrate automatic certification for your apps by ensuring they are configured with Traefik labels to use the myresolver certificate resolver.
  whoami:
    image: "traefik/whoami"
    container_name: "simple-service"
    labels:
      - "traefik.enable=true"
      - "traefik.http.routers.whoami.rule=Host(`whoami.example.com`)"
      - "traefik.http.routers.whoami.entrypoints=websecure"
      - "traefik.http.routers.whoami.tls.certresolver=myresolver"
Step 4: Starting the Services
Start the services with the following command (only works if your working directory is where your docker-compose.yaml file is saved):
docker-compose up -dYou should now be able to access your Whoami application over HTTPS, secured by a Let's Encrypt certificate.
Conclusion
In this guide, we demonstrated how to set up Traefik as a reverse proxy with Let's Encrypt using the HTTP-Challenge to secure a simple Whoami application. By following these steps, you can apply the same configuration to your own services and ensure secure communication with HTTPS.
Middlewares
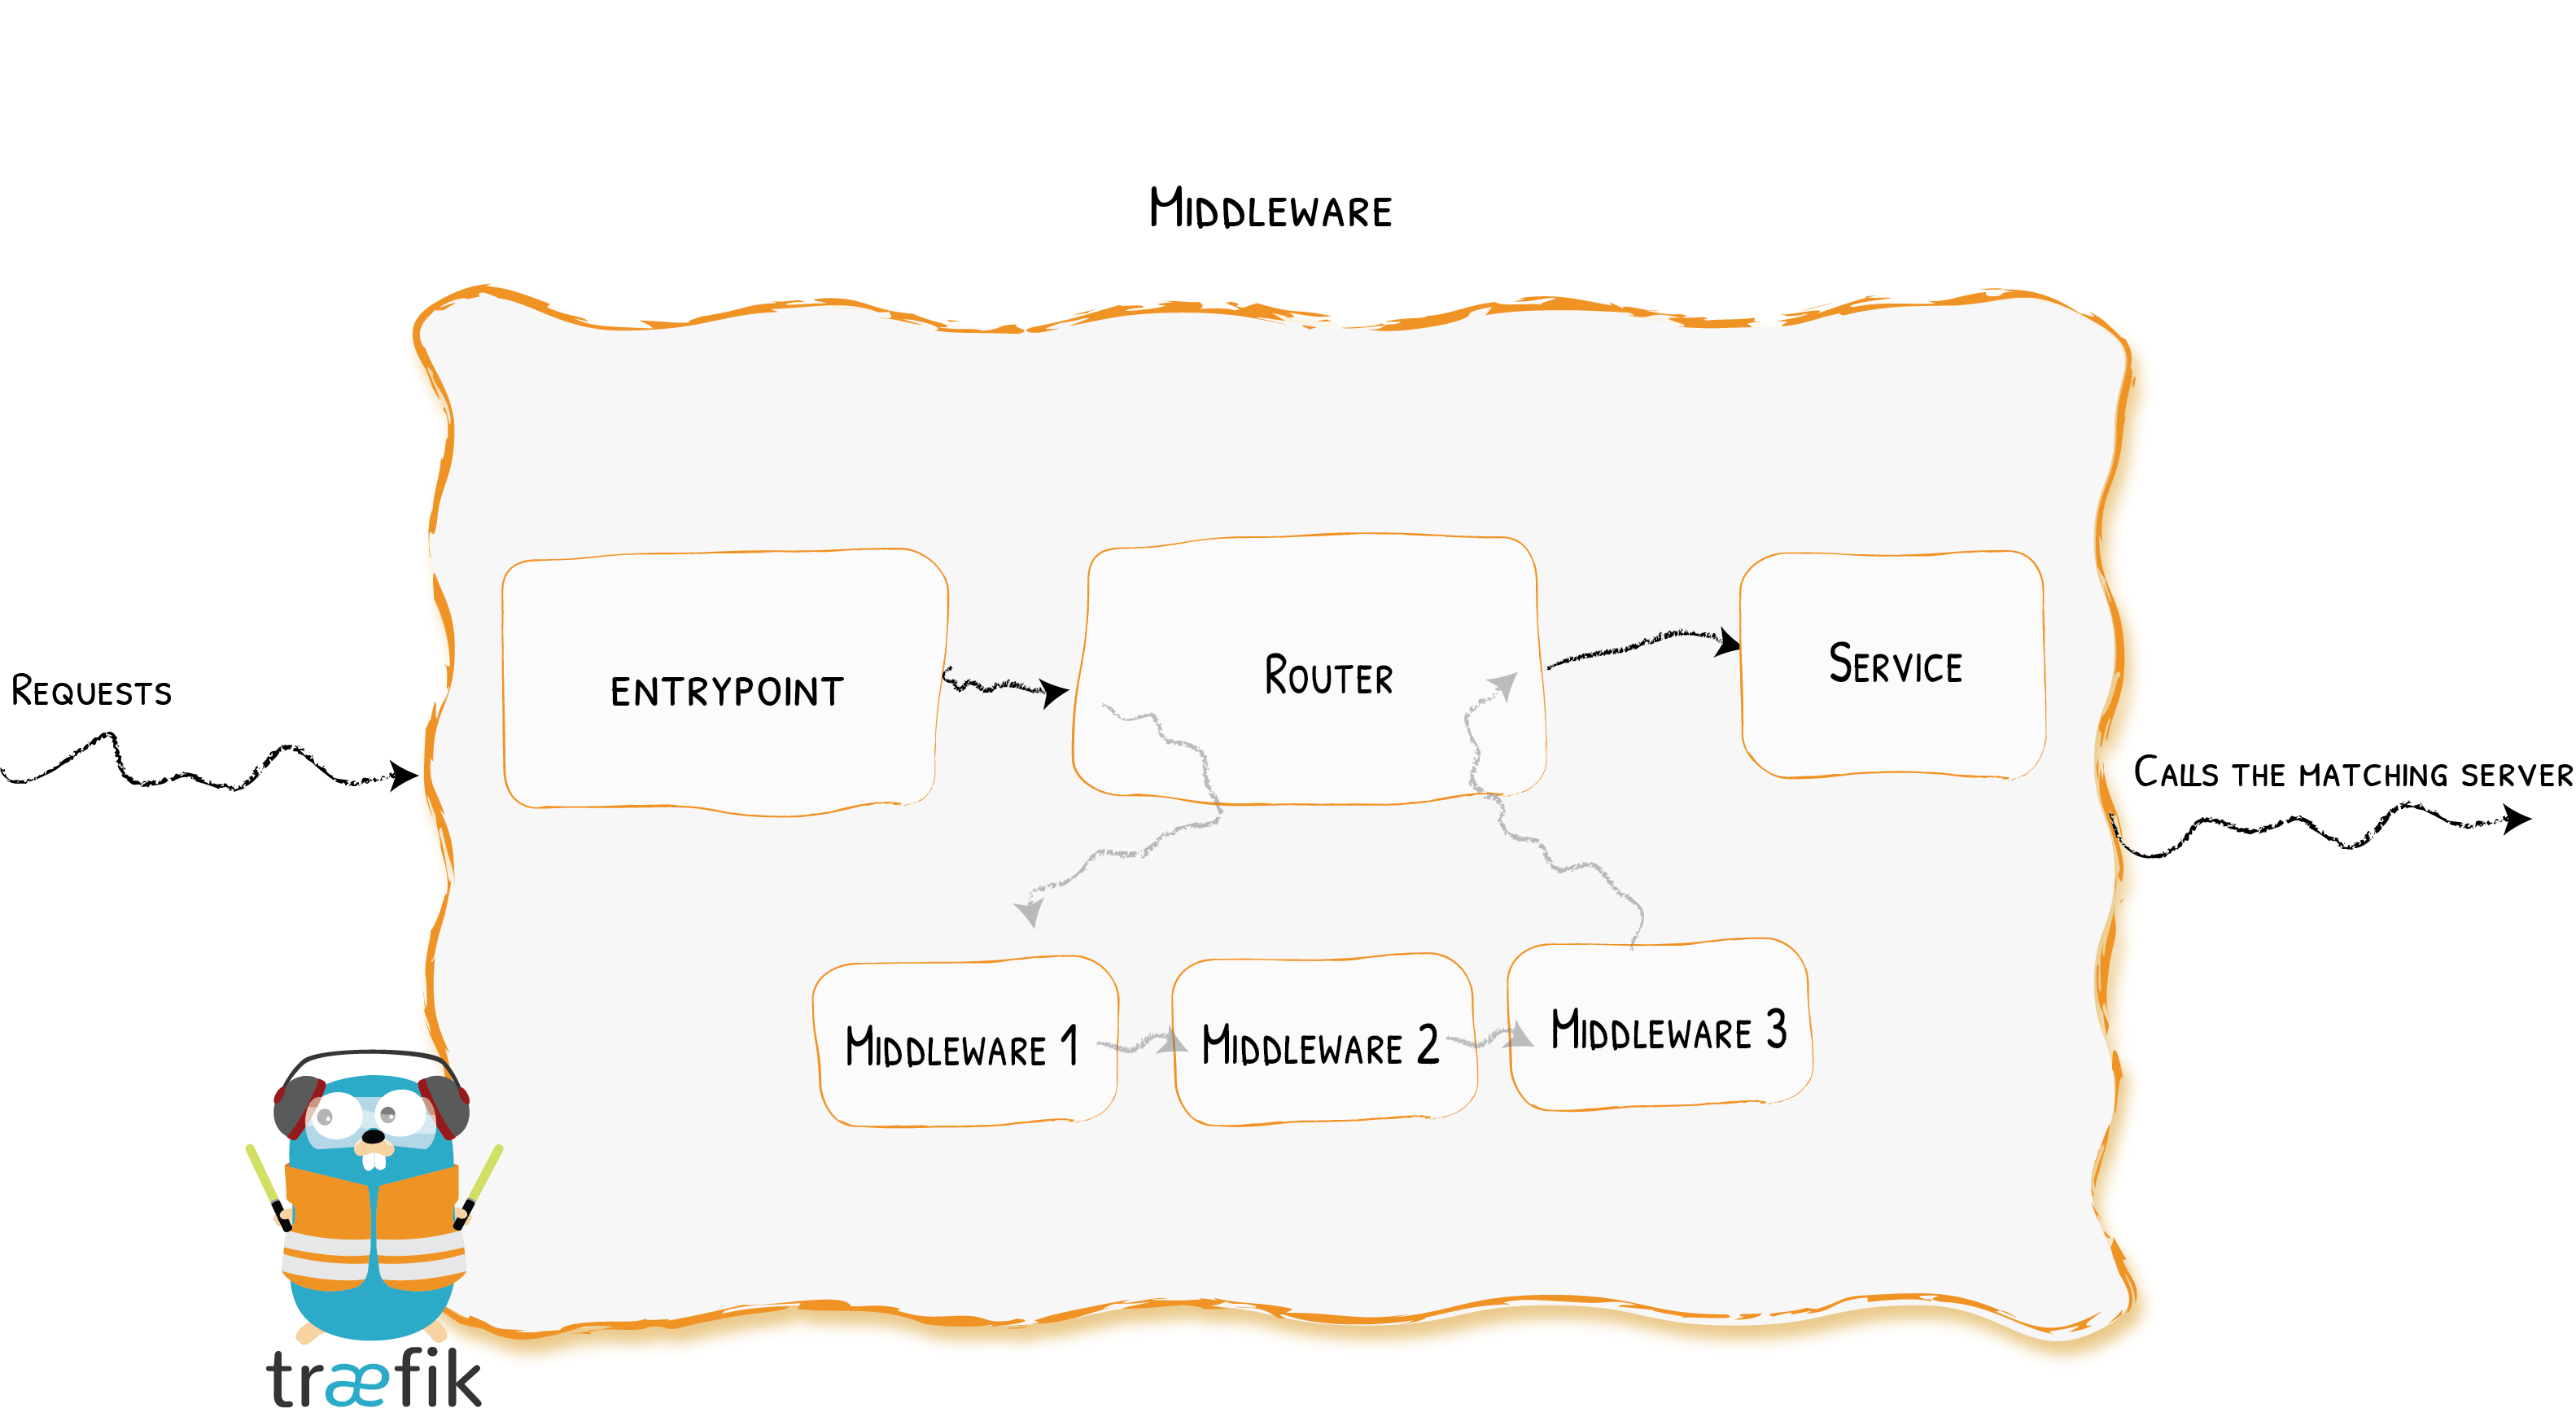
Overview Middlewares
Attached to the routers, pieces of middleware are a means of tweaking the requests before they are sent to your service (or before the answer from the services are sent to the clients).
There are several available middleware in Traefik, some can modify the request, the headers, some are in charge of redirections, some add authentication, and so on.
Middlewares that use the same protocol can be combined into chains to fit every scenario.
Middlewares can be attached to Routers (specific Services) or also added to an Entrypoint. So every Service using this Entrypoint flows through that Middleware.
Available Middlewares
Traefik provides several official middlewares by default. Refer to the documentation for the full list:
Additionally, you can explore the Plugin Catalog, where community-driven middlewares are published.
Configuration Example directly in a docker-compose.yaml
# As a Docker Label
whoami:
  # A container that exposes an API to show its IP address
  image: traefik/whoami
  labels:
    # Create a middleware named `foo-add-prefix`
    - "traefik.http.middlewares.foo-add-prefix.addprefix.prefix=/foo"
    # Apply the middleware named `foo-add-prefix` to the router named `router1`
    - "traefik.http.routers.router1.middlewares=foo-add-prefix@docker"
Configuration Example in an external dynamic.yml
http:
  routers:
    router1:
      service: myService
      middlewares:
        - "foo-add-prefix"
      rule: "Host(`example.com`)"

  middlewares:
    foo-add-prefix:
      addPrefix:
        prefix: "/foo"

  services:
    service1:
      loadBalancer:
        servers:
          - url: "http://127.0.0.1:80"
Configuration Example in a dynamic.toml
[http.routers]
  [http.routers.router1]
    service = "myService"
    middlewares = ["foo-add-prefix"]
    rule = "Host(`example.com`)"

[http.middlewares]
  [http.middlewares.foo-add-prefix.addPrefix]
    prefix = "/foo"

[http.services]
  [http.services.service1]
    [http.services.service1.loadBalancer]

      [[http.services.service1.loadBalancer.servers]]
        url = "http://127.0.0.1:80"
HTTP Middlewares Overview
HTTP Middlewares in Traefik let you modify requests and responses on the fly. You can configure them in multiple ways (Docker labels, TOML, YAML, etc.).
Configuration Example in a docker-compose.yaml
Configuration Example in a docker-compose.yaml
# As a Docker Label
whoami:
  # A container that exposes an API to show its IP address
  image: traefik/whoami
  labels:
    # Create a middleware named `foo-add-prefix`
    - "traefik.http.middlewares.foo-add-prefix.addprefix.prefix=/foo"
    # Apply the middleware named `foo-add-prefix` to the router named `router1`
    - "traefik.http.routers.router1.middlewares=foo-add-prefix@docker"
Configuration Example in a dynamic.toml
Configuration Example in a dynamic.toml
[http.routers]
  [http.routers.router1]
    service = "service1"
    middlewares = ["foo-add-prefix"]
    rule = "Host(`example.com`)"

[http.middlewares]
  [http.middlewares.foo-add-prefix.addPrefix]
    prefix = "/foo"

[http.services]
  [http.services.service1]
    [http.services.service1.loadBalancer]

      [[http.services.service1.loadBalancer.servers]]
        url = "http://127.0.0.1:80"
Configuration Example in a dynamic.yml
Configuration Example in a dynamic.yml
http:
  routers:
    router1:
      service: service1
      middlewares:
        - "foo-add-prefix"
      rule: "Host(`example.com`)"

  middlewares:
    foo-add-prefix:
      addPrefix:
        prefix: "/foo"

  services:
    service1:
      loadBalancer:
        servers:
          - url: "http://127.0.0.1:80"
Available HTTP Middlewares
| Middleware | Purpose | Area |
|---|---|---|
| AddPrefix | Adds a Path Prefix | Path Modifier |
| BasicAuth | Adds Basic Authentication | Security, Authentication |
| Buffering | Buffers the request/response | Request Lifecycle |
| Chain | Combines multiple pieces of middleware | Misc |
| CircuitBreaker | Prevents calling unhealthy services | Request Lifecycle |
| Compress | Compresses the response | Content Modifier |
| ContentType | Handles Content-Type auto-detection | Misc |
| DigestAuth | Adds Digest Authentication | Security, Authentication |
| Errors | Defines custom error pages | Request Lifecycle |
| ForwardAuth | Delegates Authentication | Security, Authentication |
| Headers | Adds / Updates headers | Security |
| IPAllowList | Limits the allowed client IPs | Security, Request lifecycle |
| InFlightReq | Limits the number of simultaneous connections | Security, Request lifecycle |
| PassTLSClientCert | Adds Client Certificates in a Header | Security |
| RateLimit | Limits the call frequency | Security, Request lifecycle |
| RedirectScheme | Redirects based on scheme | Request lifecycle |
| RedirectRegex | Redirects based on regex | Request lifecycle |
| ReplacePath | Changes the path of the request | Path Modifier |
| ReplacePathRegex | Changes the path of the request | Path Modifier |
| Retry | Automatically retries in case of error | Request lifecycle |
| StripPrefix | Changes the path of the request | Path Modifier |
| StripPrefixRegex | Changes the path of the request | Path Modifier |
For even more options, check out the community-contributed plugins in the plugin catalog.
TCP Middlewares Overview
TCP Middlewares in Traefik let you manage connections on the fly. You can configure them in multiple ways (Docker labels, TOML, YAML, etc.).
Configuration Example in a docker-compose.yaml
Configuration Example in a docker-compose.yaml
# As a Docker Label
whoami:
  # A container that exposes an API to show its IP address
  image: traefik/whoami
  labels:
    # Create a middleware named `foo-ip-allowlist`
    - "traefik.tcp.middlewares.foo-ip-allowlist.ipallowlist.sourcerange=127.0.0.1/32, 192.168.1.7"
    # Apply the middleware named `foo-ip-allowlist` to the router named `router1`
    - "traefik.tcp.routers.router1.middlewares=foo-ip-allowlist@docker"
Configuration Example in a dynamic.yml
Configuration Example in a dynamic.yml
tcp:
  routers:
    router1:
      service: myService
      middlewares:
        - "foo-ip-allowlist"
      rule: "Host(`example.com`)"

  middlewares:
    foo-ip-allowlist:
      ipAllowList:
        sourceRange:
          - "127.0.0.1/32"
          - "192.168.1.7"

  services:
    service1:
      loadBalancer:
        servers:
          - address: "10.0.0.10:4000"
          - address: "10.0.0.11:4000"
Available TCP Middlewares
| Middleware | Purpose | Area |
|---|---|---|
| InFlightConn | Limits the number of simultaneous connections. | Security, Request lifecycle |
| IPAllowList | Limit the allowed client IPs. | Security, Request lifecycle |
Plugins
Plugin Catalog
Plugin Catalog
The Traefik Plugin Catalog is a centralized marketplace where community members can share their own custom middleware solutions for the Traefik Proxy. By leveraging this catalog, you can easily discover, install, and configure third-party plugins to enhance or extend Traefik's core features. These plugins are created and maintained by the community, which means a wide variety of innovative solutions are available to address different needs.
Explore the full list of plugins at plugins.traefik.io/plugins and consider contributing your own solutions or providing feedback on existing ones. Whether you're looking for specialized middleware or simply want to see what's possible, the Plugin Catalog is an invaluable resource for any Traefik user.

Cloudflare Plugin (Allow only CF-Traffic to your Server)

Overview
This plugin ensures that incoming requests must originate from Cloudflare’s network (or other CIDRs that you explicitly allow). It is particularly useful when you only want Cloudflare-proxied traffic to reach your services. By using Cloudflare’s IP ranges, the plugin can block all other sources of traffic and help enhance security.
Plugin Page
Requirements
- A working Traefik setup (for instance, Traefik Reverse Proxy for Docker Swarm ).
- A valid DNS-01 Challenge configuration with Cloudflare to manage certificates (see Docker Compose with Let's Encrypt DNS Challenge ).
With these prerequisites in place, you can integrate the Cloudflare plugin to filter and rewrite traffic so that only Cloudflare IP ranges can access your services through Traefik.
Features
- 🌐 Only allow traffic originating from Cloudflare IP v4 and v6
- 🛡️ Custom CIDRs list can be added to allow requests not from Cloudflare
- ♻️ Refresh Cloudflare CIDRs from the Cloudflare API
- ⚙️ Handle
X-Forwarded-Fororiginal header to allow Cloudflare requests from a trusted reverse proxy behind Traefik - 🛠️ Rewrite requests
X-Forwarded-Forheader with the user IP provided byCF-Connecting-IP - 🌎 Rewrite requests
X-Forwarded-Protoheader with the scheme provided byCF-Visitor - 📡 Rewrite requests
X-Real-IPheader with the user IP provided byCF-Connecting-IP - 🔒 Rewrite
RemoteAddressto permit Traefik ipwhitelist middleware to work on IP provided byCF-Connecting-IP
Configuration
Plugin Options
| Key | Type | Default | Description |
|---|---|---|---|
trustedCIDRs |
[]string |
[] |
Requests coming from a source not matching any of these CIDRs will be terminated with a 403. If empty, it is populated with Cloudflare’s CIDRs. |
allowedCIDRs |
[]string |
[] |
Requests coming from a source matching any of these CIDRs will not be terminated with a 403 and no overwrite of request header append. |
refreshInterval |
time.Duration |
24h |
When trustedCIDRs is empty, Cloudflare’s CIDRs will be refreshed after this duration. Using a value of 0 seconds disables the refresh. |
overwriteRequestHeader |
bool |
true |
When true, the request’s header is rewritten. When false, any header or Traefik RemoteAddress is modified, filtering only the request from Cloudflare IP. |
appendXForwardedFor |
bool |
false |
Works only when overwriteRequestHeader is true. When true, prepend Cloudflare IP to X-Forwarded-For instead of replacing the first value. |
debug |
bool |
false |
Output debug messages in Traefik logs. |
Traefik Static Configuration
experimental:
  plugins:
    cloudflare:
      moduleName = "github.com/agence-gaya/traefik-plugin-cloudflare"
      version = "v1.2.0"
Where to Add This?
In your static configuration file (for instance, static.yaml or static.toml), add the above lines under the experimental section to enable the plugin. Ensure Traefik is restarted or reloaded to pick up these changes.
Dynamic Configuration
To configure and instantiate the plugin, you need a dynamic configuration file as well. This can be in YAML, TOML, or another format supported by Traefik.
http:
  middlewares:
    cloudflare:
      plugin:
        cloudflare:
          trustedCIDRs: []
          overwriteRequestHeader: true

  routers:
    foo-router:
      rule: Path(`/foo`)
      service: foo-service
      entryPoints:
        - web
      middlewares:
        - cloudflare
Step-by-Step: Creating a http.plugins.yaml File
- Create a dedicated file at
/mnt/glustermount/data/traefik_data/dynamic/http.plugins.yaml(or a suitable location). - Paste the dynamic configuration for the plugin into this file. For example:
http: middlewares: cloudflare: plugin: cloudflare: trustedCIDRs: [] allowedCIDRs: [] refreshInterval: 24h overwriteRequestHeader: true appendXForwardedFor: false debug: false routers: foo-router: rule: Path(`/foo`) service: foo-service entryPoints: - web middlewares: - cloudflare services: foo-service: loadBalancer: servers: - url: "http://127.0.0.1:8080" - Reference this dynamic file in your Traefik static configuration (e.g.,
--providers.file.filename=/mnt/glustermount/data/traefik_data/dynamic/http.plugins.yaml). - Restart or reload Traefik to apply these changes.
Verifying the Plugin Works
To ensure that the plugin is blocking traffic not coming from Cloudflare, you can attempt a cURL request from a source IP that is not one of Cloudflare’s documented IP ranges:
curl -kH "Host: test.aeoneros.com" https://<public-ip>
You should receive a 403 (Forbidden) response if your IP is not allowed. If you route through Cloudflare, the request should pass normally.
Middleware Plugins in Traefik
Once loaded, these plugins behave like statically compiled middlewares. Their instantiation and behavior are driven by the dynamic configuration. For example, you can add multiple plugins in the experimental section of your static config, and then configure them in your dynamic config similarly to built-in middlewares.
Visit the Traefik Plugin Catalog for more community-contributed plugins.
Observability
Logrotation for Log & AccessLog
Introduction
This post is about enabling log rotation for the Traefik access.log and traefik.log. Some information is sourced from this post, with additional insights by Aeoneros.
Traefik will close and reopen its log files, assuming they’re configured, upon receiving a USR1 signal. This enables the logs to be rotated and processed by external programs like logrotate. However, this does not work on Windows due to the lack of USR signals.
The access.log and traefik.log require proper setup to ensure efficient log management. Below are the steps to manually create log rotation for these logs.
Step 1: Configure the Paths for Logs
In your Traefik static configuration file (e.g., traefik.toml), define the file paths for the logs. For example:
[accessLog]
  filePath = "/mnt/glustermount/data/traefik_data/access.log"

[log]
  filePath = "/mnt/glustermount/data/traefik_data/traefik.log"
Refer to the official documentation for access logs and general logs.
Step 2: Install Logrotate
Ensure the logrotate package is installed on your Debian-based system. Install it if necessary:
sudo apt update
sudo apt install logrotate
Step 3: Create a Logrotate File
Create a new configuration file for Traefik log rotation:
sudo nano /etc/logrotate.d/traefikStep 4: Configure Logrotate
Paste the following content into the file:
/mnt/glustermount/data/traefik_data/access.log
/mnt/glustermount/data/traefik_data/traefik.log {
  compress
  create 0640 root root
  daily
  delaycompress
  missingok
  notifempty
  rotate 5
  postrotate
    # Send USR1 signal to reopen logs
    docker kill --signal=USR1 $(docker ps --filter "name=traefik_traefik" --format "{{.ID}}")
    # Pause to give Traefik time to process the signal
    sleep 5
    # Verify that Traefik is writing to the correct log files
    if [ -s /mnt/glustermount/data/traefik_data/access.log.1 ] || [ -s /mnt/glustermount/data/traefik_data/traefik.log.1 ]; then
      # Restart service if still writing to the rotated file
      docker service update --force traefik_traefik
    fi
  endscript
}Explanation:
- The
postrotatescript first sends aUSR1signal to Traefik to reopen its log files. - If Traefik continues writing to the rotated files, it restarts the container using
docker service update --force. - This ensures that both logs are properly rotated and written to their new files.
Step 5: Debugging Logrotate
Test your logrotate configuration in debug mode:
sudo logrotate -d /etc/logrotate.d/traefikStep 6: Force Logrotate
Force log rotation to execute the script:
sudo logrotate -f /etc/logrotate.d/traefikStep 7: Verify Log Rotation
Check if new files were created and if Traefik is writing to the correct log files:
ls -lh /mnt/glustermount/data/traefik_data/*.log*
tail -f /mnt/glustermount/data/traefik_data/access.log
tail -f /mnt/glustermount/data/traefik_data/traefik.log
Troubleshooting
If nothing is working, revert the changes by following these steps:
- Rename or delete the logrotate file:
sudo mv /etc/logrotate.d/traefik /etc/logrotate.d/traefik.bak- Edit the logrotate status file to remove entries related to the logs:
sudo nano /var/lib/logrotate/status- Look for and remove entries related to
/mnt/glustermount/data/traefik_data/access.logand/mnt/glustermount/data/traefik_data/traefik.log.
Reapply the steps once the issue is resolved.