Practical Guides: HTTPS with Let's Encrypt
- Docker-compose with Let's Encrypt: TLS Challenge
- Docker-compose with Let's Encrypt: DNS Challenge & Cloudflare (Recommended)
- Docker-compose with Let's Encrypt : HTTP Challenge
Docker-compose with Let's Encrypt: TLS Challenge

Introduction
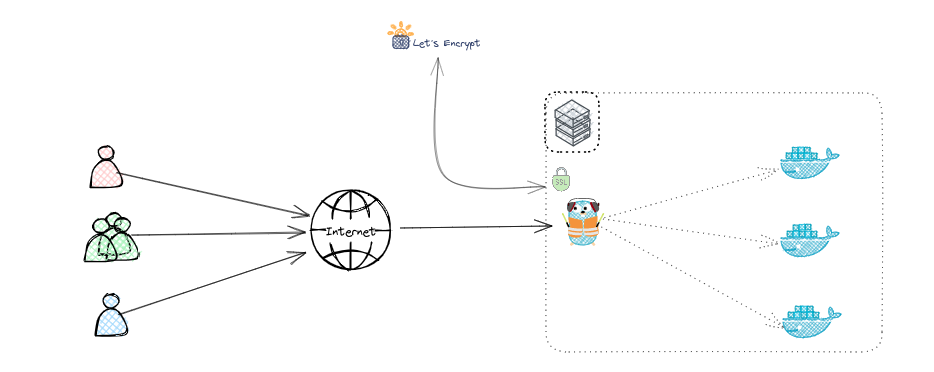
This guide provides information on how to set up a simple TLS-Challenge for Traefik to use Let's Encrypt and certify your domains/websites. We will configure Traefik to act as a reverse proxy for a simple "Whoami" application and secure the app using Let's Encrypt.
Understanding TLS: Check this guide.
Understanding Let's Encrypt: Check this guide.
Overview of TLS-Challenge
The TLS-ALPN-01 challenge is a method used by Let's Encrypt to verify domain ownership. Instead of using the HTTP challenge, it leverages the TLS handshake to validate the domain. This is especially useful for environments where port 80 is blocked or cannot be used.
Difference Between HTTP-Challenge & TLS-Challenge
The HTTP Challenge uses HTTP requests on port 80 to verify domain ownership by serving a specific file at http://your-domain/.well-known/acme-challenge/. The TLS Challenge verifies ownership during the TLS handshake on port 443 by presenting a special certificate, making it more suitable for HTTPS-only environments or when port 80 is blocked.
Prerequisite
For the TLS challenge you will need:
- A publicly accessible host allowing connections on port
443with docker & docker-compose installed. - A DNS record with the domain you want to expose pointing to this host.
Step 0: Configuring DNS Records
Before proceeding, make sure your domain name is correctly configured. Create a DNS A Record that points your domain to the public IP address of your server.
If you don't know what a DNS A Record is, check out this post from Cloudflare.
Step 1: Create ACME File
In this guide, we will use GlusterFS (only needed when using Docker Swarm).
Feel free to adjust your paths as needed.
mkdir ./letsencrypt
touch ./letsencrypt/acme.json
chmod 600 ./letsencrypt/acme.json
Step 2: Installing and Configuring Traefik
There are multiple ways to set up your Traefik configuration—either directly in the docker-compose.yaml file or by outsourcing it to external configuration files. Find more information here.
In this step, we provide the option traefik.http.routers.traefik.middlewares=authtraefik, which is optional but highly recommended to secure your Traefik dashboard with login authentication. Check out the Traefik documentation for more information.
docker-compose.yaml
version: '3.8'
services:
  traefik:
    image: "traefik:v3.3"
    container_name: traefik
    hostname: traefik
    command:
      - --entrypoints.web.address=:80
      - --entrypoints.websecure.address=:443
      - --providers.docker
      - --providers.docker.exposedByDefault=false
      - --api
      - --certificatesresolvers.le.acme.email=your-email@example.com
      - --certificatesresolvers.le.acme.storage=/letsencrypt/acme.json
      - --certificatesresolvers.le.acme.tlschallenge=true
      - --log.level=ERROR
      - --accesslog=true
    ports:
      - 80:80
      - 443:443
    volumes:
      - "/var/run/docker.sock:/var/run/docker.sock:ro"
      - "./letsencrypt:/letsencrypt"
    labels:
      - "traefik.enable=true"
      - "traefik.http.routers.traefik.rule=Host(traefik.example.com)"
      - "traefik.http.routers.traefik.service=api@internal"
      - "traefik.http.routers.traefik.tls=true"
      - "traefik.http.routers.traefik.tls.certresolver=le"
      - "traefik.http.routers.traefik.entrypoints=websecure"
      - "traefik.http.routers.traefik.middlewares=authtraefik"
      - "traefik.http.middlewares.authtraefik.basicauth.users=your-user:$$your-password"
    restart: unless-stopped
Replace your-email@example.com with your actual email address and traefik.example.com with your Traefik dashboard domain name.
Step 3: Integrating Let's Encrypt
You can now integrate automatic certification for your apps by adding configurations to the docker-compose.yaml file for the Whoami app:
  whoami:
    image: containous/whoami
    restart: always
    labels:
      - "traefik.enable=true"
      - "traefik.http.routers.whoami.rule=Host(whoami.example.com)"
      - "traefik.http.routers.whoami.entrypoints=websecure"
      - "traefik.http.routers.whoami.tls=true"
      - "traefik.http.routers.whoami.tls.certresolver=le"
      - "traefik.http.routers.whoami.service=whoami"
      - "traefik.http.routers.whoami.priority=100"
      - "traefik.http.services.whoami.loadbalancer.server.port=80"
Remember to replace whoami.example.com with your actual domain name.
Step 4: Starting the Services
Start the services with the following command (only works if your working directory is where your docker-compose.yaml file is saved):
docker-compose up -dYou should now be able to access your Whoami application over HTTPS, secured by a Let's Encrypt certificate.
Conclusion
In this guide, we demonstrated how to set up Traefik as a reverse proxy with Let's Encrypt TLS-Challenge to secure a simple Whoami application. By following these steps, you can easily apply the same configuration to your own services and ensure secure communication with HTTPS.
Docker-compose with Let's Encrypt: DNS Challenge & Cloudflare (Recommended)
Introduction
This guide aims to demonstrate how to create a certificate with the Let's Encrypt DNS-01 Challenge to use HTTPS on a simple service exposed with Traefik.
Why Use DNS-01 Challenge Instead of TLS?
Using the DNS-01 Challenge instead of TLS-ALPN-01 provides several advantages:
- Wildcard Certificates: DNS-01 is the only challenge type that supports wildcard domains (e.g.,
*.example.com), simplifying the management of multiple subdomains. - No Open Ports Required: Unlike TLS-ALPN, DNS-01 doesn’t rely on ports 443 or 80 being open, offering better security and flexibility for non-web services.
- Multi-Server and Complex Setups: DNS-01 works in distributed or multi-server environments without requiring direct communication from Let's Encrypt to each server.
- Behind Proxies or Firewalls: Ideal for servers behind NAT, private networks, or reverse proxies where direct access to the server is limited.
Overview of DNS-01 Challenge
The DNS-01 Challenge is a method used by Let's Encrypt to verify domain ownership by creating a specific DNS TXT record for the domain. This challenge is particularly useful for issuing wildcard certificates (*.example.com), securing services that are not publicly accessible, and environments where direct access to ports 80 or 443 is not possible. It provides flexibility and higher security, especially when combined with automated DNS providers like Cloudflare.
Prerequisite
- A publicly accessible host allowing connections on port
443with Docker and Docker Compose installed. - A working DNS provider (e.g., Cloudflare) with credentials to create and remove DNS records.
- If you use a 3rd-party hosting provider, make sure your domain uses Cloudflare's nameservers. Learn more about changing nameservers in this guide.
Step 0: Add Domain to Cloudflare
To add your domain to the Cloudflare dashboard, follow Cloudflare's full setup guide: Cloudflare Guide.
Step 1: Change Nameservers to Cloudflare
Log in to your hosting provider's control panel and change your domain's nameservers to Cloudflare's. This process may take up to 24 hours to propagate. For more information or an Example, check this guide.
When changing the NS, most Hosting Providers take up to 24h to update them.
Make Sure to ask your Hoster for more Informations
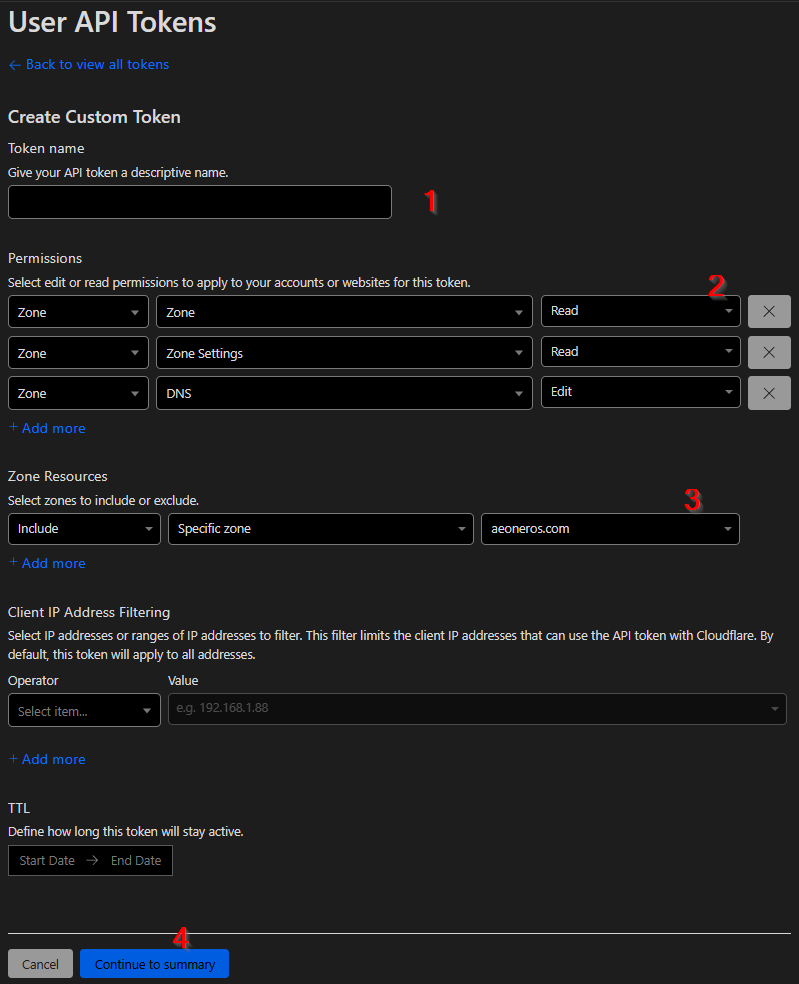
Step 2: Create a Custom Cloudflare API Token
Log in to Cloudflare and navigate to API Tokens. Click "Create Token".

Steps to create the token:
- Give your token a descriptive name (e.g., "Homelab Traefik API-Token").
- Set the permissions as shown in the example image (Zone → Zone [Read], Zone → Zone Settings [Read], Zone → DNS [Edit]).
- Select your domain.
- Click "Continue to Summary" and create the token.
What Does These Permissions do?
Zone → Zone (Read):
Allows read-only access to basic information about the specified zone (e.g., DNS records, configuration, status, etc.).
Zone → Zone Settings (Read):
Grants read-only access to view the zone’s settings (e.g., SSL/TLS settings, security settings, and performance configurations).
Zone → DNS (Edit):
Allows full control over DNS records in the specified zone. This means you can create, edit, and delete DNS records.
Step 3: Create a Local API Token File
In This Step you could also Work with Docker Secrets. I did not get it Working with the Docker Secret, that why i put it in a File. If you want to use a Docker Secret, please visit Official Docker Docs: https://docs.docker.com/compose/how-tos/use-secrets/
Go to your Traefik folder and create a file to store your Cloudflare API token securely:
nano ./traefik_data/cloudflare_api_tokenPaste your token in the file, then save and close it (CTRL+O, CTRL+X).
Step 4: Create the ACME.json File
The acme.json file stores Let's Encrypt certificates, keys, and account information in JSON format for Traefik's ACME integration.
Ensure the file is created and secured with the Rights 600:
mkdir ./letsencrypt
touch ./letsencrypt/acme.json
chmod 600 ./letsencrypt/acme.json
Step 5: Adjust Your Traefik Docker-Compose File
In This Step you could also Work with Docker Secrets. I did not get it Working with the Docker Secret, that why i put it in a File. If you want to use a Docker Secret, please visit Official Docker Docs: https://docs.docker.com/compose/how-tos/use-secrets/
Mount your Cloudflare API token file and set the appropriate environment variables:
Example Docker Compose Configuration:
services:
  traefik:
    image: "traefik:v3.3"
    volumes:
      - "./traefik_data/cloudflare_api_token:/cloudflare_api_token:ro"
      - "./letsencrypt:/letsencrypt"
    environment:
      - TZ=Europe/Zurich
      - CF_API_EMAIL=yourmail@example.com
      - CF_DNS_API_TOKEN_FILE=/cloudflare_api_token
Step 6: Adjust your Traefik Config
You can also use a static.yaml or static.toml file for this configuration. Check out this guide for more information.
You can Change the Value "leresolver" to your own Resolvername. Make sure to adjust your Traefik Router Labels/Settings.
Make Sure to Adjust the Variable "yourmail@example.com" to your actual Email.
Example for Traefik CLI:
    command:
      - --certificatesresolvers.leresovler.acme.email=yourmail@example.com
      - --certificatesresolvers.leresovler.acme.storage=/letsencrypt/acme.json
      - --certificatesresolvers.myresolver.acme.caserver=https://acme-v02.api.letsencrypt.org/directory
      - --certificatesresolvers.myresolver.acme.dnschallenge.provider=cloudflare
      - --certificatesresolvers.leresovler.acme.dnschallenge.delaybeforecheck=0
      - --certificatesresolvers.leresovler.acme.dnschallenge.resolvers=1.1.1.1:53,1.0.0.1:53,8.8.8.8:53
Example for a static.yaml:
certificatesResolvers:
  leresovler:
    acme:
      email: 'yourmail@example.com'
      storage: '/letsencrypt/acme.json'
      caServer: 'https://acme-v02.api.letsencrypt.org/directory'
      dnsChallenge:
        provider: 'cloudflare'
        delayBeforeCheck: '0'
        resolvers:
          - '1.1.1.1:53'
          - '1.0.0.1:53'
          - '8.8.8.8:53'
Example for static.toml:
[certificatesResolvers.leresolver.acme]
  email = "yourmail@example.com"
  storage = "/letsencrypt/acme.json"
  caServer = "https://acme-v02.api.letsencrypt.org/directory"

  [certificatesResolvers.leresolver.acme.dnsChallenge]
    provider = "cloudflare"
    delayBeforeCheck = 0
    resolvers = ["1.1.1.1:53", "1.0.0.1:53", "8.8.8.8:53"]
Step 7: Restart Traefik
Restart Traefik and make sure your application routers are configured to use the leresolver for certificate generation.
Have fun Troubbleshooting. You can Change your Traefik-Log-Level to DEBUG for further Troubbleshooting.
Additional Tips
To improve security, you can add a plugin to allow only Cloudflare traffic to access your services. Check out this guide.
Docker-compose with Let's Encrypt : HTTP Challenge
Introduction
This guide provides information on how to set up a simple HTTP-Challenge for Traefik to use Let's Encrypt and certify your domains/websites. We will configure Traefik to act as a reverse proxy for a simple "Whoami" application and secure the app using Let's Encrypt.
Understanding Let's Encrypt: Check this guide.
Overview of HTTP-Challenge
The HTTP-01 challenge is a method used by Let's Encrypt to verify domain ownership. Let's Encrypt requests a specific file to be available at http://your-domain/.well-known/acme-challenge/. Traefik serves this file, and Let's Encrypt verifies its presence to confirm domain ownership.
Difference Between HTTP-Challenge & TLS-Challenge
The HTTP Challenge uses HTTP requests on port 80 to verify domain ownership by serving a specific file at http://your-domain/.well-known/acme-challenge/. The TLS Challenge verifies ownership during the TLS handshake on port 443 by presenting a special certificate, making it more suitable for HTTPS-only environments or when port 80 is blocked.
Prerequisite
For the HTTP challenge you will need:
- A publicly accessible host allowing connections on port
80with Docker and Docker Compose installed. - A DNS record with the domain you want to expose pointing to this host.
Step 0: Configuring DNS Records
Before proceeding, make sure your domain name is correctly configured. Create a DNS A Record that points your domain to the public IP address of your server.
If you don't know what a DNS A Record is, check out this post from Cloudflare.
Step 1: Create ACME File
In this guide, we will store the ACME data in a letsencrypt directory within the folder containing your Docker Compose file. This folder will store your certificates.
mkdir ./letsencrypt
touch ./letsencrypt/acme.json
chmod 600 ./letsencrypt/acme.json
Step 2: Installing and Configuring Traefik
There are multiple ways to set up your Traefik configuration—either directly in the docker-compose.yaml file or by outsourcing it to external configuration files. Find more information here.
In this setup, we will configure the HTTP challenge for Let's Encrypt directly in the docker-compose.yaml file.
docker-compose.yaml
version: "3.3"
services:
  traefik:
    image: "traefik:v3.3"
    container_name: "traefik"
    command:
      - "--api.insecure=true"
      - "--providers.docker=true"
      - "--providers.docker.exposedbydefault=false"
      - "--entryPoints.web.address=:80"
      - "--entryPoints.websecure.address=:443"
      - "--certificatesresolvers.myresolver.acme.httpchallenge=true"
      - "--certificatesresolvers.myresolver.acme.httpchallenge.entrypoint=web"
      - "--certificatesresolvers.myresolver.acme.email=yourmail@example.com"
      - "--certificatesresolvers.myresolver.acme.storage=/letsencrypt/acme.json"
    ports:
      - "80:80"
      - "443:443"
      - "8080:8080"
    volumes:
      - "./letsencrypt:/letsencrypt"
      - "/var/run/docker.sock:/var/run/docker.sock:ro"
Replace yourmail@example.com with your actual email address and whoami.example.com with your domain name.
Step 3: Integrating Let's Encrypt
You can now integrate automatic certification for your apps by ensuring they are configured with Traefik labels to use the myresolver certificate resolver.
  whoami:
    image: "traefik/whoami"
    container_name: "simple-service"
    labels:
      - "traefik.enable=true"
      - "traefik.http.routers.whoami.rule=Host(`whoami.example.com`)"
      - "traefik.http.routers.whoami.entrypoints=websecure"
      - "traefik.http.routers.whoami.tls.certresolver=myresolver"
Step 4: Starting the Services
Start the services with the following command (only works if your working directory is where your docker-compose.yaml file is saved):
docker-compose up -dYou should now be able to access your Whoami application over HTTPS, secured by a Let's Encrypt certificate.
Conclusion
In this guide, we demonstrated how to set up Traefik as a reverse proxy with Let's Encrypt using the HTTP-Challenge to secure a simple Whoami application. By following these steps, you can apply the same configuration to your own services and ensure secure communication with HTTPS.