HTTPS & TLS
- Overview HTTPS & TLS
- How SSL Certificates Work: A Breakdown
- Let's Encrypt: How does it Work? & More
- TLS: How does it Work? & More
- Setting up Self-Signed Multiple FQDN Certificates for Local Services in Traefik
Overview HTTPS & TLS

Traefik supports HTTPS & TLS, which concerns roughly two parts of the configuration:
- Routers: Define how HTTPS traffic is handled.
- TLS Connection: Manage certificates and TLS-specific settings.
For Automated Certification Check this post:
https://wiki.aeoneros.com/books/traefik-reverse-proxy-for-docker-swarm/page/lets-encrypt
Configuring HTTPS in Routers
When a router needs to handle HTTPS traffic, it should include a tls field in its definition. For detailed instructions, refer to the TLS section of the routers documentation.
Managing TLS Connections
To configure the TLS connection itself, you need to:
- Obtain TLS Certificates: This can be done either through:
- Dynamic Configuration: Define certificates directly in your dynamic configuration files.
- Let’s Encrypt (ACME): Automate certificate generation and renewal. Refer to Let’s Encrypt (ACME) Wiki Post for more details.
- Configure TLS Options: Set security policies like minimum TLS version and cipher suites.
- Manage Certificate Stores: Store and retrieve certificates used in TLS connections.
Example: Configuring HTTPS in a Router
http:
  routers:
    secure-router:
      rule: "Host(`example.com`)"
      entryPoints:
        - websecure
      service: my-service
      tls:
        certResolver: "myresolver"
Example: Defining Certificates in Dynamic Configuration
tls:
  certificates:
    - certFile: "/path/to/cert.crt"
      keyFile: "/path/to/cert.key"
Example: Using Let’s Encrypt with ACME
certificatesResolvers:
  myresolver:
    acme:
      email: "your-email@domain.com"
      storage: "/acme.json"
      httpChallenge:
        entryPoint: "web"
TLS Options Example
tls:
  options:
    default:
      minVersion: VersionTLS12
      cipherSuites:
        - TLS_ECDHE_RSA_WITH_AES_128_GCM_SHA256
        - TLS_ECDHE_RSA_WITH_AES_256_GCM_SHA384
For a deeper dive into certificate management, TLS options, and other HTTPS configurations, see the official Traefik documentation.
How SSL Certificates Work: A Breakdown

What is SSL?
SSL stands for Secure Sockets Layer, a protocol for encrypting, securing, and authenticating communications on the Internet. Although SSL has been replaced by TLS (Transport Layer Security), the term "SSL" is still widely used to describe this technology.
Primary Use Cases
- Securing communications between a client and a server (e.g., web browsers and websites)
- Securing email, VoIP, and other communications over unsecured networks
How does SSL/TLS work?
SSL/TLS operates based on several key principles:
- A secure connection begins with a TLS handshake, where the client and server exchange public keys and establish a secure session.
- Session keys are generated during the handshake and used to encrypt/decrypt all communications within the session.
- Each session uses unique session keys.
- TLS authenticates the server's identity to ensure it is legitimate.
- Data integrity is ensured using a message authentication code (MAC).
The TLS Handshake
The TLS handshake is the process by which two parties establish a secure connection. This involves:
- Asymmetric encryption: Public and private keys are used for secure communication during the handshake.
- Session keys: Generated during the handshake and used for symmetric encryption for the remainder of the session.
Symmetric Encryption
After the handshake, both parties use the same session key for encryption. These keys are temporary and unique to each session, ensuring high levels of security.
Authenticating the Origin Server
TLS communications include a digital signature (MAC) that authenticates the server and prevents data alteration during transmission.
What is an SSL Certificate?
An SSL certificate is a data file installed on a website's server. It contains:
- The public key
- The identity of the website owner
- Other identifying information
SSL certificates are essential for enabling encrypted communications using TLS.
Self-Signed Certificates
Website owners can create self-signed certificates, but these are not as trusted as certificates issued by a certificate authority (CA).
Obtaining an SSL Certificate
SSL certificates are issued by certificate authorities (CAs) after verifying the website owner’s identity. The CA maintains a copy of the certificates they issue.
Free SSL Certificates
Many CAs charge for SSL certificates, but some, like Cloudflare, offer them for free to encourage secure Internet practices.
HTTP vs. HTTPS
HTTPS is HTTP with SSL/TLS encryption. A website using HTTPS:
- Has a valid SSL certificate issued by a CA
- Encrypts all traffic to and from the website
- Ensures data authenticity and integrity
Modern browsers mark HTTP websites as "not secure," making HTTPS essential for trust and security.
For further details on SSL/TLS, visit the official Traefik documentation.
Let's Encrypt: How does it Work? & More
Overview
Traefik can automatically generate and renew TLS certificates using an ACME provider, such as Let’s Encrypt. This simplifies certificate management while ensuring secure HTTPS connections.
How does Let's Encrypt Work?
Let's Encrypt is a free, automated, and open Certificate Authority that provides SSL/TLS certificates to enable encrypted connections to websites. Its mission is to create a more secure and privacy-respecting web by promoting the widespread adoption of HTTPS.
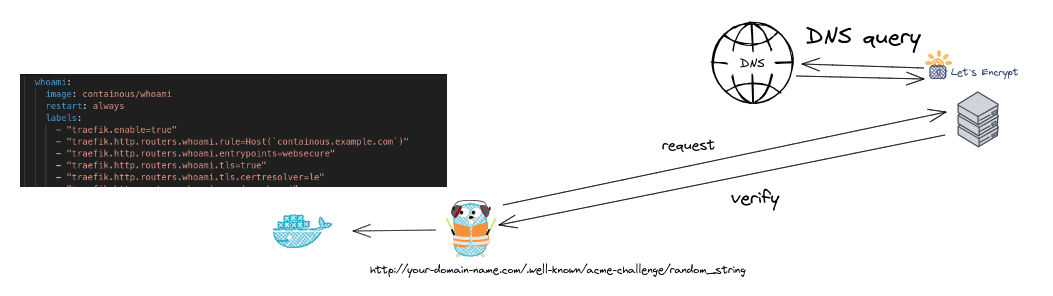
Let's Encrypt follows a protocol called ACME (Automated Certificate Management Environment) for the issuance and renewal of certificates. Here's a simplified version of how it works:
Step 1: Domain Ownership Verification
To ensure that the certificate isn't provided to malicious entities, Let's Encrypt needs to confirm that the entity controlling the domain is the one requesting the certificate. This is achieved through a challenge-response protocol.
In our example with Traefik, we're using the HTTP challenge method, where Traefik will be asked to put a specific file at a known location on your site, like http://your-domain.com/.well-known/acme-challenge/random_string. Let's Encrypt then verifies the file's presence, thus confirming domain ownership.
Step 2: Certificate Issuance and Installation
Once domain ownership is confirmed, Let's Encrypt issues a certificate that can be installed on your server. Traefik automates this step by pulling the issued certificate and storing it locally, then using it whenever an HTTPS connection is initiated.
Step 3: Automatic Renewal
Let's Encrypt certificates are valid for 90 days, but you don't have to worry about the expiration date because Traefik will automatically renew the certificates before they expire, as long as the ACME configuration is correct.
By automating the process of issuing, installing, and renewing certificates, Let's Encrypt has significantly lowered the complexity of setting up and maintaining HTTPS on a website.
If you want to Setup your Own TLS-Challenge go check out this Guide: Docker-compose with Let's Encrypt: TLS Challenge
More about Lets Encrypt & Traefik
Let’s Encrypt and Rate Limiting
Let’s Encrypt imposes rate limits for API requests, which last up to one week and cannot be overridden. To avoid reaching these limits:
- Persist the
acme.jsonfile across container restarts to prevent Traefik from requesting new certificates unnecessarily. - Use the Let’s Encrypt staging server with the
caServerconfiguration option for testing.
Certificate Resolvers
Certificate resolvers are defined in the static configuration and retrieve certificates from an ACME server. Each router that requires a certificate must reference a resolver explicitly using the tls.certresolver option.
Configuration Reference
- Domain Definition: Certificates are requested for domain names specified in the router’s dynamic configuration. Multiple domain names are supported, with one acting as the main domain and others as Subject Alternative Names (SANs).
- ACME Challenges: Each resolver must define an ACME challenge type: HTTP-01, DNS-01, or TLS-ALPN-01.
Configuration Examples
Enable ACME
# Static configuration
entryPoints:
  web:
    address: ":80"
  websecure:
    address: ":443"

certificatesResolvers:
  myresolver:
    acme:
      email: your-email@example.com
      storage: acme.json
      httpChallenge:
        entryPoint: web
Single Domain from Router’s Rule
# Dynamic configuration
labels:
  - traefik.http.routers.blog.rule=Host(`example.com`) && Path(`/blog`)
  - traefik.http.routers.blog.tls=true
  - traefik.http.routers.blog.tls.certresolver=myresolver
Multiple Domains from Router’s Rule
# Dynamic configuration
labels:
  - traefik.http.routers.blog.rule=(Host(`example.com`) && Path(`/blog`)) || Host(`blog.example.org`)
  - traefik.http.routers.blog.tls=true
  - traefik.http.routers.blog.tls.certresolver=myresolver
Multiple Domains from Router’s tls.domain
# Dynamic configuration
labels:
  - traefik.http.routers.blog.rule=Host(`example.com`) && Path(`/blog`)
  - traefik.http.routers.blog.tls=true
  - traefik.http.routers.blog.tls.certresolver=myresolver
  - traefik.http.routers.blog.tls.domains[0].main=example.com
  - traefik.http.routers.blog.tls.domains[0].sans=*.example.org
ACME Challenges
HTTP-01 Challenge
# Static configuration
entryPoints:
  web:
    address: ":80"
  websecure:
    address: ":443"

certificatesResolvers:
  myresolver:
    acme:
      httpChallenge:
        entryPoint: web
DNS-01 Challenge
# Static configuration
certificatesResolvers:
  myresolver:
    acme:
      dnsChallenge:
        provider: digitalocean
        delayBeforeCheck: 0
        resolvers:
          - "1.1.1.1:53"
          - "8.8.8.8:53"
TLS-ALPN-01 Challenge
# Static configuration
certificatesResolvers:
  myresolver:
    acme:
      tlsChallenge: {}
Automatic Renewals
Traefik manages 90-day certificates and renews them automatically 30 days before expiry. For resolvers issuing custom-duration certificates, configure the renewal duration with the certificatesDuration option.
For more details, refer to the official Traefik documentation.
TLS: How does it Work? & More
Automated Certification via Let’s Encrypt
For automated TLS certificate management, Traefik integrates with Let’s Encrypt. See detailed instructions in this Let’s Encrypt Post.
If you want to Setup your Own TLS-Challenge go check out this Guide: Docker-compose with Let's Encrypt: TLS Challenge
What is TLS and How Does It Work?
TLS (Transport Layer Security) is a cryptographic protocol designed to provide secure communication over a network. It is the successor to SSL and ensures that data transmitted between a client and server is encrypted and authenticated, protecting it from eavesdropping and tampering.
When a client (such as a browser) connects to a server via HTTPS, the following steps occur:
- Handshake: The client and server exchange information to establish a secure connection, agreeing on encryption protocols and verifying identities using certificates.
- Encryption: Once the handshake is complete, all subsequent communication is encrypted to protect the data from being intercepted.
- Data Integrity: TLS ensures that the transmitted data has not been altered during transfer.
TLS is crucial for securing sensitive information like login credentials, credit card numbers, and personal data. Traefik makes it easy to manage TLS certificates, either through Let’s Encrypt or user-defined certificates.
More about TLS-Options for Traefik
User-Defined Certificates
To add or remove TLS certificates dynamically, define them in the tls.certificates section of the dynamic configuration:
File (YAML)
# Dynamic configuration
tls:
  certificates:
    - certFile: /path/to/domain.cert
      keyFile: /path/to/domain.key
    - certFile: /path/to/other-domain.cert
      keyFile: /path/to/other-domain.key
File (TOML)
Note: In Kubernetes, certificates must be provided as secrets instead of using the file provider.
Certificates Stores
In Traefik, certificates are grouped in certificate stores:
File (YAML)
# Dynamic configuration
tls:
  stores:
    default: {}
By default, all certificates are stored in the default store. Any additional store definitions are ignored.
File (YAML): Specifying Certificate Stores
# Dynamic configuration
tls:
  certificates:
    - certFile: /path/to/domain.cert
      keyFile: /path/to/domain.key
      stores:
        - default
    - certFile: /path/to/other-domain.cert
      keyFile: /path/to/other-domain.key
Default Certificate
Traefik can use a default certificate for connections without SNI or matching domains. Define the default certificate in a TLS store:
File (YAML)
# Dynamic configuration
tls:
  stores:
    default:
      defaultCertificate:
        certFile: /path/to/cert.crt
        keyFile: /path/to/cert.key
ACME Default Certificate: Traefik can also generate a default certificate using an ACME provider:
File (YAML)
# Dynamic configuration
tls:
  stores:
    default:
      defaultGeneratedCert:
        resolver: myresolver
        domain:
          main: example.org
          sans:
            - foo.example.org
            - bar.example.org
TLS Options
The TLS options allow you to configure parameters of the TLS connection:
Default TLS Option
# Dynamic configuration
tls:
  options:
    default:
      minVersion: VersionTLS12
Minimum and Maximum TLS Version
# Dynamic configuration
tls:
  options:
    default:
      minVersion: VersionTLS12
      maxVersion: VersionTLS13
Cipher Suites
# Dynamic configuration
tls:
  options:
    default:
      cipherSuites:
        - TLS_ECDHE_RSA_WITH_AES_128_GCM_SHA256
For more information, refer to the official Traefik documentation.
Setting up Self-Signed Multiple FQDN Certificates for Local Services in Traefik
Overview
In this article, we will walk through creating a self-signed certificate for multiple local services (e.g., Portainer and Pi-hole) using OpenSSL. We'll also configure Traefik to use this certificate in Docker Swarm. Additionally, we will explain how SSL certificates work, the role of key components like the private key, public key, and Certification Authority (CA). We'll use the provided image for understanding these concepts.
Prerequisites
- You already have Traefik, Portainer, Pi-hole, and Docker Swarm set up.
- You have a local DNS setup using Pi-hole to resolve local domain names such as
portainer.localandpihole.local.
Whats FQDN?
FQDN (Fully Qualified Domain Name) is the complete domain name of a specific host within the internet or a local network. It includes both the hostname and the domain name, ensuring the address is globally unique. An FQDN typically follows this format: hostname.domain.tld (e.g., www.example.com). For local networks, it can be something like portainer.local or pihole.local. The FQDN provides a precise location for a resource in the DNS hierarchy, making it essential for properly identifying services across networks.
Step 1: Create a Multiple FQDN Certificate with OpenSSL
-
Generate a private key for the certificate:
openssl genrsa -out local.key 4096 - Create a Certificate Signing Request (CSR) for multiple FQDNs. First, create a configuration file
san.cnf:
touch /mnt/glustermount/data/certs/san.cnf
[req] # Request options default_bits = 4096 # Size of the encryption key prompt = no # No prompts, all values are provided in the config file default_md = sha256 # Use SHA256 for the certificate distinguished_name = dn # Use the 'dn' section for distinguished names req_extensions = req_ext # Use 'req_ext' for additional extensions like SAN (Subject Alternative Name) [dn] # Distinguished Name section CN = portainer.local # Common Name (CN) for the certificate (primary domain) [req_ext] # Extensions for the certificate request subjectAltName = @alt_names # Use alternative names (SAN) [alt_names] # Alternative domain names DNS.1 = portainer.local # First DNS name (alternative domain) DNS.2 = pihole.local # Second DNS name (alternative domain) - Generate the CSR using the configuration file:
openssl req -new -key local.key -out local.csr -config san.cnf - Generate a self-signed certificate for 1 year (365 days):
openssl x509 -req -in local.csr -signkey local.key -out local.crt -days 365 -extfile san.cnf -extensions req_ext - Move the certificate and key to a shared directory accessible by Docker Swarm:
(If you need help to understand how the Nodes of the Docker Swarm Cluster are sharing the synced Files - Check this Article)
mkdir -p /mnt/glustermount/data/certs
mv local.crt local.key /mnt/glustermount/data/certs/
Step 2: Understanding the san.cnf File
The san.cnf file helps OpenSSL create a certificate with multiple domain names (FQDNs). Here’s a breakdown of the file:
- [req]: Specifies the general options for generating the certificate request, such as key size, hashing algorithm (SHA256), and the distinguished name section.
- [dn]: Defines the common name (CN), which in this case is the primary domain (
portainer.local). - [req_ext]: Specifies the Subject Alternative Names (SANs), which allow the certificate to be valid for additional domain names (e.g.,
pihole.local). - [alt_names]: Lists the additional domain names (
DNS.1,DNS.2, etc.) that will be included in the certificate.
This setup creates a certificate that can be used for both portainer.local and pihole.local, ensuring secure access over HTTPS. You can add any other Local DNS Entry to the List. Just make sure to add the Entry to your Pihole under the "Local DNS - DNS Records" Section.
Step 3: Add the Certificate to Traefik's Static Configuration (TOML)
Edit your traefik.toml file to include the certificate you generated:
[entryPoints]
  [entryPoints.websecure]
    address = ":443"

[tls]
  [[tls.certificates]]
    certFile = "/mnt/glustermount/data/certs/local.crt"
    keyFile  = "/mnt/glustermount/data/certs/local.key"
    stores = ["default"]

[tls.stores]
  [tls.stores.default]
    [tls.stores.default.defaultCertificate]
      certFile = "/mnt/glustermount/data/certs/local.crt"
      keyFile  = "/mnt/glustermount/data/certs/local.key"
This configuration tells Traefik to use the multiple FQDN certificate (local.crt) for requests matching portainer.local and pihole.local.
Step 4: Assign the Self-Signed Certificate to Specific Services
Now, configure the dynamic behavior of Traefik using the dynamic.toml file:
[http]
  [http.routers]
    [http.routers.portainer-secure]
      rule = "Host(`portainer.local`)"
      service = "portainer"
      entryPoints = ["websecure"]
      tls = { certResolver = "self-signed" }

    [http.routers.pihole-secure]
      rule = "Host(`pihole.local`)"
      service = "pihole"
      entryPoints = ["websecure"]
      tls = { certResolver = "self-signed" }

  [http.services]
    [http.services.portainer.loadBalancer]
      [[http.services.portainer.loadBalancer.servers]]
        url = "http://portainer:9443"

    [http.services.pihole.loadBalancer]
      [[http.services.pihole.loadBalancer.servers]]
        url = "http://pihole:888"
Step 5: Adjust the Pi-hole Docker Compose Configuration
Here’s the Pi-hole docker-compose.yml adjusted to match the certificate and Traefik settings:
version: '3'

services:
  pihole:
    networks:
      - management_net  # For management via Traefik
    image: pihole/pihole:latest
    ports:
      - "53:53/tcp"
      - "53:53/udp"
      - "888:80"
    environment:
      TZ: 'Europe/Zurich'
      WEBPASSWORD: '${PIHOLE_PASSWORD}'
    volumes:
      - '/mnt/glustermount/data/pihole_data/etc:/etc/pihole'
      - '/mnt/glustermount/data/pihole_data/dns:/etc/dnsmasq.d'
    restart: unless-stopped
    deploy:
      mode: replicated
      replicas: 1
      placement:
        constraints: [node.platform.os == linux]
      labels:
        - 'traefik.enable=true'
        - "traefik.http.routers.pihole-secure.rule=Host(`pihole.local`)"
        - "traefik.http.routers.pihole-secure.entrypoints=websecure"
        - "traefik.http.routers.pihole-secure.tls=true"
        - "traefik.http.services.pihole.loadbalancer.server.port=80"

networks:
  management_net:
    external: true
Step 6: Deploy the Updated Stack
Run the following command to apply the updated stack configuration:
(You can also use Portainer running the Stack)
docker stack deploy -c docker-compose.yml your_stack_nameStep 7: Test the Setup
-
Add the self-signed certificate to your trusted sources on your machine. This can be done by importing the
.crtfile into your browser or system's trusted certificates store. -
Verify the secure connections:
- Access
https://portainer.local:9443 - Access
https://pihole.local:888
- Access
Both should now use your self-signed certificate with proper encryption.