Getting Started
- Overview of Traefik Reverse Proxy 3.0 & Key Concepts
- Beginner-Guide: Traefik & Docker Swarm
- Beginner-Guide: Traefik & Docker Standalone Engine
Overview of Traefik Reverse Proxy 3.0 & Key Concepts
 Introduction
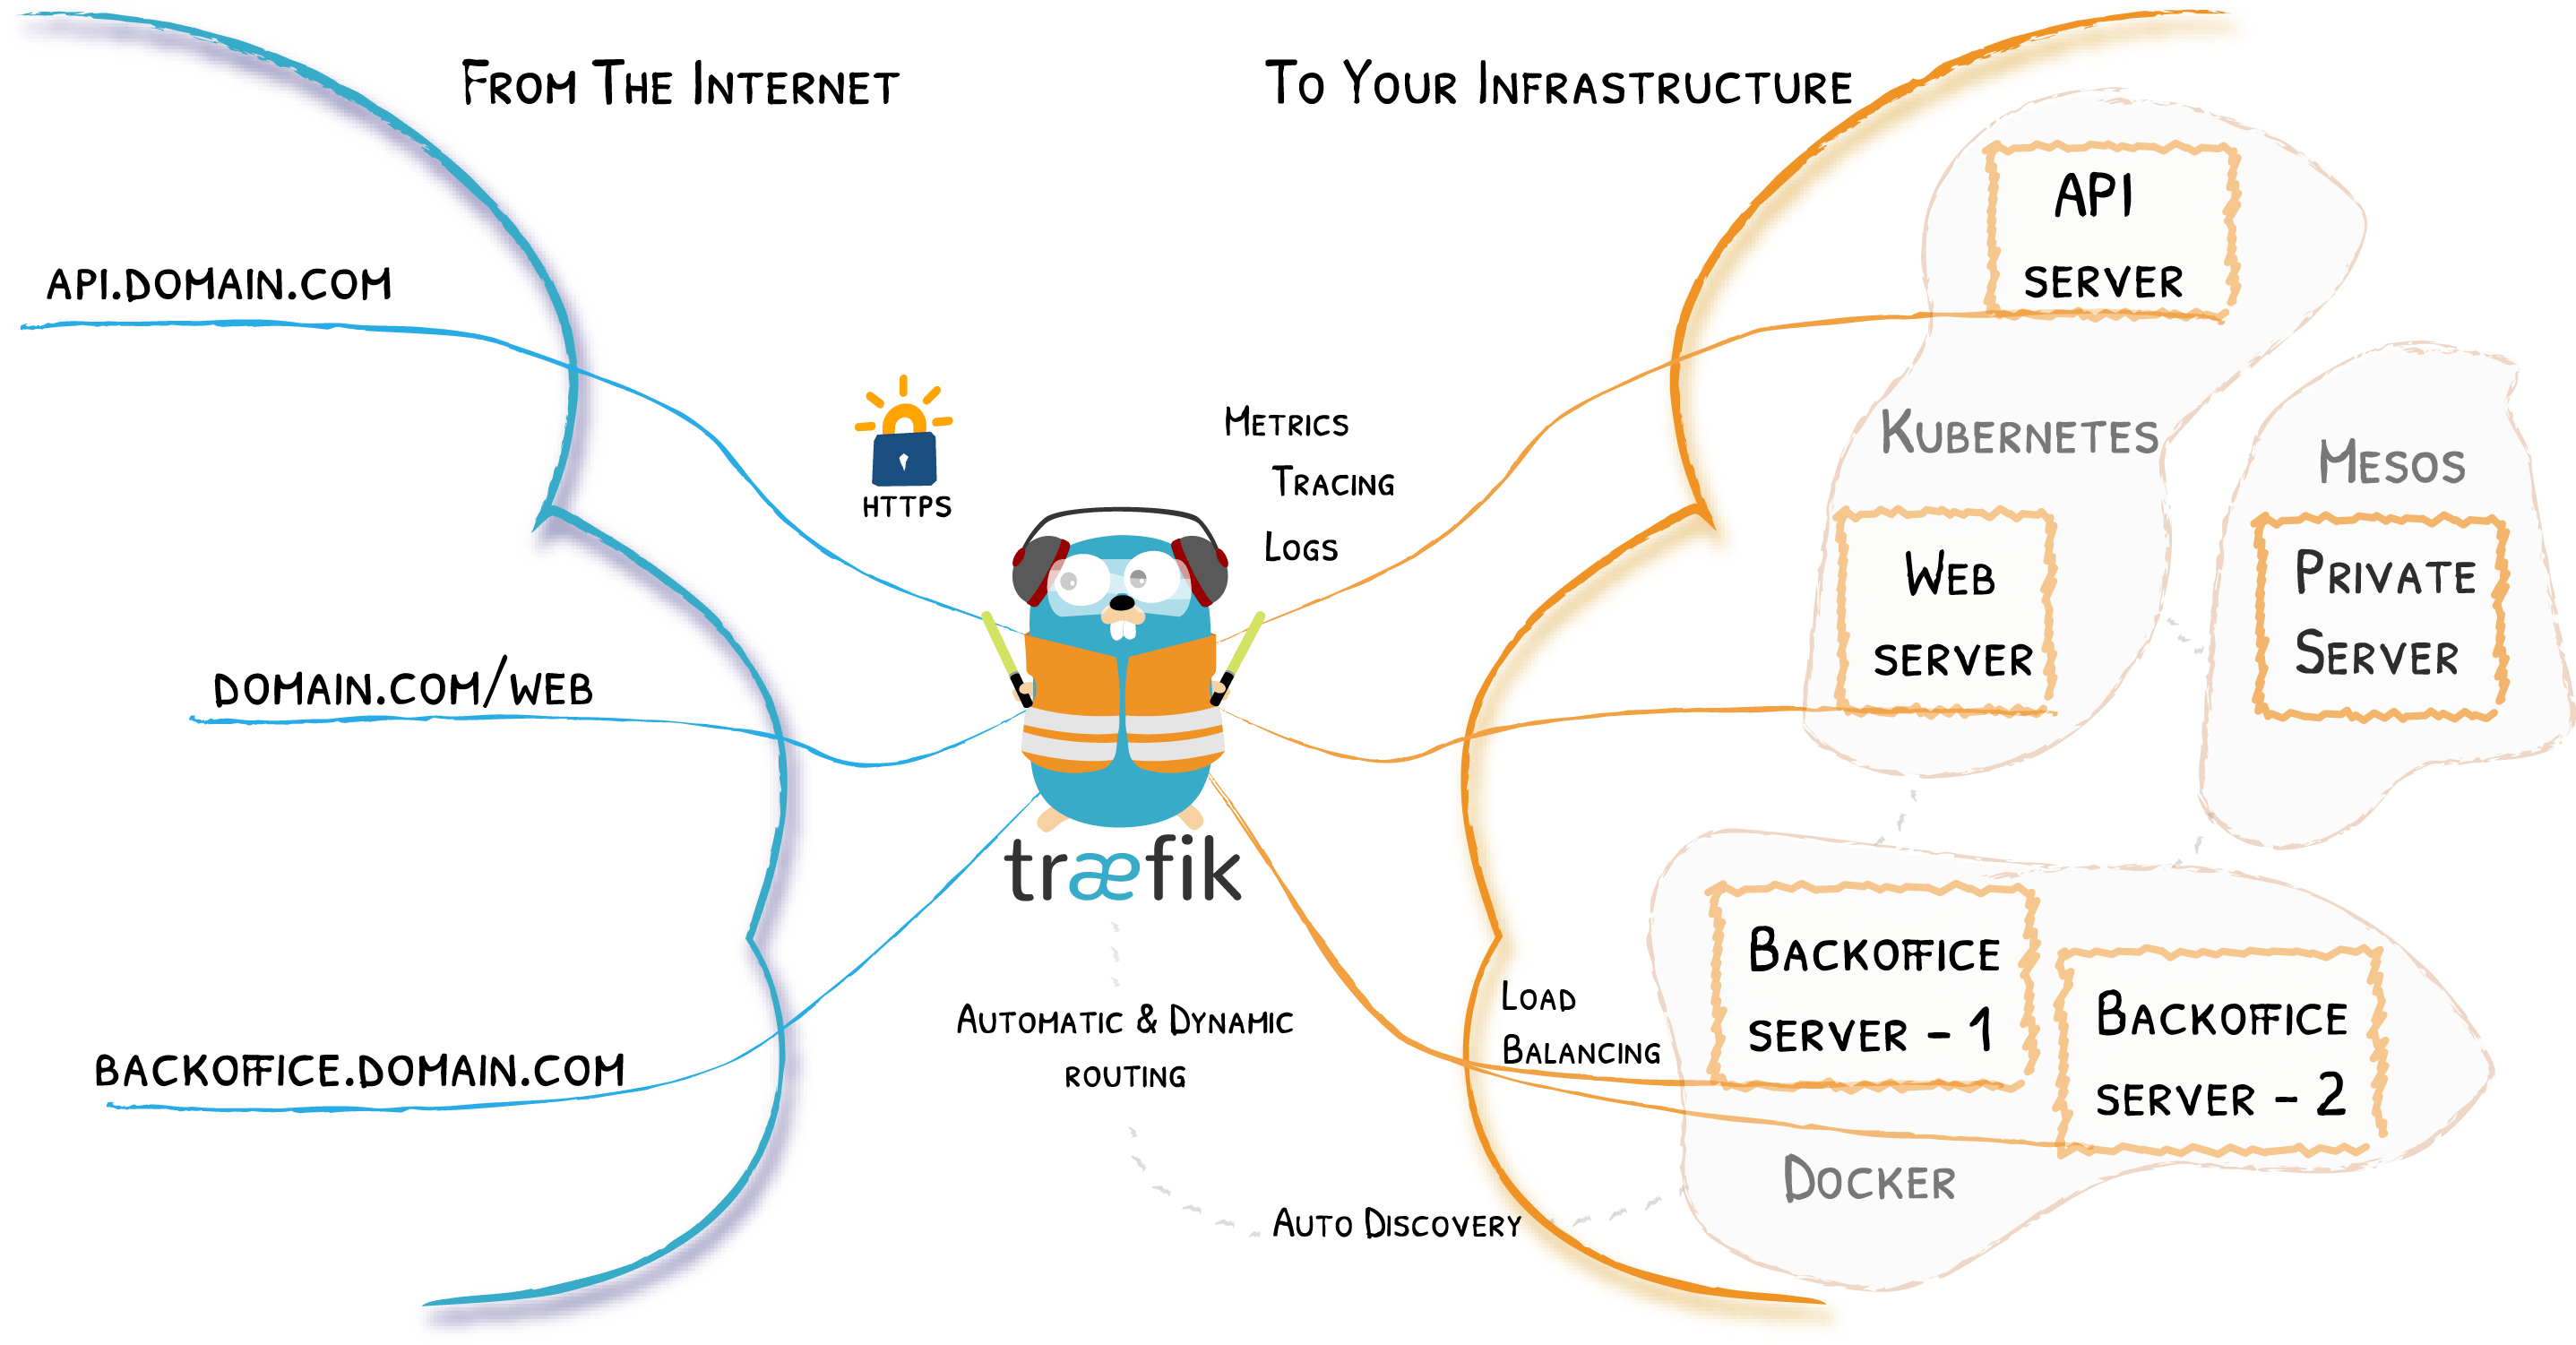
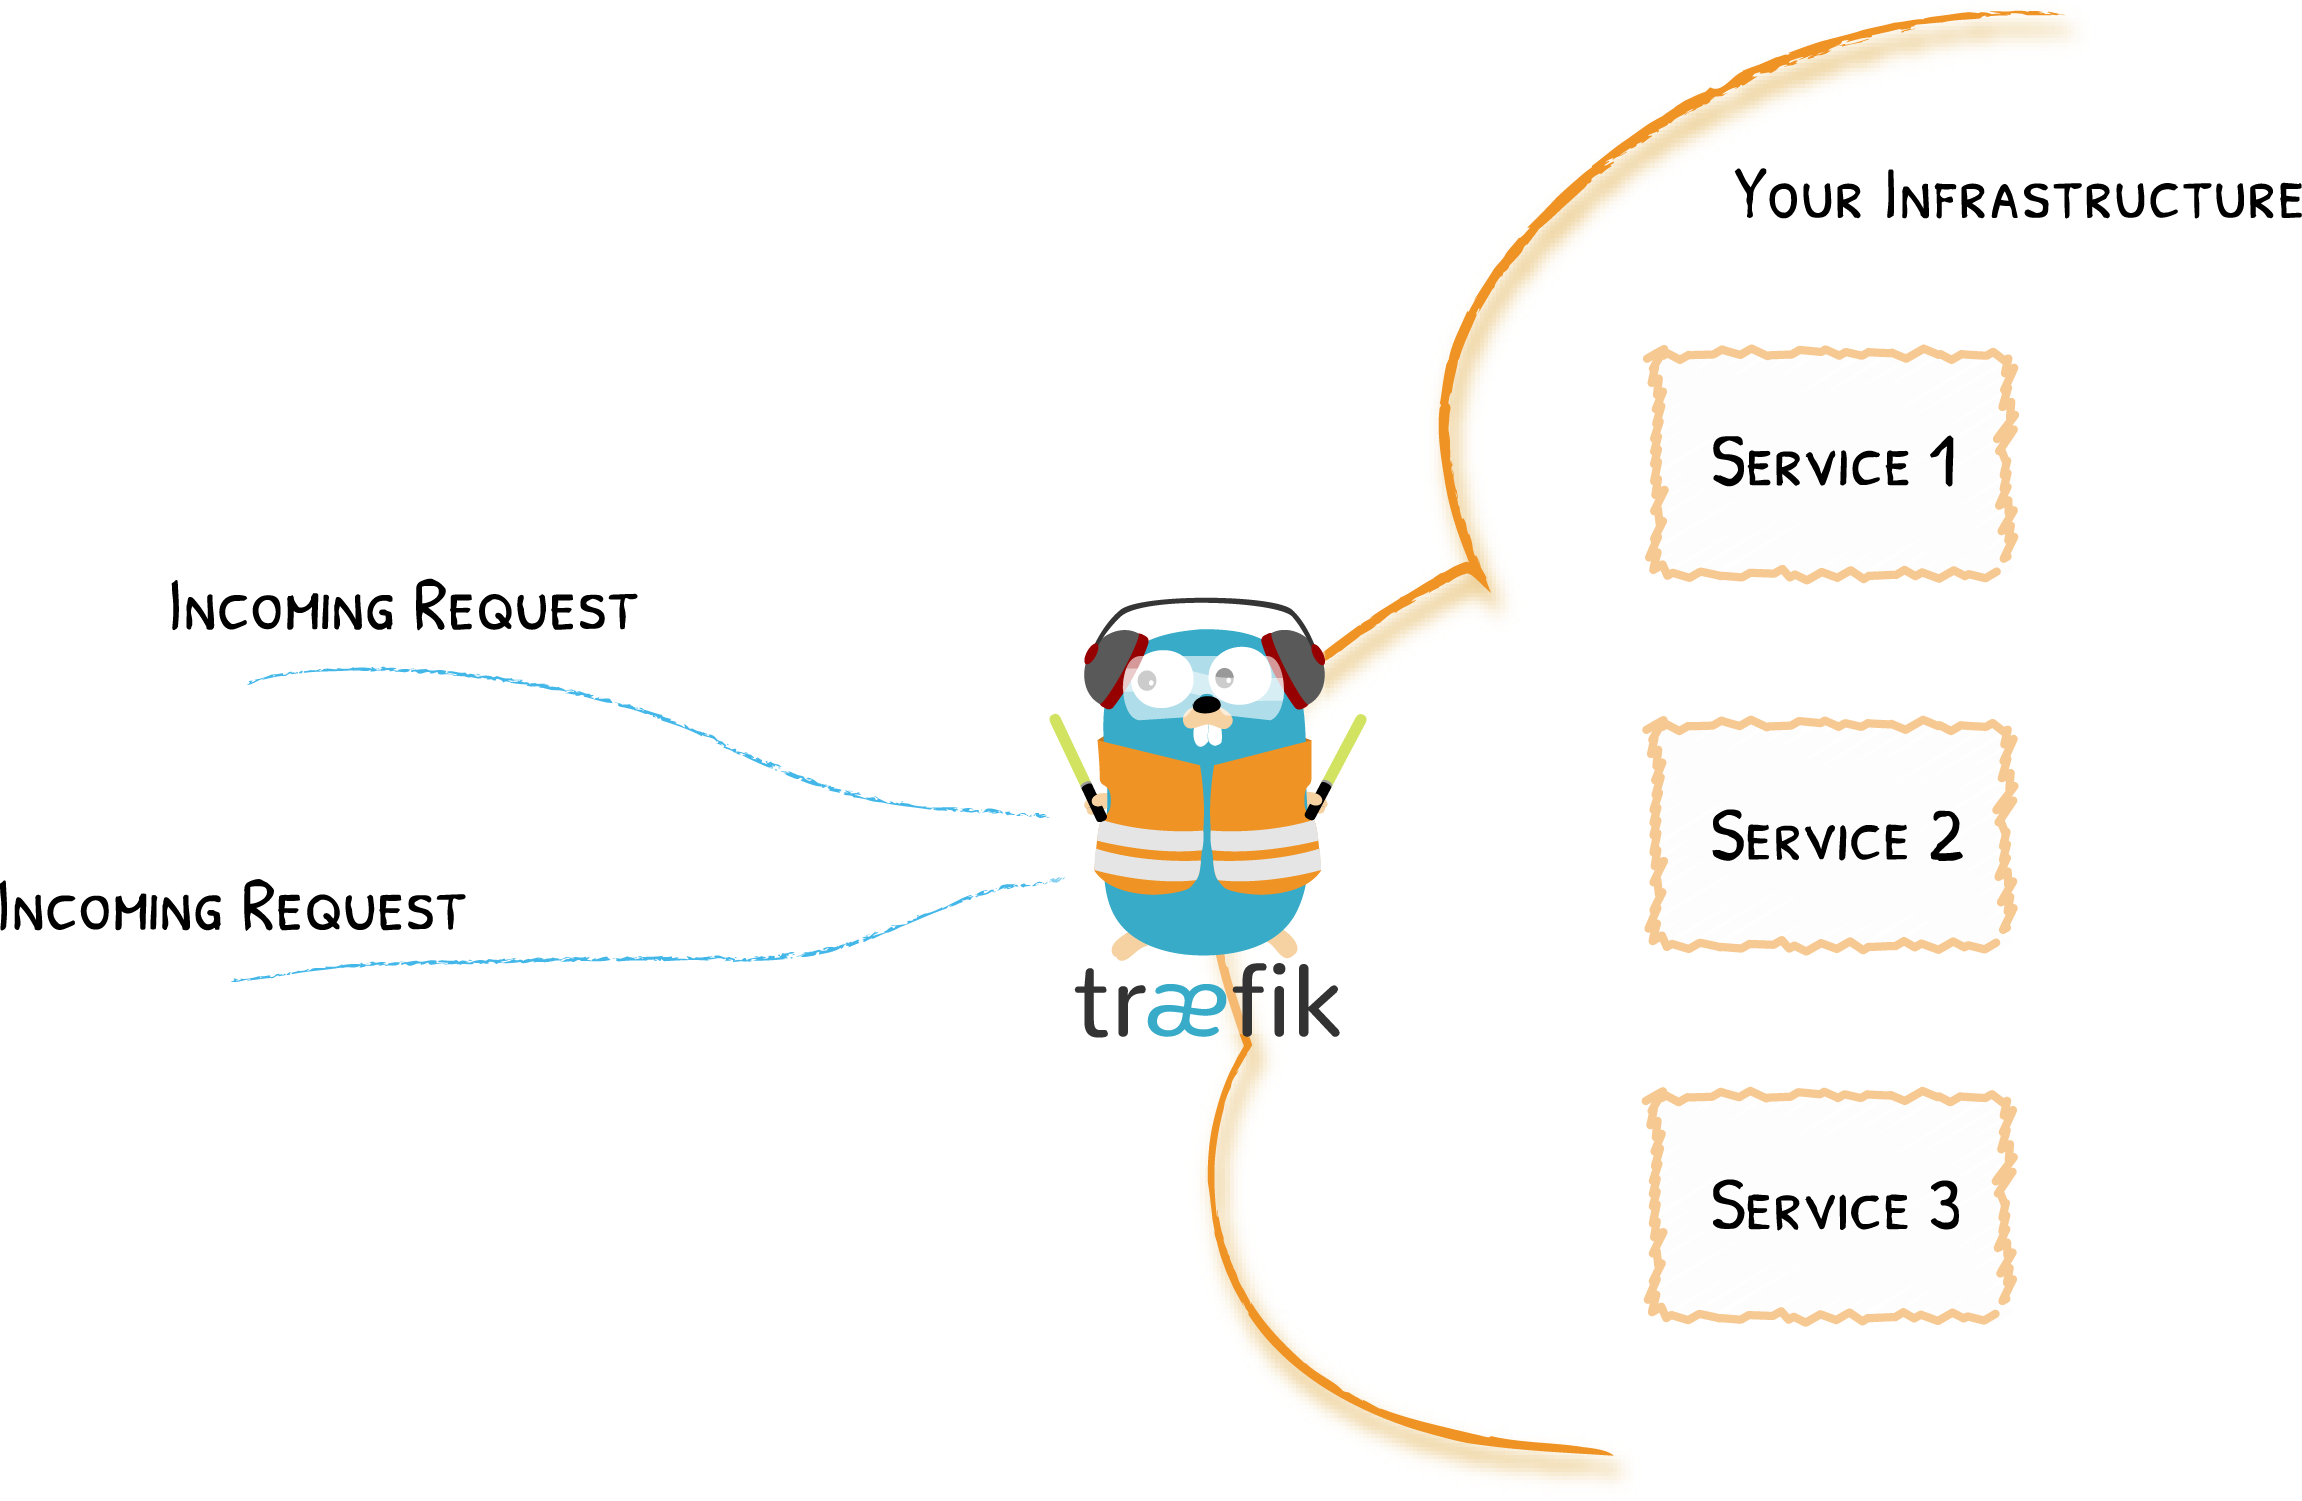
Traefik is an open-source Application Proxy that simplifies the process of exposing and managing services in your infrastructure. It acts as the gateway to your platform, receiving incoming requests and securely routing them to the appropriate services. Traefik is highly flexible and supports dynamic service discovery, automatic routing, and can handle complex routing configurations without requiring manual intervention.
Traefik is based on key concepts like EntryPoints, Routers, Middlewares, and Services, which work together to manage traffic and make your infrastructure more efficient and easier to scale.
Key Concepts in Traefik
-
EntryPoints: These define how traffic enters Traefik. Each EntryPoint specifies a port and whether to listen for TCP or UDP traffic.
-
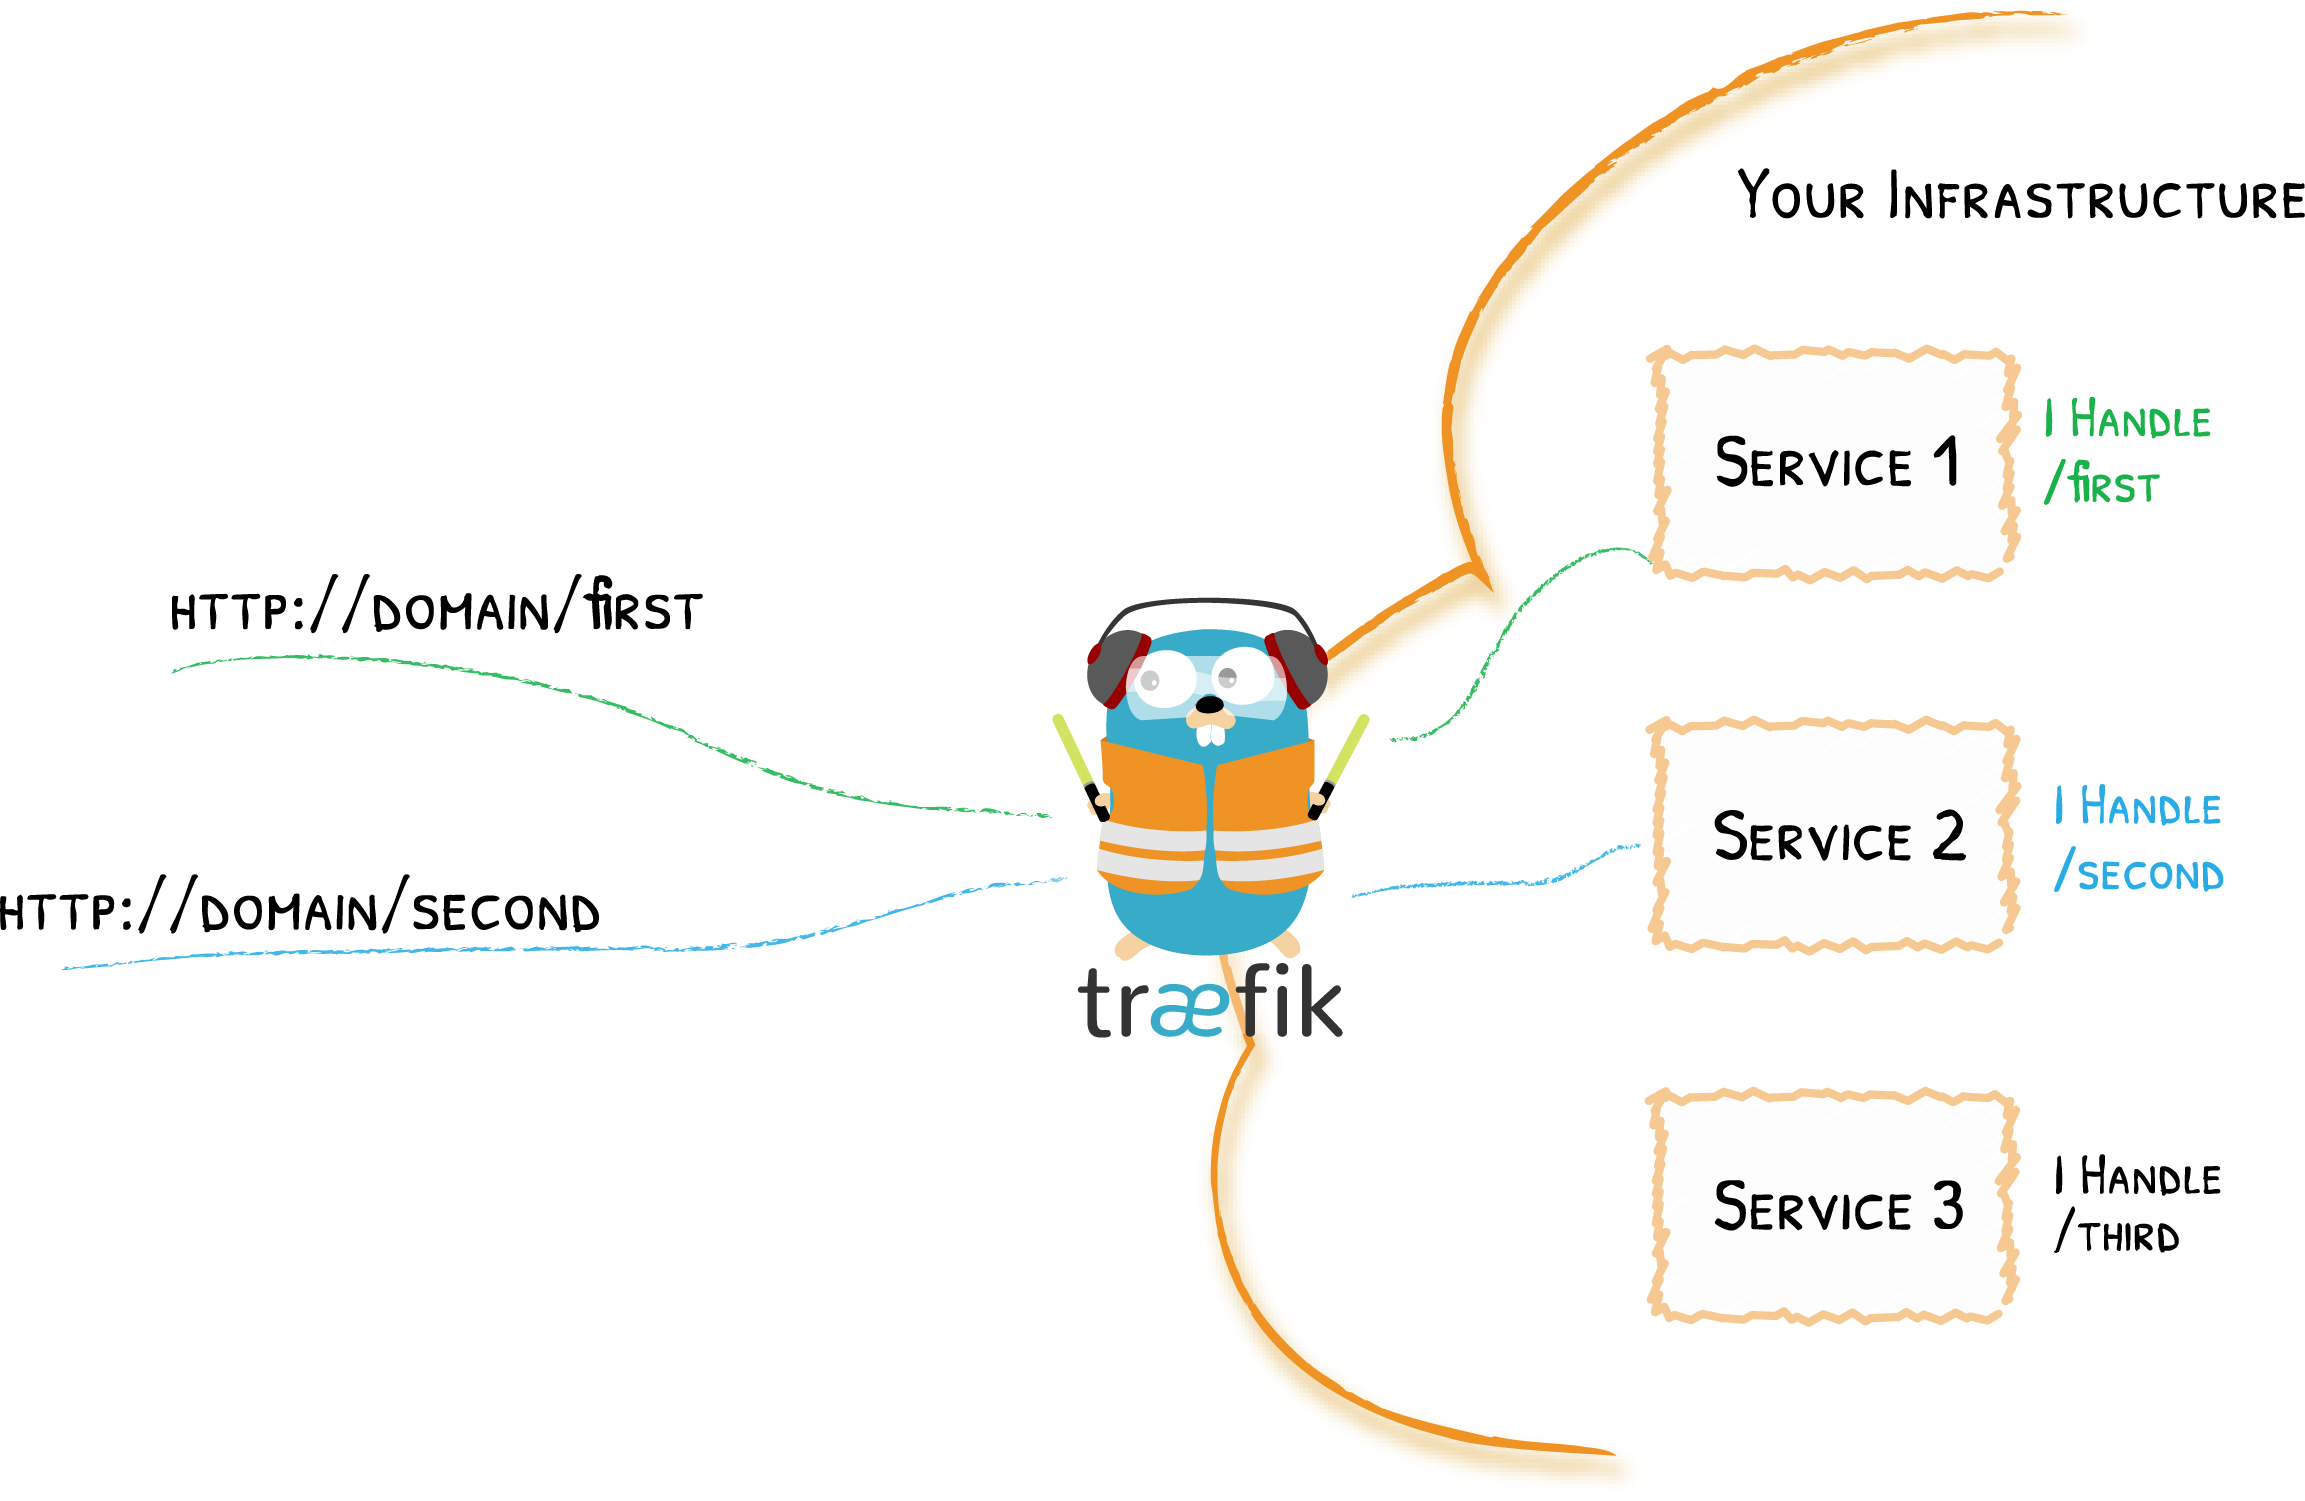
Routers: Routers match incoming requests with services based on rules like the request's host, path, or headers. Routers act as a bridge between incoming requests and the appropriate service.
-
Middlewares: Middlewares allow you to modify requests and responses as they pass through Traefik. You can apply Middlewares to Routers to add functionality like authentication, rate-limiting, or header modification.
-
Services: Services define how to reach the backend applications that will handle the requests. Traefik forwards the requests to these Services, whether they are running on Docker, Kubernetes, or other platforms.
Traefik as an Edge Router
As an Edge Router, Traefik manages all incoming requests, applying routing logic to determine which service should handle a given request. It can route traffic based on a variety of criteria, such as URL paths, hostnames, headers, and more. This makes Traefik highly effective as the entry point to your infrastructure.
Automatic Service Discovery
One of the standout features of Traefik is its ability to perform automatic service discovery. Traditional reverse proxies require you to maintain a configuration file that lists all possible routes and services. With Traefik, this process is fully automated. Traefik continuously scans your infrastructure for new or updated services, automatically configuring itself in real time without any need for manual updates.
When a service is deployed, Traefik detects it immediately and updates its routing rules. If a service is removed, Traefik dynamically removes the associated route, ensuring that your routing configuration is always accurate and up to date.
Decentralized Configuration
With Traefik, configuration is decentralized, meaning services themselves provide the necessary information for routing. This eliminates the need to manually update and synchronize configuration files across multiple nodes or platforms. Traefik ensures that routing rules reflect the current state of your infrastructure at all times.
Traefik in Multi-Platform Environments
Traefik supports seamless integration with a variety of container orchestration platforms and cloud services, such as:
- Kubernetes
- Docker Swarm
- AWS
- Azure
- Google Cloud
It can handle multiple backends simultaneously, allowing you to manage modern microservices alongside legacy applications running on bare metal.
Conclusion
Traefik Reverse Proxy 3.0 provides a robust and flexible solution for handling routing, load balancing, and service discovery across modern and legacy infrastructure. Whether you're managing containerized microservices, cloud-based services, or traditional applications, Traefik makes routing and service discovery a seamless experience.
Beginner-Guide: Traefik & Docker Swarm

How Traefik Works with Docker Swarm
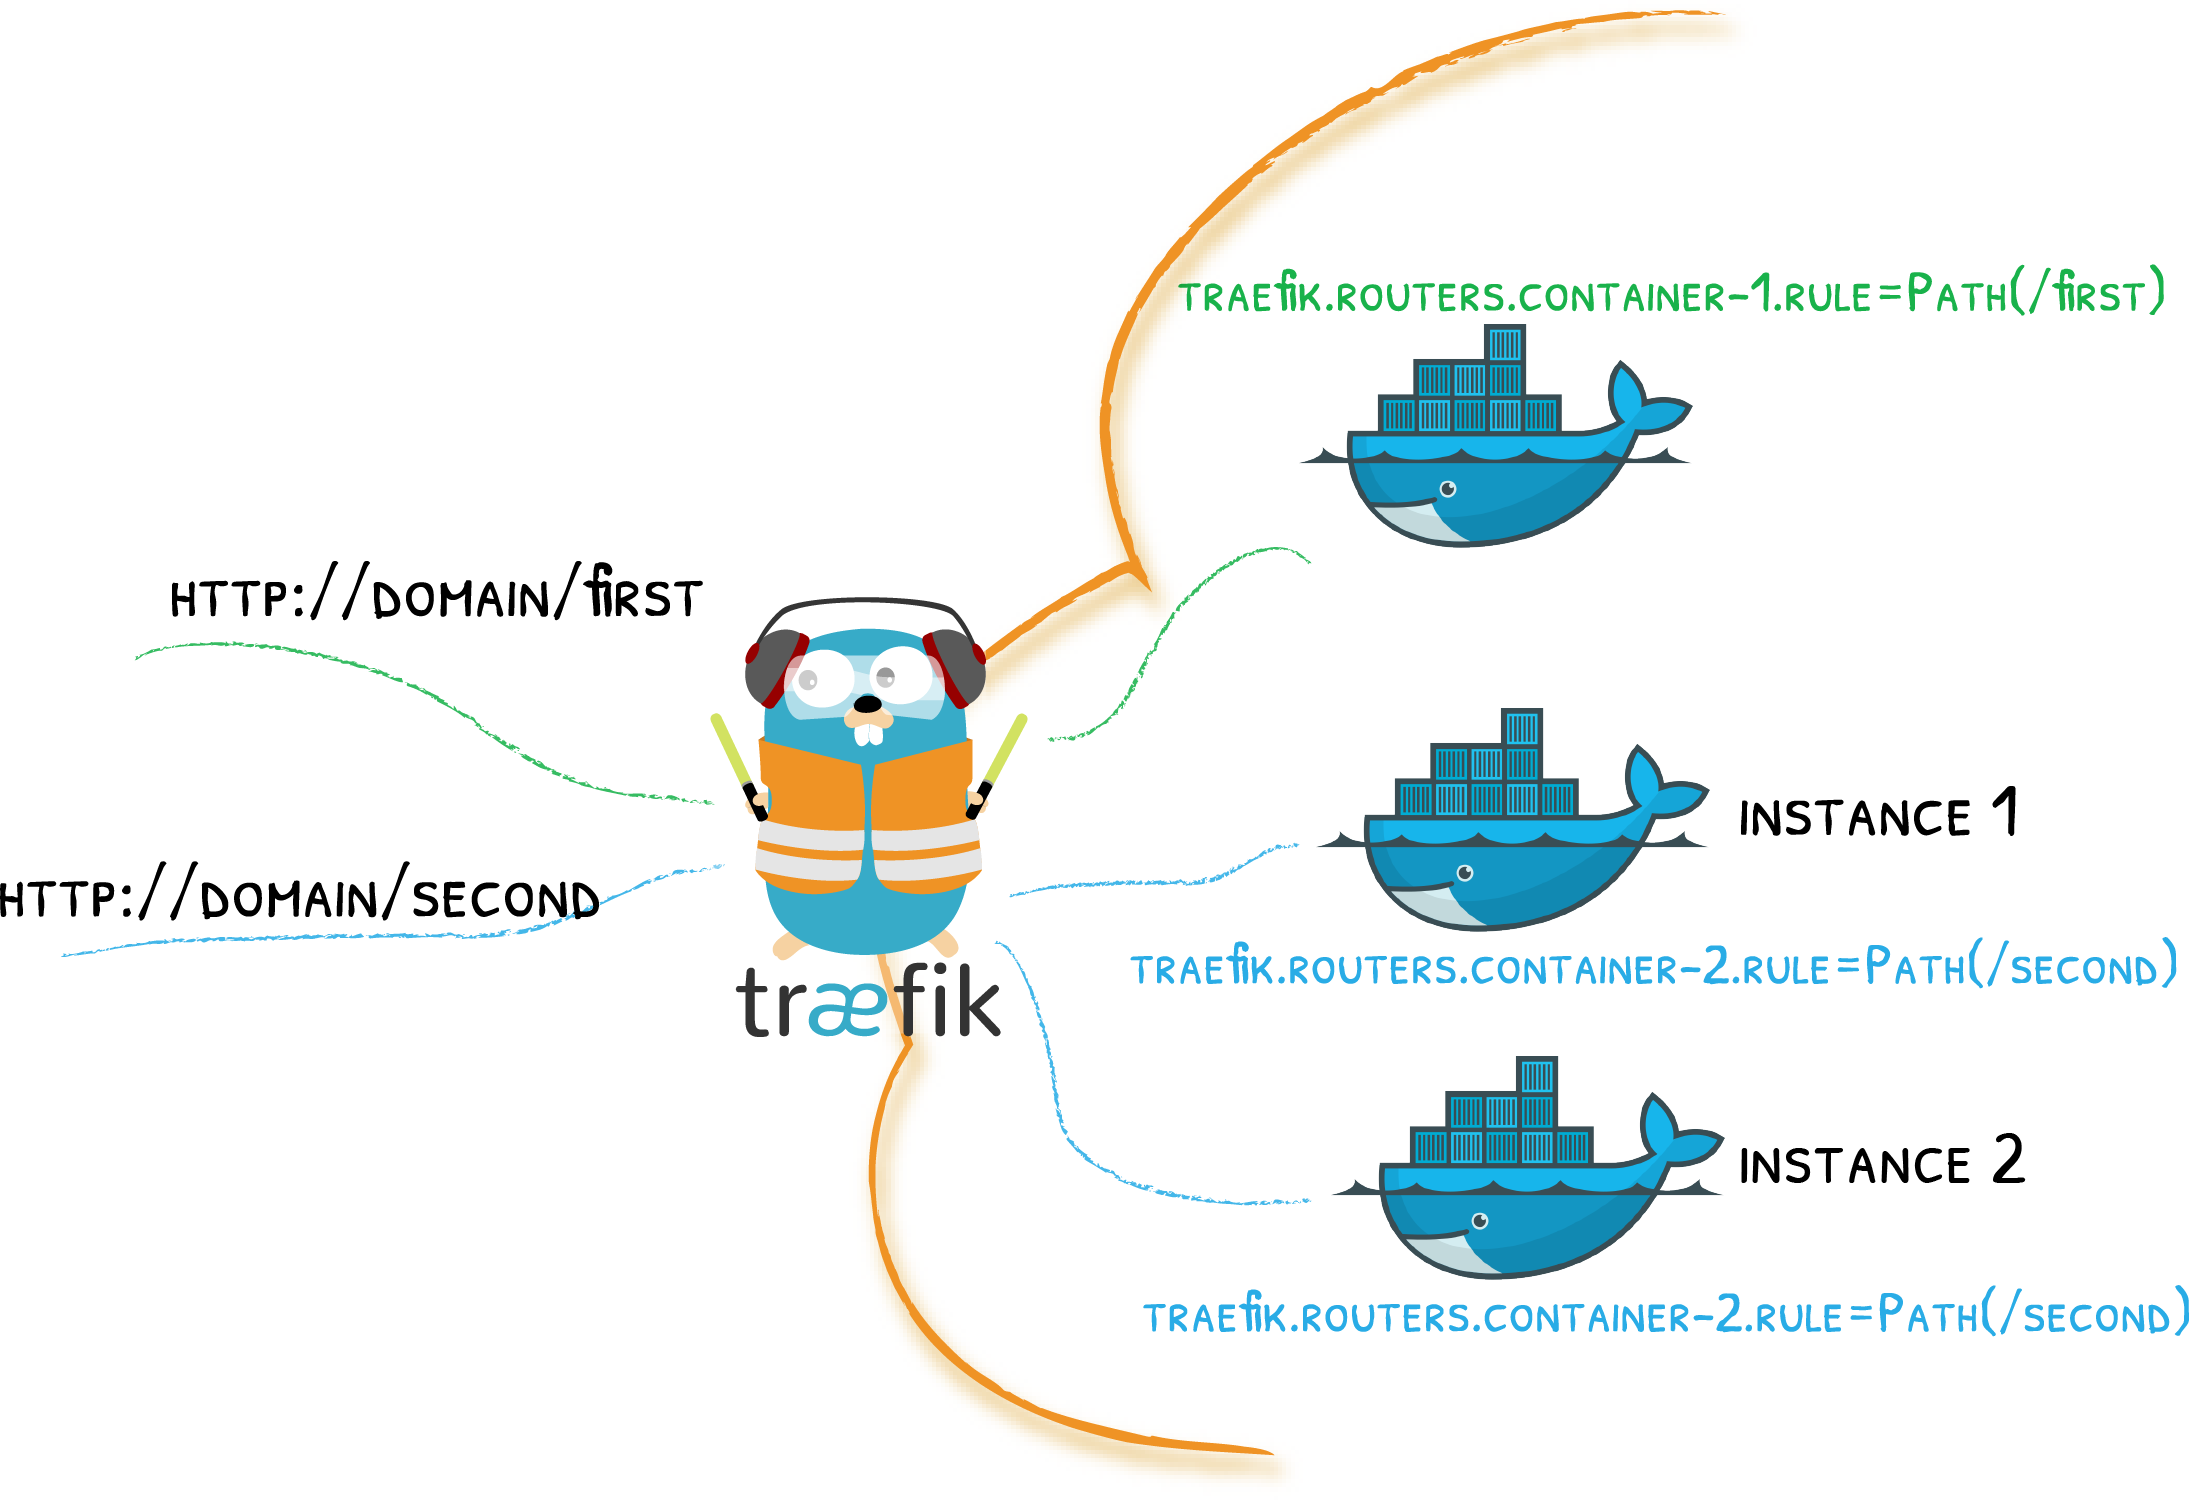
Traefik integrates tightly with Docker Swarm, using the Docker API to automatically discover services. In Swarm Mode, Traefik watches for service-level labels rather than container-level labels (which are used in standalone Docker mode). This allows Traefik to dynamically adapt as services are created, updated, or removed.
Benefits of Using Traefik with Docker Swarm:
- Dynamic Service Discovery: Traefik automatically finds and configures services based on Docker labels, which eliminates the need for manually updating configuration files.
- Scalability: Traefik automatically adjusts routing as new instances of services are scaled up or down.
- Real-Time Updates: As services are added or removed in Swarm, Traefik updates routing rules without needing restarts or manual intervention.
Example: Deploying Traefik with Docker Swarm
Let’s walk through an example where we deploy Traefik as a reverse proxy in a Docker Swarm environment. We’ll expose a simple web service and configure routing with labels.
1. Setting Up Traefik in Docker Swarm
First, we need to deploy Traefik as a service in the Docker Swarm cluster. Traefik requires access to the Docker socket to monitor the containers and services. Here's how to deploy Traefik with Docker Swarm using Docker Compose:
version: '3.7'
services:
  traefik:
    image: traefik:v3.0
    command:
      - "--api.insecure=true"  # Exposes Traefik's dashboard
      - "--providers.docker=true"  # Enables Docker as the provider
      - "--entrypoints.web.address=:80"  # Defines an HTTP EntryPoint on port 80
    ports:
      - "80:80"       # Expose Traefik's HTTP EntryPoint
      - "8080:8080"   # Expose the Traefik Dashboard
    volumes:
      - "/var/run/docker.sock:/var/run/docker.sock"  # Access Docker API
    deploy:
      placement:
        constraints:
- node.role == manager # Only run on Swarm manager nodesExplanation:
providers.docker=true: Enables Traefik to use Docker as a provider.entrypoints.web.address=:80: Defines an HTTP EntryPoint listening on port 80.api.insecure=true: Enables Traefik's web dashboard (only for demonstration purposes, not recommended in production).
2. Deploying a Service with Routing Labels
Next, let’s deploy a simple web service, such as Nginx, and attach routing labels so that Traefik can automatically route traffic to it.
version: '3.7'
services:
  nginx:
    image: nginx
    deploy:
      labels:
        - "traefik.enable=true"
        - "traefik.http.routers.nginx.rule=Host(`nginx.local`)"
- "traefik.http.services.nginx.loadbalancer.server.port=80"Explanation:
traefik.enable=true: Tells Traefik to expose this service.traefik.http.routers.nginx.rule=Host('nginx.local'): Defines a routing rule that routes requests with theHostheadernginx.localto this service.traefik.http.services.nginx.loadbalancer.server.port=80: Specifies the internal port for Nginx.
Now, you can deploy this configuration in your Swarm cluster with:docker stack deploy -c docker-compose.yml my-stack
Or you can run the Stack in Portainer :)
Understanding Key Configuration Elements
Port Detection in Docker Swarm
Traefik does not automatically detect ports in Docker Swarm mode. You must explicitly set the port label (traefik.http.services.<service_name>.loadbalancer.server.port) to tell Traefik which port to use for the service. This ensures that Traefik can properly route requests to the service.
Host Networking with Traefik
If you are exposing containers configured with host networking, Traefik resolves the host IP based on the following priorities:
host.docker.internalhost.containers.internal- If both fail, it falls back to
127.0.0.1.
IPv4 and IPv6
By default, Traefik prioritizes the IPv4 address of a container, even in an IPv6-enabled Docker stack. If you want Traefik to use the IPv6 address, make sure your Docker configuration supports IPv6 routing.
Scheduling Traefik on Swarm Nodes
In Docker Swarm mode, only manager nodes can access the Docker Swarm API, which Traefik needs to dynamically discover services. Therefore, you must schedule Traefik on manager nodes. Here’s how to do it:
Example for Docker Compose:
services:
  traefik:
    image: traefik:v3.0
    deploy:
      placement:
        constraints:
          - "node.role == manager"
Docker API Access and Security Considerations
Since Traefik requires access to the Docker API via the docker.sock socket, this raises potential security risks. Anyone with access to Traefik can also gain access to the Docker API and, by extension, the underlying host. To mitigate this risk:
- Only expose the Docker socket to trusted services.
- Consider securing the Docker socket with a TLS connection.
Here’s an example of a secure Docker API configuration with TLS:
providers:
  swarm:
    tls:
      cert: "/path/to/cert.crt"
      key: "/path/to/key.key"
      ca: "/path/to/ca.crt"
This configuration ensures that the Docker API connection is secured using TLS.
Conclusion
Traefik’s integration with Docker Swarm provides a powerful, dynamic solution for managing services at scale. By using labels on services, Traefik can automatically discover, configure, and route traffic without the need for manual intervention. It’s particularly useful for dynamic environments where services are frequently added or removed, as Traefik handles these changes in real time.
This beginner-friendly overview of Traefik with Docker Swarm should give you a solid foundation for deploying and routing your services dynamically. As you become more familiar, you can explore advanced configurations such as load balancing strategies, security features, and using external providers like Kubernetes.
Beginner-Guide: Traefik & Docker Standalone Engine
Step 1: Install Docker
Before setting up Traefik, make sure Docker is installed on your system. You can follow My Dockerengine Guide for instructions on installing Docker Engine.
Step 2: Setting Up Traefik
Create a docker-compose.yml file to define the Traefik service and its basic configuration.
Example docker-compose.yml:
version: "3.7"

services:
  traefik:
    image: traefik:v3.0
    container_name: traefik
    command:
      - "--api.insecure=true"  # Enable Traefik dashboard (insecure mode, disable in production)
      - "--providers.docker=true"  # Enable Docker as a provider
      - "--entrypoints.web.address=:80"  # Define HTTP EntryPoint
      - "--entrypoints.websecure.address=:443"  # Define HTTPS EntryPoint
    ports:
      - "80:80"       # Expose Traefik on port 80 (HTTP)
      - "443:443"     # Expose Traefik on port 443 (HTTPS)
      - "8080:8080"   # Traefik Dashboard
    volumes:
      - "/var/run/docker.sock:/var/run/docker.sock:ro"  # Allow Traefik to access Docker API
    networks:
      - traefik-net

networks:
  traefik-net:
driver: bridgeExplanation:
- Docker Provider (
--providers.docker=true): Enables Traefik to watch Docker containers for routing configuration. - EntryPoints: Define which ports Traefik listens to. We use port 80 for HTTP and port 443 for HTTPS traffic.
- Let’s Encrypt Configuration: Automatically issues SSL certificates using the Let’s Encrypt ACME protocol.
- Docker Socket (
/var/run/docker.sock): Traefik uses the Docker socket to monitor container changes and apply routing rules dynamically. - Dashboard: Exposes Traefik’s dashboard on port
8080for monitoring purposes.
Step 3: Run Traefik
To start Traefik, run the following command in the directory containing the docker-compose.yml file:
docker-compose up -dThis command will start Traefik in detached mode. You can check if Traefik is running by visiting http://localhost:8080. You should see the Traefik dashboard.
Step 4: Exposing a Service via Traefik
Now that Traefik is up and running, let’s deploy a simple service, such as an Nginx container, and configure it to route traffic through Traefik.
Create a new docker-compose.yml for the Nginx service:
version: "3.7"

services:
  nginx:
    image: nginx
    container_name: nginx
    labels:
      - "traefik.enable=true"  # Enable Traefik routing for this container
      - "traefik.http.routers.nginx.rule=Host(`nginx.local`)"  # Route traffic based on hostname
      - "traefik.http.services.nginx.loadbalancer.server.port=80"  # Nginx runs on port 80
    networks:
      - traefik-net

networks:
  traefik-net:
external: trueExplanation:
- Labels: Labels are key to telling Traefik how to route traffic.
traefik.enable=true: Enables Traefik for this service.traefik.http.routers.nginx.rule=Host('nginx.local'): Configures a routing rule where requests with theHostheadernginx.localwill be routed to this service.traefik.http.services.nginx.loadbalancer.server.port=80: Defines the port where Nginx listens for incoming traffic.
- Shared Network: The
nginxservice needs to be in the same Docker network as Traefik to allow communication.
Run the following command to deploy the Nginx service:
docker-compose up -dAt this point, Traefik should automatically detect the Nginx service and route traffic based on the hostname nginx.local. To test this setup locally, you can add the following line to your /etc/hosts file:
127.0.0.1 nginx.localNow, visiting http://nginx.local should display the Nginx default welcome page.
Step 5: Routing Configuration with Labels
In Traefik, labels define how traffic is routed to services. These labels are attached to the Docker containers and can configure anything from simple routing rules to advanced load balancing configurations.
Here are some useful labels you can apply to your containers:
- Basic Routing:
traefik.enable=true: Enable routing for the container.traefik.http.routers.<router_name>.rule=Host('example.com'): Routes requests toexample.comto the container.
- Load Balancing:
traefik.http.services.<service_name>.loadbalancer.server.port=<port>: Defines the internal port where the container listens.traefik.http.services.<service_name>.loadbalancer.sticky=true: Enable sticky sessions to ensure a user connects to the same container during a session.
- Middleware (for modifying requests/responses):
traefik.http.middlewares.<middleware_name>.addPrefix.prefix=/api: Adds/apito the beginning of every request.traefik.http.routers.<router_name>.middlewares=<middleware_name>: Applies middleware to the router.
- SSL/TLS: (Check Out This Post for More Informations)
traefik.http.routers.<router_name>.tls=true: Enables TLS for a router (required for HTTPS).traefik.http.routers.<router_name>.tls.certresolver=myresolver: Uses the Let’s Encrypt resolver to obtain SSL certificates.
Port Detection
By default, Traefik automatically detects which port to use based on the ports exposed by the Docker container:
- Single Port: If the container exposes only one port, Traefik will use it.
- Multiple Ports: If multiple ports are exposed, Traefik will select the lowest numbered port. For example, if ports
80and8080are exposed, Traefik will select port80.
If Traefik cannot determine the correct port, you can manually define the port using the label:
labels:
  - "traefik.http.services.my-service.loadbalancer.server.port=8080"
Security Considerations
When running Traefik with Docker, there are a few important security considerations:
-
Docker API Access: Traefik requires access to the Docker socket (
/var/run/docker.sock) to monitor container events and retrieve routing configuration. This can expose your Docker environment to potential security risks. Ensure only trusted services have access to the Docker API. -
TLS/SSL: Enable SSL certificates for your services by configuring Let’s Encrypt or using your own certificate. Traefik’s ACME integration with Let’s Encrypt allows for automatic certificate management. Check out This Guide for HTTPS.
-
Secure the Dashboard: By default, the Traefik dashboard is exposed on port
8080in insecure mode. In production environments, disable the insecure API or secure the dashboard with authentication.
Conclusion
Traefik makes it incredibly easy to manage traffic and load balancing for your Docker containers. With its dynamic service discovery, routing rules based on labels, and automatic SSL management, Traefik can simplify your Docker environment and reduce the complexity of traditional reverse proxy setups.
By following this guide, you should have a basic understanding of how to set up Traefik with Docker, configure routing with labels, and expose services dynamically. As you gain more experience, you can explore advanced features such as middlewares, sticky sessions, and custom SSL configurations.
Traefik is a powerful tool for anyone looking to manage traffic in a Docker environment, whether you're running a few containers or managing a large-scale microservices architecture.