Swarm Mode
- Swarm mode Overview & Key Concepts
- How Nodes work
- How Services work
- Getting started with Swarm mode & Create a swarm
- Understanding Docker Swarm Mode Routing Mesh
Swarm mode Overview & Key Concepts
 Docker Swarm Mode is a feature within Docker that allows you to manage a cluster of Docker nodes (computers running Docker) as if they were a single machine. This is extremely useful for deploying applications that require multiple containers distributed across various servers. It provides built-in tools for clustering, service orchestration, load balancing, and scaling without needing extra software.
In simple terms, Swarm Mode turns a collection of computers running Docker into a "swarm," allowing you to manage services across these machines as though they were one system.
How Docker Swarm Mode Works
When you deploy an application to a swarm, here’s what happens:
- You define a service (e.g., a web server) that should run in the swarm.
- You tell Docker how many replicas (copies) of this service you want running at all times.
- Docker ensures that these replicas are distributed across the available nodes.
- If one node fails or a container crashes, Docker automatically adjusts to maintain the desired state.
Here’s an example: Let’s say you want to run a web application in a swarm with 5 replicas of a web server. Docker will create 5 containers and distribute them across the nodes in the swarm. If one node fails, Docker will automatically start new containers on other nodes to keep 5 web servers running.
Key Concepts in Docker Swarm Mode
1. Nodes
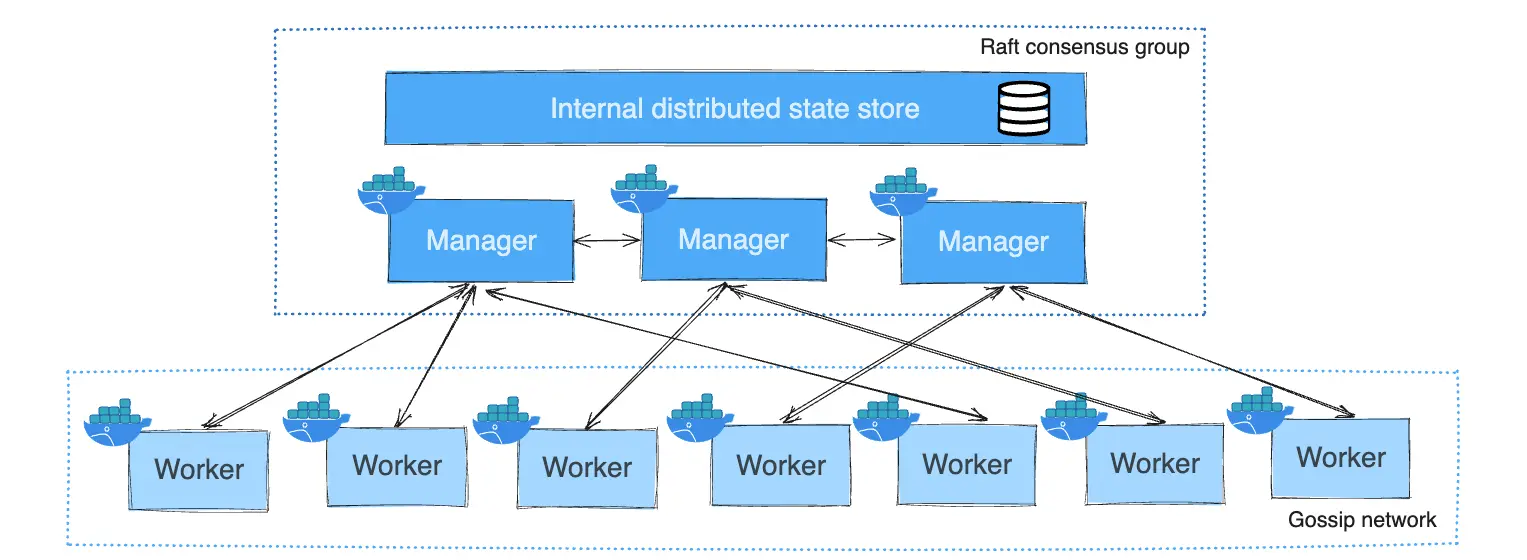
A node is any machine that is part of a Docker Swarm cluster. Nodes can either be manager nodes (which control the swarm) or worker nodes (which run containers). In a real-world production environment, nodes are often spread across multiple physical servers or cloud machines.
- Manager Node: Manages the cluster by keeping track of tasks and assigning them to workers. The manager also ensures that the desired number of containers are always running.
- Worker Node: Receives and executes tasks given by the manager. Workers run the containers but do not manage the swarm.
2. Services and Tasks
-
A service is a definition of what needs to be run in the swarm. When you create a service, you specify things like the container image to use and how many copies (replicas) of the service should run.
There are two types of services:
- Replicated Services: The swarm manager assigns a set number of replica tasks to run across the available nodes.
- Global Services: A task for this service runs on every node in the swarm.
-
A task is a unit of work, which includes running a Docker container. Each task is scheduled by the swarm manager to be executed on one of the worker nodes. Once a task is assigned to a node, it remains on that node until it completes or fails.
3. Load Balancing
Docker Swarm has built-in load balancing to distribute traffic between the different containers running on the swarm. When external users access a service, the traffic is routed to any node in the swarm, and that node forwards the request to the appropriate container running the service. Swarm uses ingress load balancing for external traffic and internal DNS-based load balancing for traffic within the swarm.
4. Desired State Reconciliation
One of the most important features of Docker Swarm is its ability to maintain the desired state. The manager nodes constantly monitor the swarm and automatically adjust the number of containers to match what you have defined. For example, if one of the worker nodes fails, the manager will ensure that new containers are created on other nodes to maintain the required number of replicas.
Docker Swarm Mode Features
-
Cluster Management: Swarm Mode provides built-in tools for managing a cluster of Docker nodes without needing additional software.
-
Declarative Service Model: You define what you want your application to look like (number of containers, network, resources) and Docker ensures it matches your specification.
-
Automatic Scaling: You can increase or decrease the number of service replicas at any time, and Docker will automatically adjust the cluster to match.
-
Rolling Updates: When you update your application, Docker can gradually roll out the update to your nodes. If something goes wrong, you can roll back to a previous version of the service.
-
Multi-Host Networking: Docker allows services to communicate across different nodes using an overlay network. This simplifies networking across nodes in different locations.
-
Service Discovery: Docker Swarm automatically assigns each service a DNS name, so containers can find and communicate with each other easily.
-
Security: Docker Swarm Mode is secure by default. All communications between nodes in the swarm are encrypted using TLS, and each node must authenticate itself to the others.
Swarm Mode vs. Standalone Containers
When running Docker in Swarm Mode, you can still use standalone containers alongside your swarm services. However, there are key differences between the two:
- Swarm Services: These are managed by the swarm manager and offer advanced features like scaling, load balancing, and automatic updates.
- Standalone Containers: These are not part of the swarm, and you manage them manually, just like regular Docker containers.
When to Use Docker Swarm Mode?
- Production Environments: Swarm Mode is ideal for managing containerized applications in production environments where you need high availability and automatic failover.
- Distributed Applications: If your application needs to run across multiple servers or cloud instances, Docker Swarm provides the tools to manage the cluster efficiently.
- Scaling: If you expect your application to scale, Swarm Mode lets you easily add or remove replicas of your services without downtime.
Conclusion
Docker Swarm Mode is a powerful feature for managing and orchestrating containerized applications across a cluster of machines. It simplifies complex tasks like scaling, load balancing, and maintaining application availability, all while being integrated directly into Docker Engine. With Docker Swarm, you can manage multiple Docker hosts as one, ensuring your applications are resilient, scalable, and easy to update.
How Nodes work
What are Roles?
A swarm is a group of Docker hosts (servers running Docker) that are connected and work together to run containerized applications. Each host can play one of two roles:
- Manager: A node that controls the swarm. It handles the cluster management tasks, such as assigning workloads (tasks) to worker nodes and maintaining the desired state of the services.
- Worker: A node that does the actual work by running containers. The worker nodes execute the tasks assigned by the manager.
Any Docker host in the swarm can be a manager, a worker, or even perform both roles.
Example: Creating a 3-Node Docker Swarm with All Manager Nodes
Let’s walk through an example where we set up a Docker Swarm with three nodes, all acting as manager nodes. This scenario is useful when you want high availability and fault tolerance in your cluster, meaning if one or two manager nodes fail, the remaining nodes can continue managing the swarm.
Why Make All Nodes Managers?
In a Docker Swarm, manager nodes are responsible for handling the cluster's state, scheduling tasks, and distributing containers to the worker nodes. By making all three nodes managers, you ensure that your swarm can tolerate failures of one or even two nodes and still function. This is known as high availability because the swarm can elect a new leader and continue operating without downtime.
If you haven't already, read through the Swarm mode overview and key concepts.
Manager Nodes
Manager nodes play a crucial role in maintaining and orchestrating the state of the swarm. They are responsible for:
- Maintaining Cluster State: Manager nodes keep track of the state of the swarm and all services running on it, ensuring that the desired state (e.g., the number of replicas of a service) is met.
- Scheduling Services: Managers are in charge of scheduling tasks (containers) across the worker nodes in the swarm.
- Serving Swarm Mode HTTP API Endpoints: Manager nodes expose the Swarm mode HTTP API, which is used to control the swarm via commands or automation.
Fault Tolerance and High Availability
Docker Swarm uses a Raft consensus algorithm to ensure that the state of the swarm is consistent across all manager nodes. This is particularly important for high availability. The general rule is that an odd number of managers provides fault tolerance, allowing the swarm to continue functioning if some managers fail.
- A three-manager swarm can tolerate the loss of one manager node.
- A five-manager swarm can tolerate the loss of two manager nodes.
The formula for fault tolerance is that a swarm can tolerate the loss of at most (N-1)/2 manager nodes, where N is the total number of managers.
Best Practices for Manager Nodes
- Odd Number of Managers: To take full advantage of Docker’s fault tolerance, always use an odd number of manager nodes. This ensures that the swarm can maintain quorum (i.e., the minimum number of nodes needed to keep the swarm functional).
- Limit the Number of Managers: Although adding more manager nodes increases fault tolerance, it does not improve performance or scalability. In fact, having too many manager nodes can slow down decision-making processes. Docker recommends a maximum of seven managers in a swarm.
Manager Node Failure
If you’re running a single-manager swarm and the manager node fails, the services on the worker nodes will continue to run, but you won’t be able to control or update the swarm. You’d need to recreate the swarm to recover full control.
In contrast, when running a swarm with multiple managers, if one manager fails, the remaining managers can take over, ensuring that the swarm continues to operate without downtime.
Worker Nodes
Worker nodes are simpler compared to manager nodes. Their primary purpose is to execute containers. Worker nodes don't participate in swarm management decisions and don’t maintain the state of the swarm.
- Executing Tasks: Workers run the containers assigned to them by the manager nodes. They receive tasks (containers to run) and report back to the managers on the status of these tasks.
- No Raft Participation: Worker nodes do not store the cluster's state and don’t participate in the Raft consensus. This allows them to focus purely on running workloads.
Worker Node Setup
In any Docker Swarm, there must be at least one manager node, but you can have any number of worker nodes. By default, all manager nodes also act as workers, meaning they can schedule tasks and run containers.
However, if you want to prevent managers from running containers (e.g., to dedicate them solely to management tasks), you can adjust their availability. This brings us to the concept of Drain Mode.
Manager Node Availability and Drain Mode
In a multi-node swarm, you may want to prevent managers from running any tasks or containers. For example, you might want to ensure that managers are purely dedicated to orchestration and scheduling tasks, leaving the heavy lifting of running containers to worker nodes.
You can change the availability of a manager node to Drain mode, which means the scheduler will not assign new tasks to that node, and existing tasks will be moved to other nodes.
To set a manager node to Drain mode, you can run the following command:
docker node update --availability drain <manager-node-name>This will ensure that the manager node doesn't run any new tasks but continues its role as a swarm manager, making scheduling decisions and maintaining the cluster's state.
Changing Roles: Promoting and Demoting Nodes
Swarm mode also provides flexibility when it comes to changing the roles of your nodes. You can promote a worker node to become a manager or demote a manager node to a worker if needed.
Promoting a Worker to a Manager
If you want to add more fault tolerance to your swarm or need to take a manager node offline for maintenance, you can promote a worker node to a manager. This is done with the following command:
docker node promote <worker-node-name>This is useful in situations where you want to ensure that the cluster remains highly available, even if one of your manager nodes needs to be taken down.
Demoting a Manager to a Worker
If you no longer need a manager node or want to reduce the number of managers for better performance, you can demote a manager back to a worker. This can be done using:
docker node demote <manager-node-name>Conclusion
Understanding the roles of manager and worker nodes in Docker Swarm is essential for creating a stable, highly available, and scalable cluster. Manager nodes handle critical tasks such as maintaining the cluster state and scheduling services, while worker nodes focus purely on running containers.
In larger clusters, having multiple manager nodes ensures that your swarm can tolerate failures without disrupting service. However, it’s important to maintain an odd number of managers for fault tolerance and to avoid adding too many managers, as this can slow down the swarm’s performance.
By effectively using Drain mode and node promotion/demotion, you can adjust your swarm’s architecture to meet your organization’s needs, ensuring optimal performance and availability.
How Services work
When Docker Engine operates in Swarm mode, services become the fundamental units for deploying and managing applications. A service is essentially a set of instructions for running containerized applications across multiple Docker nodes. This might be part of a larger application, such as a microservice architecture, or it could be a stand-alone service like an HTTP server or a database.
What is a Service?
A service in Docker Swarm represents a task that you want to run, such as running a containerized application.
When you create a service, you specify a few essential options:
- The container image to use for the service.
- Commands to execute inside the running containers.
- The port to expose to make the service available outside the swarm.
- An overlay network to connect the service with other services within the swarm.
- CPU and memory limits for the resources allocated to each service instance.
- Rolling update policies to control how services are updated across the swarm.
- The number of replicas (i.e., how many copies of the service) you want to run.
Services, Tasks, and Containers
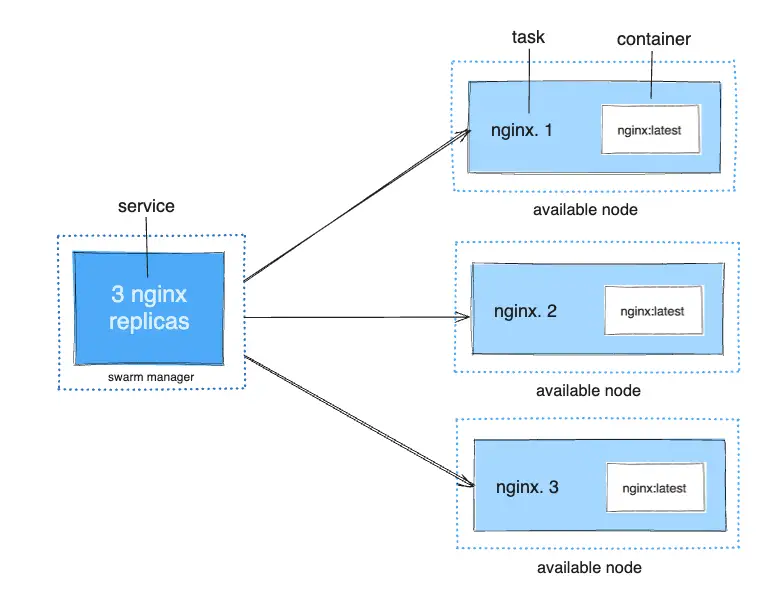
Once you define the service, the swarm manager takes your service definition and turns it into one or more tasks. A task is the smallest unit of work in a swarm and represents a single instance of a container running on a node.
For example, if you want to balance traffic between three instances of a web server, you might deploy a service with three replicas. Each replica is a task, and each task runs one container on a different node.
- Service: Defines the application you want to run.
- Task: A unit of work managed by the swarm that runs a single container.
- Container: The actual application process that runs as part of a task on a node.
In short, when you deploy a service, you define the desired state, and Docker Swarm schedules that service across the available nodes.
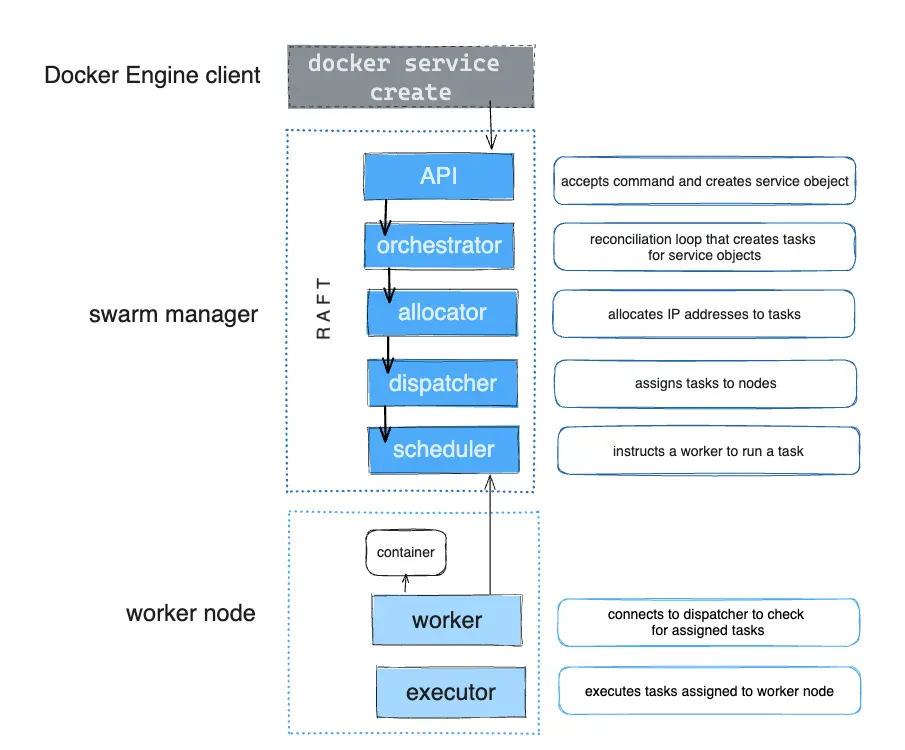
Tasks and Scheduling
When you create or update a service, you declare a desired state (e.g., three instances of an HTTP service). The orchestrator (which is part of the swarm manager) ensures that this state is met by creating and scheduling tasks. For instance, if you define a service with three replicas, the swarm manager creates three tasks. Each task runs a container on a node.
If a container crashes or fails its health check, the orchestrator detects the failure and schedules a new task to replace it, ensuring that the desired state of the service is always maintained.
Pending Services
Sometimes, a service may remain in a pending state, meaning that it cannot be deployed yet. Here are a few scenarios where this might happen:
- Node Availability: If no nodes are available to run tasks (e.g., all nodes are in paused or drained mode), the service will remain in the pending state until nodes become available.
- Resource Constraints: If the service requires more memory or CPU than any node can provide (e.g., a service requiring 500GB of RAM but no node has that capacity), the service will stay pending.
- Placement Constraints: If the service is configured with specific placement constraints (e.g., to only run on certain nodes), it may stay pending until a suitable node is available.
Tip:
In these cases, it is often better to scale the service to zero replicas if your goal is to pause the service temporarily.
If your only intention is to prevent a service from being deployed, scale the service to 0 instead of trying to configure it in such a way that it remains in pending.
Replicated and Global Services
There are two types of services in Docker Swarm: replicated services and global services.
Replicated Services
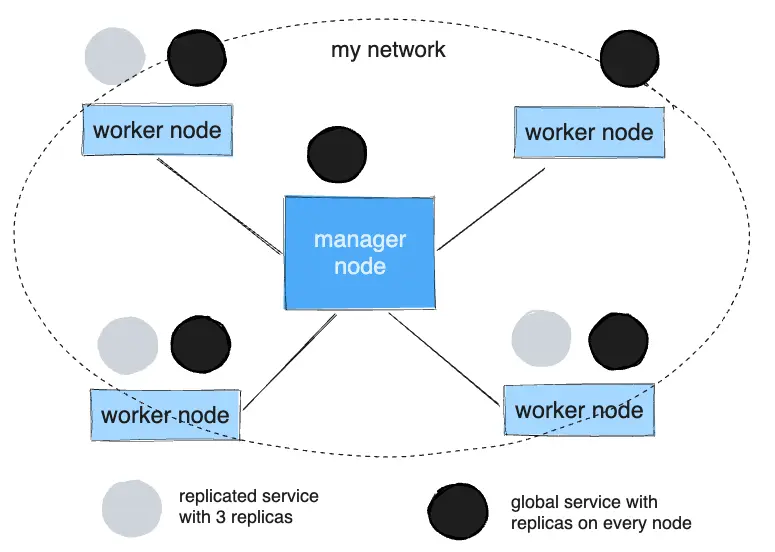
For replicated services, you specify the number of identical tasks you want to run. Each replica runs on a separate node, providing redundancy and load balancing. For example, if you create a service with three replicas, the swarm manager ensures that three identical instances (tasks) of the service are running on different nodes.
This is useful for applications like web servers, where you want multiple instances of the same service to handle requests simultaneously.
Global Services
A global service runs one instance of the service on every node in the swarm. You do not specify the number of replicas; instead, the swarm ensures that each node runs exactly one instance of the service.
Global services are ideal for tasks like monitoring or logging agents, where you want each node to run the same service. For example, you might use a global service to run an anti-virus scanner or a network monitoring agent on every node in your swarm.
The diagram below shows a three-service replica in gray and a global service in black.
Getting started with Swarm mode & Create a swarm
This tutorial introduces Docker Swarm mode, which allows you to deploy and manage containerized applications across a cluster of Docker nodes. In Swarm mode, Docker Engine transforms multiple Docker hosts into a single, distributed system, making it easier to scale, orchestrate, and manage applications.
What This Tutorial Covers:
- Initializing a Docker Swarm
- Adding nodes to the Swarm
- Deploying services to the Swarm
- Managing the Swarm (Lightweight Version)
Prerequisites:
- You need three Linux hosts (physical or virtual machines) that can communicate over a network, with Docker installed.
- Open ports between the hosts.
- The IP address of the manager node.
Step 1: Setting Up the Environment
To get started, you'll need three Linux hosts that can communicate over a network. These hosts can be physical machines, virtual machines, or cloud instances (e.g., Amazon EC2).
- One of these hosts will be the manager (we’ll call it
manager1). - The other two hosts will be workers (
worker1andworker2).
You can follow most steps of this tutorial on a single-node Swarm (with just one host), but for full multi-node functionality, you’ll need three hosts.
Install Docker Engine on Linux Hosts
Follow Docker's official installation instructions for your Linux distribution to install Docker on each of your machines. Once Docker is installed, you’re ready to create your Swarm.
Check the Manager Node's IP Address
You’ll need the IP address of the manager node (manager1) for the Swarm to function properly. To find it, run the following command on manager1:
ifconfigThis will display a list of available network interfaces. Pick the IP address that is accessible to the other nodes in the network. The tutorial assumes manager1 has the IP address 192.168.99.100.
Step 2: Open Required Ports
Ensure the following ports are open between all your nodes:
- Port 2377 (TCP): For communication between manager nodes.
- Port 7946 (TCP/UDP): For node discovery within the overlay network.
- Port 4789 (UDP): For overlay network traffic (VXLAN).
If you plan to use an encrypted overlay network, ensure IPSec ESP traffic is allowed on IP protocol 50.
To secure your swarm further, consider applying the following iptables rule to block untrusted traffic from reaching the Swarm’s data path port (4789):
iptables -I INPUT -m udp --dport 4789 -m policy --dir in --pol none -j DROP
Step 3: Initializing the Swarm
Once your setup is ready, it’s time to initialize the Swarm on your manager node (manager1).
- SSH into the
manager1machine. - Run the following command to initialize the Swarm, specifying the IP address of the manager node:
docker swarm init --advertise-addr 192.168.99.100
If successful, the output will look like this:
Swarm initialized: current node (dxn1zf6l61qsb1josjja83ngz) is now a manager.It will also provide the command to add worker nodes to the swarm:
docker swarm join --token <worker-token> 192.168.99.100:2377
Step 4: Adding Worker Nodes to the Swarm
Now that the Swarm is initialized, you can add your worker nodes (worker1 and worker2).
- SSH into each worker node (
worker1andworker2). - Run the
docker swarm joincommand provided when you initialized the Swarm onmanager1.
For example, on worker1, the command might look like this:
docker swarm join --token SWMTKN-1-49nj1cmql0jkz5s954yi3oex3nedyz0fb0xx14ie39trti4wxv-8vxv8rssmk743ojnwacrr2e7c 192.168.99.100:2377Repeat this step for worker2. Once completed, both worker1 and worker2 will join the swarm and begin listening for tasks from the manager.
Step 5: Verifying the Swarm
To verify that all nodes have successfully joined the swarm, SSH into the manager node (manager1) and run the following command:
docker node lsYou should see all three nodes (manager1, worker1, and worker2) listed, along with their roles and statuses:
ID                           HOSTNAME   STATUS  AVAILABILITY  MANAGER STATUS
dxn1zf6l61qsb1josjja83ngz *  manager1   Ready   Active        Leader
8l3nse6qox9pxdj67c5utodl4    worker1    Ready   Active
fxp1kjvthh2qyuodhd83uixg5    worker2    Ready   Active
The * next to manager1 indicates that you're currently connected to this node. The MANAGER STATUS column shows that manager1 is the leader.
Step 6: Deploying a Service to the Swarm
Now that your swarm is ready, you can deploy a service to it. For example, you can deploy an Nginx web server service with three replicas:
- SSH into the manager node (
manager1). - Run the following command to deploy the service:
This command creates a service calleddocker service create --name web --replicas 3 -p 8080:80 nginxwebwith three replicas, and each replica runs an Nginx container listening on port 80. The service is exposed to the outside world on port 8080.
Step 7: Managing the Swarm
After deploying a service, you can monitor and manage your swarm using several Docker commands.
Viewing Services
To see the list of services running in your swarm, use:
docker service lsViewing Nodes
To check the status of nodes in your swarm, use:
docker node lsScaling Services
If you want to scale the number of replicas for a service (e.g., increase Nginx replicas from 3 to 5), you can run:
docker service scale web=5Removing Services
To remove a service, use the following command:
docker service rm web
Conclusion
Docker Swarm Mode simplifies the process of managing containerized applications across multiple machines. By setting up a swarm and deploying services, you can build a scalable, fault-tolerant infrastructure with minimal effort. This tutorial has covered the essential steps to get started with Docker Swarm, from initializing the swarm to managing services on it.
Understanding Docker Swarm Mode Routing Mesh
Docker Swarm Mode introduces the concept of a routing mesh, a powerful feature that simplifies the process of exposing services to external clients in a swarm cluster. This tutorial provides an overview of how the ingress network and routing mesh work, how to publish ports for services, and how to configure an external load balancer like HAProxy to interact with a Swarm service.
What is the Routing Mesh?
The routing mesh in Docker Swarm Mode allows all nodes in the swarm to accept connections to a published service port, even if the service isn't running on that particular node. The routing mesh automatically routes incoming requests to a node where an instance of the service is active, ensuring the requests are handled efficiently and transparently.
Ingress Network
The ingress network is a special network created by Docker for the purpose of handling the routing mesh. All Swarm services are connected to the ingress network, allowing them to communicate and route requests to the correct node.
Key Ports to Open
Before you enable Swarm Mode and use the ingress network, make sure the following ports are open between the swarm nodes:
- Port 7946 (TCP/UDP): For container network discovery.
- Port 4789 (UDP): For the container ingress network (VXLAN).
How the Routing Mesh Works
When you publish a service in Docker Swarm, each node in the swarm can receive traffic for that service, regardless of whether the service is running on that node or not. The swarm manager's routing mesh ensures that requests are forwarded to the appropriate node where the service is active.
Example:
You have three nodes in your swarm:
node1with IP192.168.99.100node2with IP192.168.99.101node3with IP192.168.99.102
You deploy a service called my-web using the Nginx container. Even if the Nginx container is only running on node1 and node2, you can send a request to node3, and Docker will route that request to one of the active containers running on node1 or node2.
Here’s an example of the command to create the service with two replicas:
docker service create \
  --name my-web \
  --publish published=8080,target=80 \
  --replicas 2 \
  nginx
In this case, the Nginx service is available on port 8080 on all swarm nodes.

In the diagram above, you can see that requests sent to any node on port 8080 are routed to the appropriate Nginx instance.
Publishing a Port for a Service
To expose a service to the outside world, you use the --publish flag when creating the service. This flag lets you map a port on the node (published port) to a port inside the container (target port).
For example:
docker service create \
  --name my-web \
  --publish published=8080,target=80 \
  nginx
This command publishes port 8080 on the swarm nodes and maps it to port 80 inside the Nginx container.
- published: The port that the swarm makes available outside the container.
- target: The port that the container listens on (inside the container).
Viewing Published Ports with docker service inspect
You can use docker service inspect to view detailed information about a service, including which ports have been published.
For example, to inspect the my-web service:
docker service inspect --format="{{json .Endpoint.Spec.Ports}}" my-webThe output will show the TargetPort (the container’s internal port) and the PublishedPort (the port on the swarm nodes):
[{"Protocol":"tcp","TargetPort":80,"PublishedPort":8080}]
Configuring an External Load Balancer with the Routing Mesh
In a real-world production scenario, you may want to use an external load balancer such as HAProxy to handle traffic across multiple swarm nodes. The load balancer can distribute incoming traffic to the nodes in the swarm, which will then use the routing mesh to route the traffic to the correct container.
Example HAProxy Configuration
The following HAProxy configuration listens on port 80 and forwards requests to the my-web service running on port 8080 on the swarm nodes:
global
    log /dev/log local0
    log /dev/log local1 notice

frontend http_front
   bind *:80
   stats uri /haproxy?stats
   default_backend http_back

backend http_back
   balance roundrobin
   server node1 192.168.99.100:8080 check
   server node2 192.168.99.101:8080 check
   server node3 192.168.99.102:8080 check
This configuration ensures that incoming traffic on port 80 is distributed across the nodes (node1, node2, and node3) on port 8080.
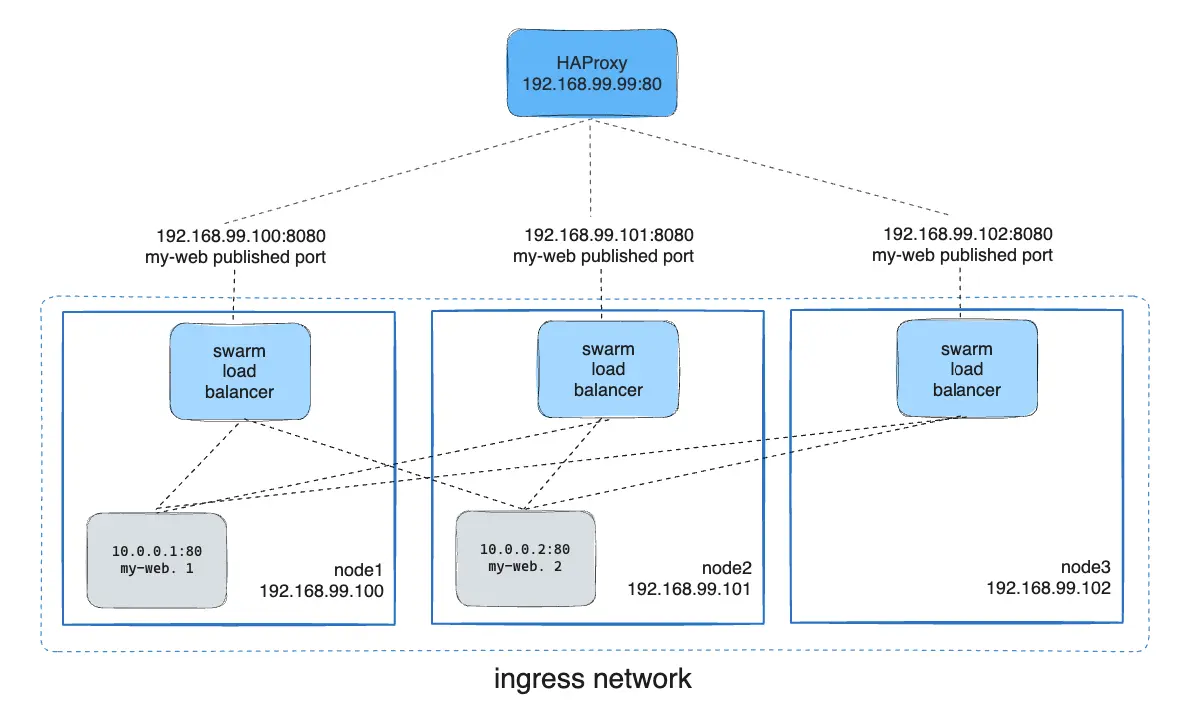
In the above diagram, the HAProxy load balancer distributes requests across all nodes in the swarm, and the swarm routing mesh ensures that traffic is forwarded to an active container.
Bypassing the Routing Mesh (Host Mode)
In some cases, you may want to bypass the routing mesh so that requests are sent directly to the node that is running the service. This is useful when you want to ensure that only nodes running the service are accessible on the published port. This mode is referred to as host mode.
To bypass the routing mesh, use the --publish flag with the mode=host option:
docker service create --name dns-cache \
  --publish published=53,target=53,protocol=udp,mode=host \
  --mode global \
  dns-cache
In host mode, traffic sent to a node will only be handled if that node is running the service task. Otherwise, the connection will fail.
Using an External Load Balancer Without the Routing Mesh
If you want to bypass the routing mesh entirely, you can configure an external load balancer to handle traffic without relying on the Swarm's built-in load balancing.
Use --endpoint-mode dnsrr to configure Docker to return a list of IP addresses for the nodes running the service when queried, rather than a virtual IP. This allows your external load balancer to directly handle traffic distribution based on DNS entries.
Example:
docker service create \
  --name my-web \
  --publish published=8080,target=80 \
  --endpoint-mode dnsrr \
  nginx
In this mode, the load balancer directly routes traffic to nodes running the service, without going through the swarm routing mesh.
Conclusion
Docker Swarm Mode's routing mesh and ingress network provide powerful and flexible ways to expose services to external clients. By using the routing mesh, all swarm nodes can participate in traffic routing, providing high availability and fault tolerance. For more control, you can configure external load balancers like HAProxy or bypass the routing mesh entirely to meet specific needs.
Whether you are using the default routing mesh or integrating with an external load balancer, Docker Swarm Mode simplifies the process of deploying and scaling services across distributed systems.