Beszel
A lightweight server monitor with Docker stats, historical data, and alerts.
Overview
What is Beszel?


Introduction
Beszel is a lightweight server monitoring platform that provides a friendly, configurable interface for tracking system health and Docker statistics. It supports historical data storage, alerting, and simple setup processes. It offers multi-user support, OAuth / OIDC authentication, automatic backups, and more—making it ready to use out of the box.
Architecture
Beszel consists of two main components: the hub and the agent.
- Hub: A web application built on PocketBase that provides a dashboard for viewing and managing connected systems.
- Agent: Runs on each system you want to monitor, creating a minimal SSH server to communicate system metrics to the hub.
Features
- ⚡ Lightweight server monitoring with minimal resource consumption.
- ✅ Simple web interface: quick to configure and easy to use.
- 🐳 Docker stats: track CPU, memory, and network usage for containers.
- 📈 Historical data: log metrics over time for trend analysis.
- 🔔 Alerts: configurable notifications for CPU, memory, disk usage, and more.
- 👥 Multi-user access: each user manages their own systems, admins can share systems.
- 🔐 OAuth / OIDC support: connect with popular third-party authentication providers.
- 💾 Automatic backups: store data on disk or in S3-compatible storage.
- 🛠️ REST API: build automation scripts or integrate with external applications.
- ✨ Ready to go: no complex setup or public internet exposure needed.
Supported Metrics
- 🖥️ CPU usage: Host system and Docker/Podman containers.
- 🧠 Memory usage: Host system and containers (including swap and ZFS ARC).
- 💽 Disk usage: Host system (multiple partitions and devices supported).
- 🔄 Disk I/O: Host system (multiple partitions and devices supported).
- 🌐 Network usage: Host system and containers.
- 🌡️ Temperature: Host system sensors.
- 🎨 GPU usage/temperature/power draw: Nvidia and AMD only (must use binary agent).
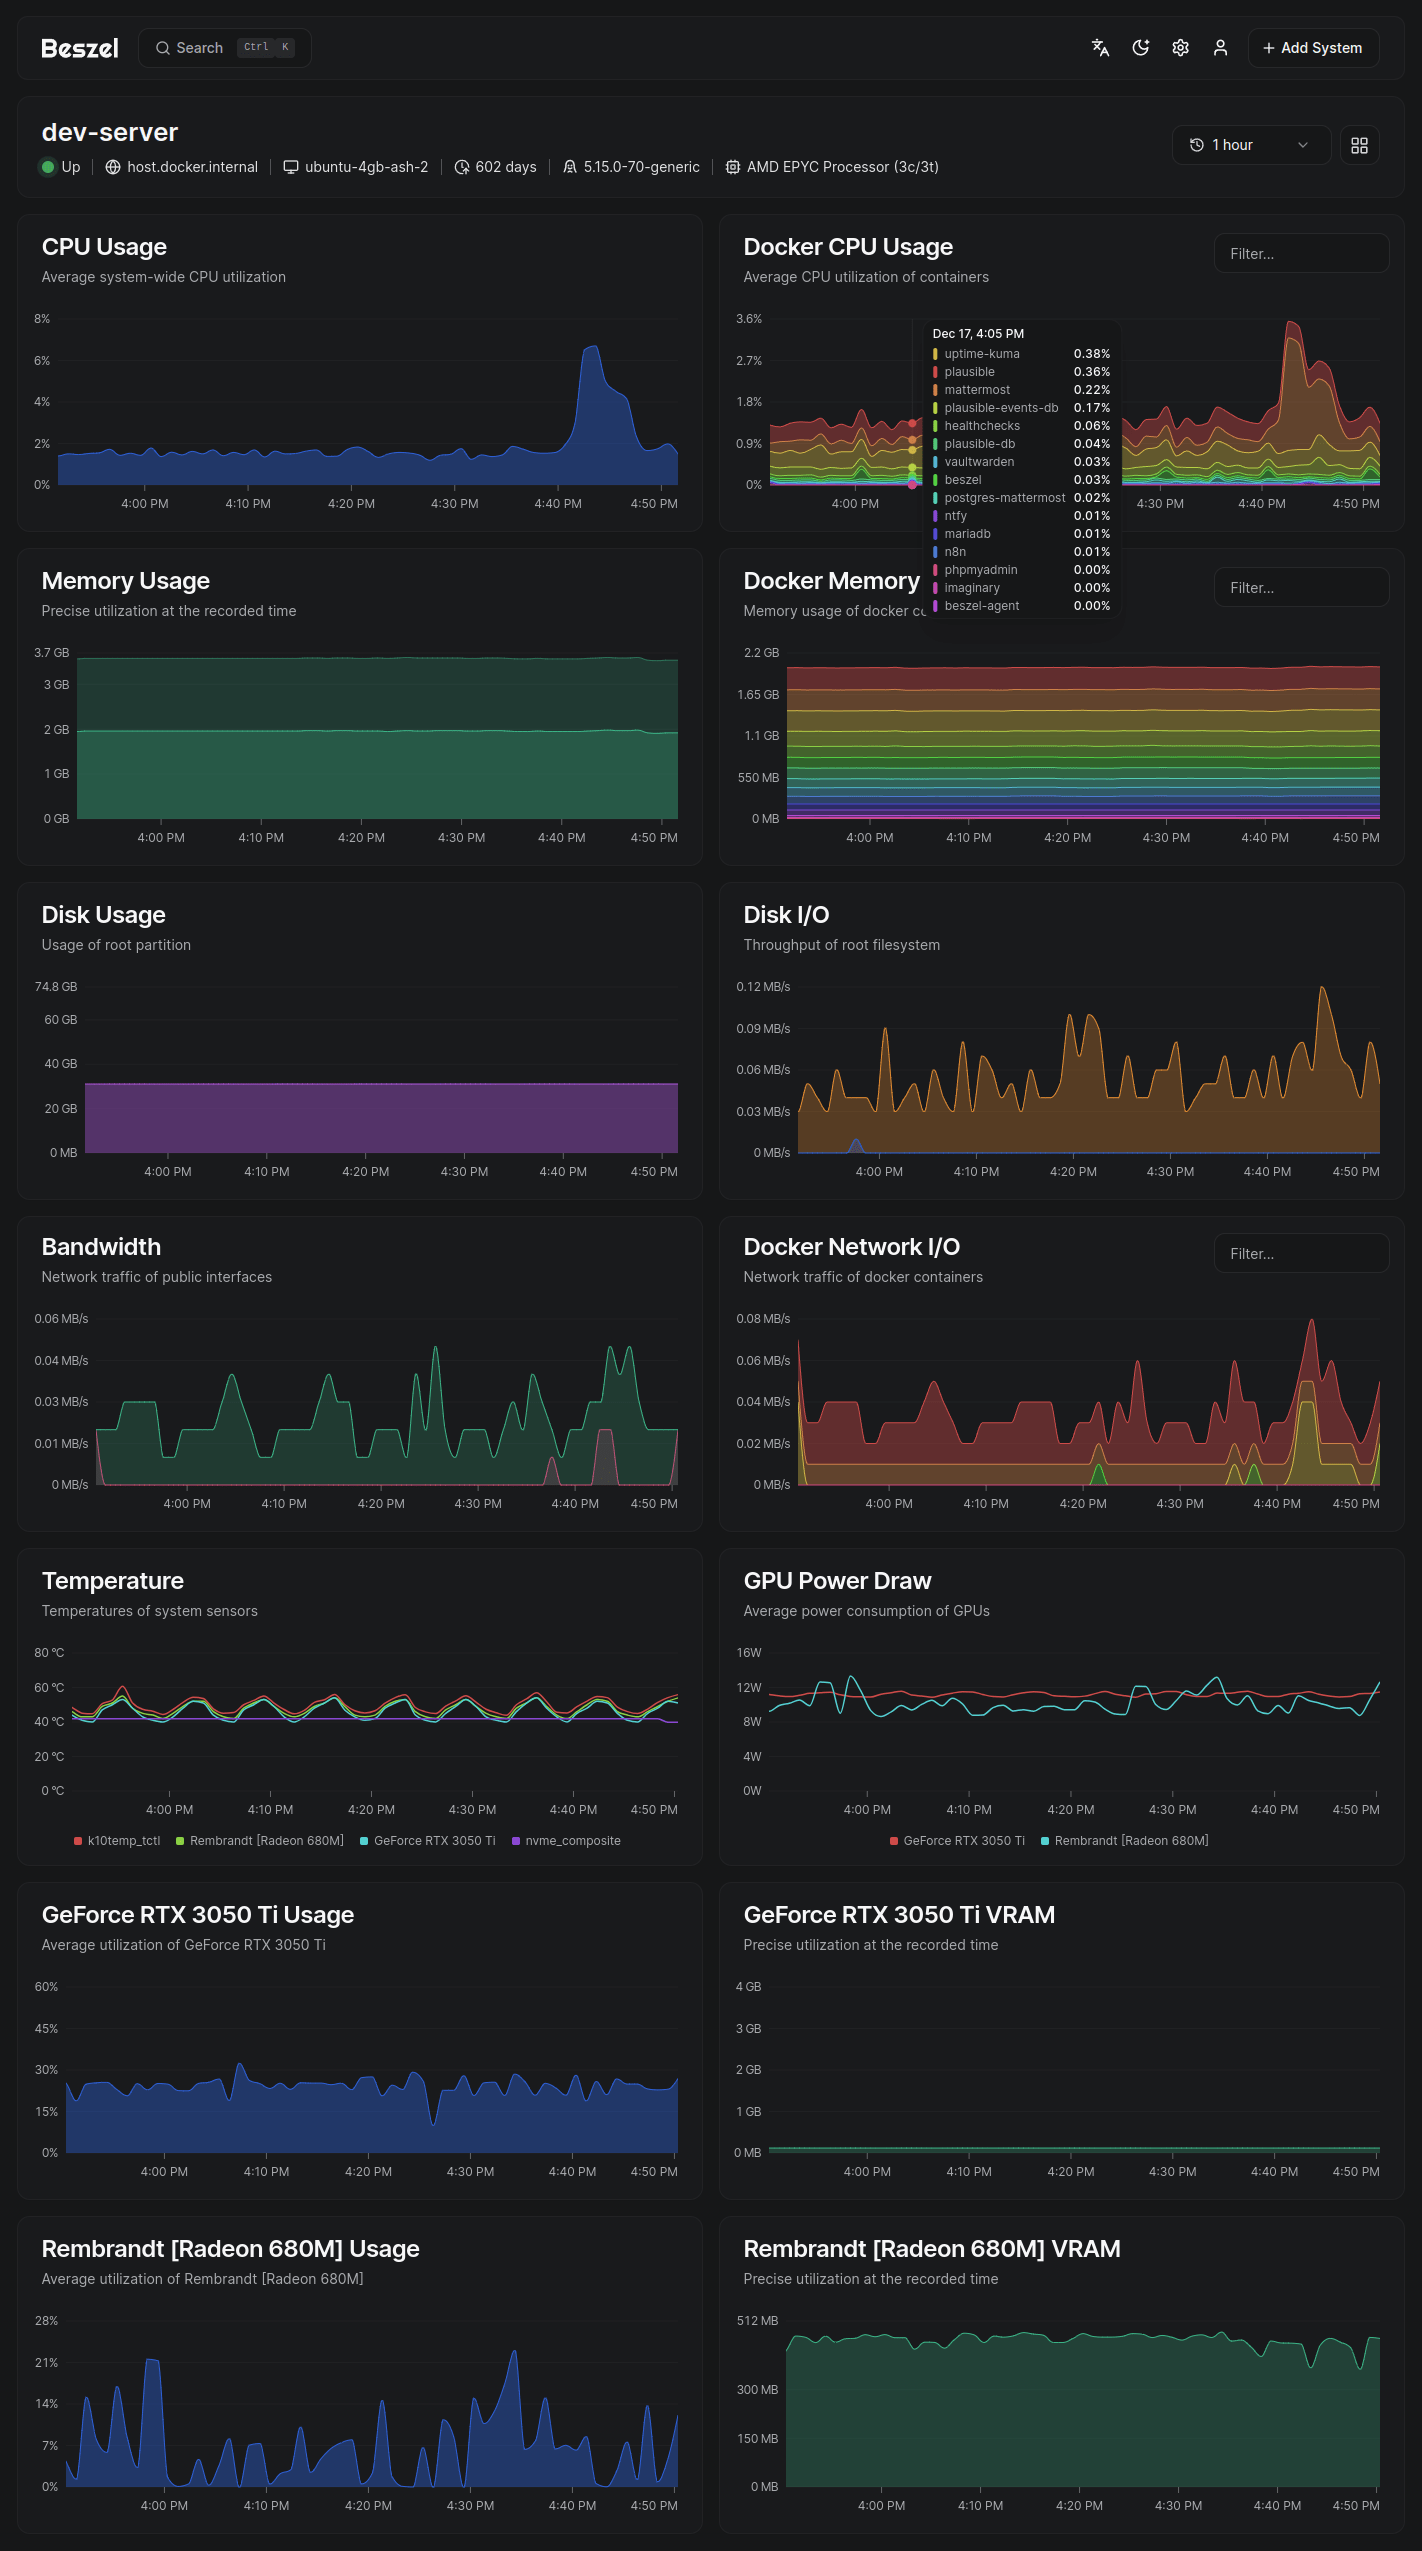
Screenshots
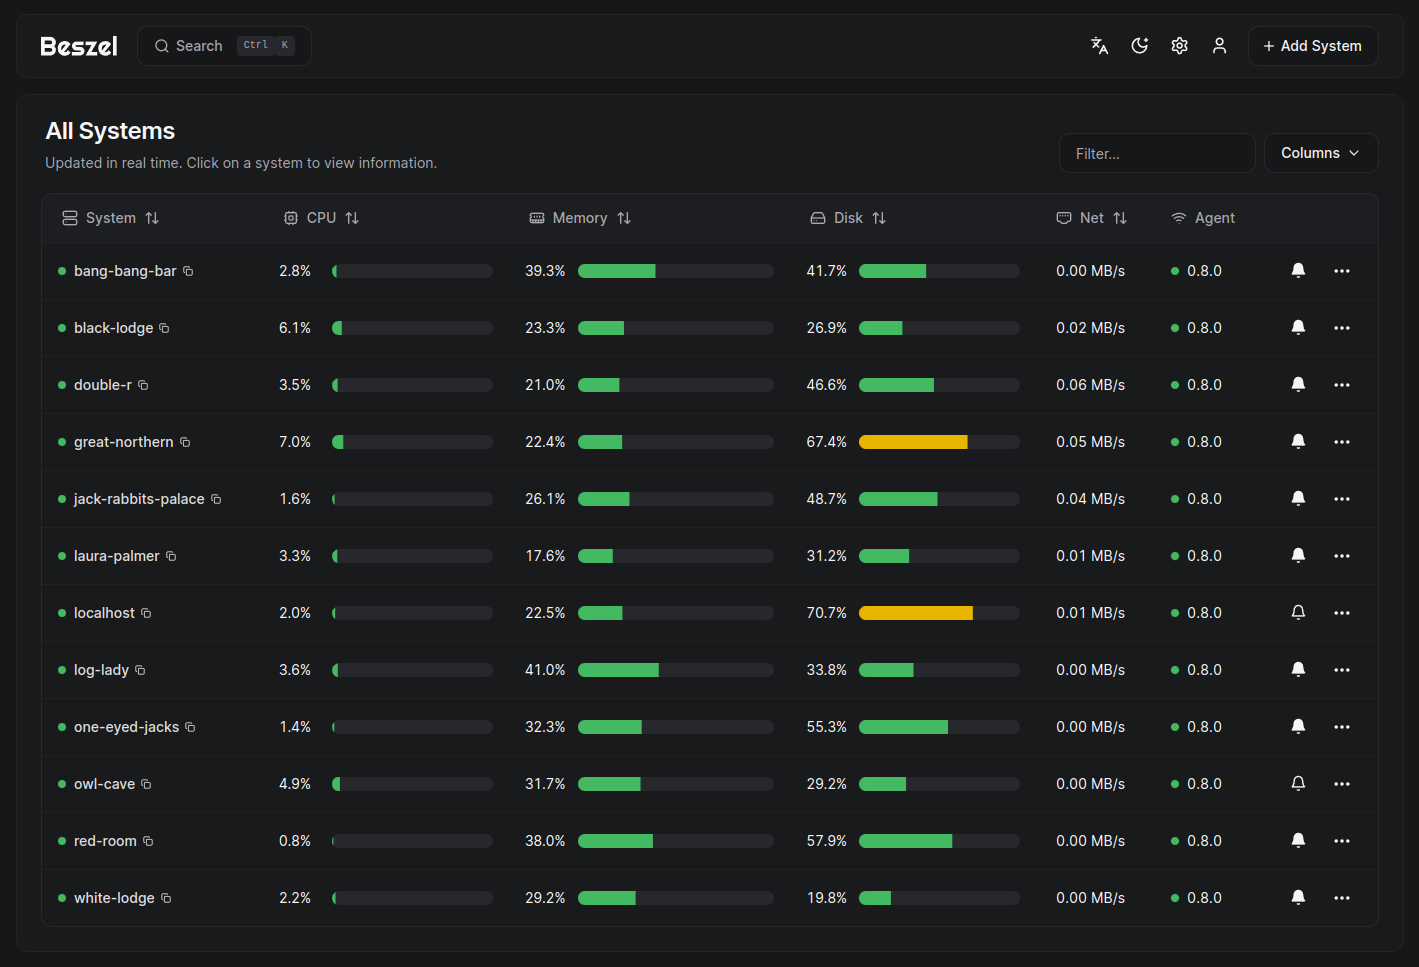
Metrics:
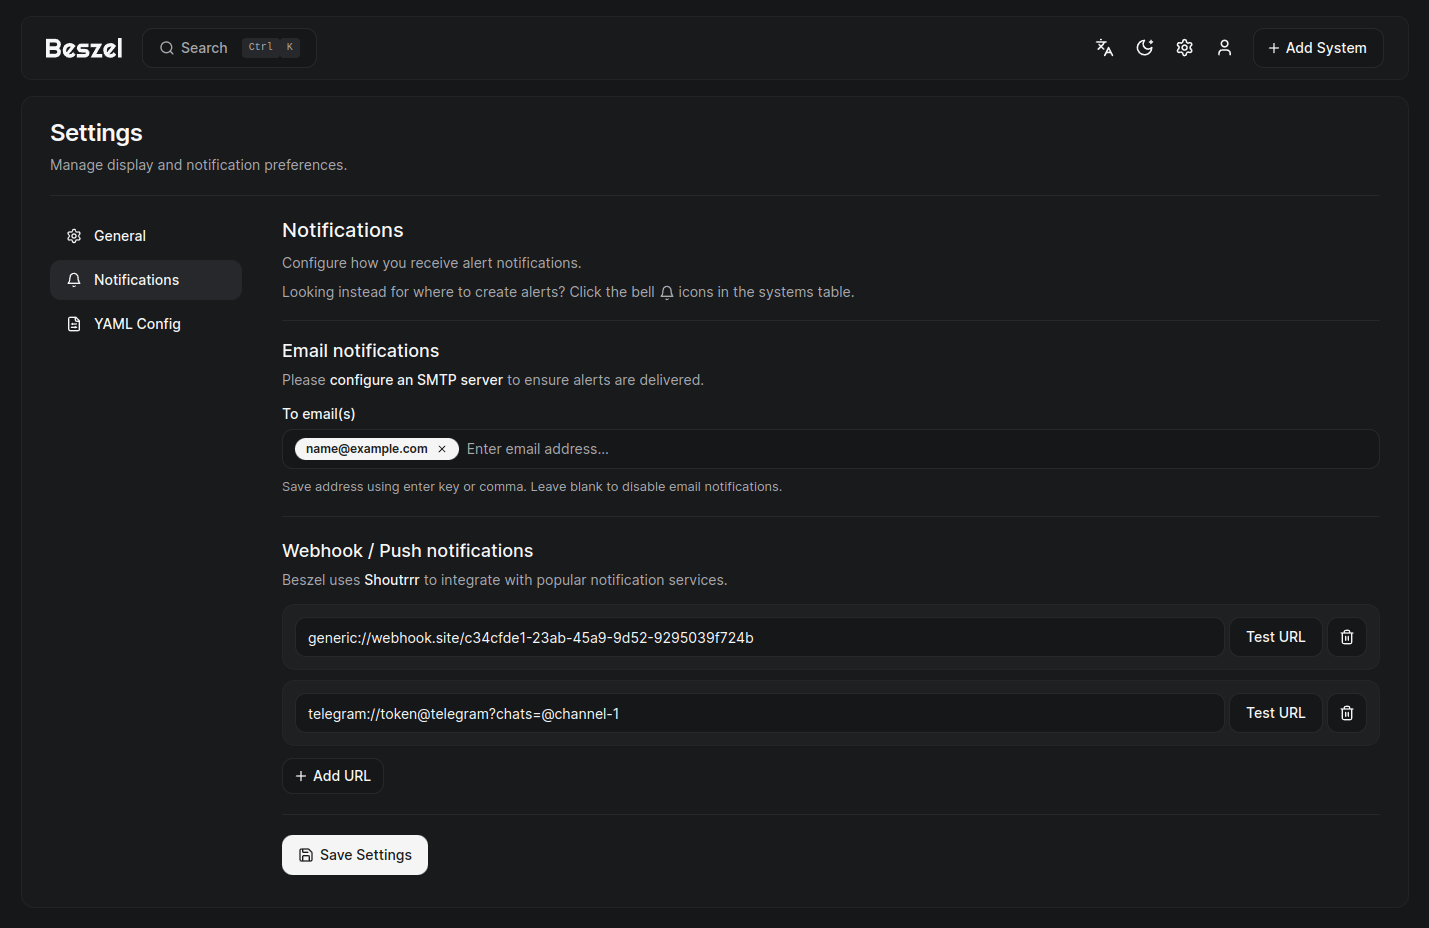
Settings:
Getting Started
Quickstart Guide
Introduction
Architecture
Beszel consists of two main components:
- Hub: A web application that provides a dashboard for viewing and managing connected systems. Built on PocketBase.
- Agent: Runs on each system you want to monitor, creating a minimal SSH server to communicate system metrics to the hub.
Step 1: Create the Necessary Folders
If you have multiple nodes and a Docker Swarm environment, you can reference the GlusterFS guide for distributing folders across nodes. The Folders needs to be Accasable from every Node and be updated in realtime.
mkdir -p /mnt/glustermount/data/beszel_dataStep 2: Docker Compose or Portainer for Initial Setup
You can either create a docker-compose.yaml file manually or use Portainer to set up Beszel. Below is an example configuration that should work out of the box for a standalone Docker setup.
IMPORTANT: After you add a new system in the Beszel web UI, you must update the KEY value with your public key (provided by the hub) and then restart the agent service. Also, use host.docker.internal as the Host/IP when prompted, instead of localhost or 127.0.0.1.
Always make sure your beszel-hub starts first. So on the Agent you add the Option: ""depends_on:"
Docker Standalone Example
services:
  beszel:
    image: henrygd/beszel:latest
    container_name: beszel
    restart: unless-stopped
    extra_hosts:
      - host.docker.internal:host-gateway
    ports:
      - 8090:8090
    volumes:
      - /mnt/glustermount/data/beszel_data:/beszel_data

  beszel-agent:
    image: henrygd/beszel-agent:latest
    container_name: beszel-agent
    restart: unless-stopped
    network_mode: host
    volumes:
      - /var/run/docker.sock:/var/run/docker.sock:ro
    environment:
      PORT: 45876
      # Do not remove quotes around the key
      KEY: 'UPDATE WITH YOUR PUBLIC KEY (copy from "Add system" dialog)'
Docker Swarm + Traefik Example
version: "3.7"

services:
  beszel:
    image: henrygd/beszel:latest
    container_name: beszel
    restart: unless-stopped
    networks:
      - management_net
    extra_hosts:
      - host.docker.internal:host-gateway
    ports:
      - 8090:8090
    volumes:
      - /mnt/glustermount/data/beszel_data:/beszel_data
    deploy:
      mode: replicated
      replicas: 1
      labels:
        - "traefik.enable=true"
        - "traefik.http.services.beszel-agent.loadbalancer.server.port=8090"

  beszel-agent:
    image: henrygd/beszel-agent:latest
    container_name: beszel-agent
    restart: unless-stopped
    network_mode: host
    depends_on:
      - beszel_beszel
    ports:
      - 45876:45876
    volumes:
      - /var/run/docker.sock:/var/run/docker.sock:ro
    environment:
      PORT: 45876
      # Do not remove quotes around the key
      KEY: 'UPDATE WITH YOUR PUBLIC KEY (copy from "Add system" dialog)'
    deploy:
      mode: replicated
      replicas: 1
      labels:
        - "traefik.enable=true"
        - "traefik.http.services.beszel-agent.loadbalancer.server.port=45876"

networks:
  management_net:
    external: true
In Docker Swarm the Name-Conventions might be a little different, thats why the Depends_on Option uses beszel_beszel and not only beszel. because the first beszel stands for the stackname and the second beszel for the service name defined in the docker-compose
Why network_mode: host?
The agent must use host network mode to access network interface metrics, which automatically exposes the port. If you do not need network statistics, you can remove network_mode: host and map the port manually in the Compose file.
Step 3: Start the Containers
Once you've created your Compose file, you can deploy the services. The process differs slightly depending on your setup:
- Docker Swarm:
docker stack deploy -c docker-compose.yaml beszel - Docker Standalone:
docker compose up -d - Portainer: Use the Portainer UI to import the
docker-compose.yamlfile and start the stack.
Step 4: Create an Admin User
Open http://localhost:8090 (or your chosen URL/port) in your browser and follow the prompts to create an admin user.
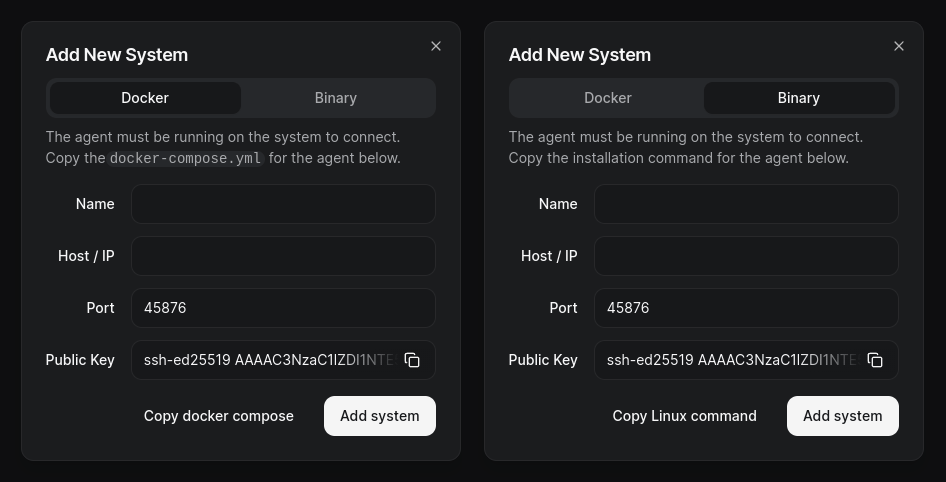
Step 5: Adding Systems / Nodes
When you add a new system from the Beszel hub's web UI, you'll be given a snippet for the beszel-agent configuration (Docker Compose or a binary install command). Copy the public key from the "Add system" dialog and place it in the KEY variable of your agent container or service.
Different Agents on Different Nodes:
If you plan to monitor multiple nodes with Docker Swarm, you can create separate agent services, each running on a different node with constraints to ensure proper placement.
Make sure to give each Agent an unique Servicename.
Make sure to give each Agent an unique Port and also change that Port in the Web-UI when adding a new System.
beszel-agent1:
  image: henrygd/beszel-agent:latest
  restart: unless-stopped
  network_mode: host
  depends_on:
    - beszel_beszel
  volumes:
    - /var/run/docker.sock:/var/run/docker.sock:ro
  ports:
    - 45876:45876
  environment:
    PORT: 45876
    KEY: 'YOUR_PUBLIC_KEY_FROM_HUB'
  deploy:
    mode: replicated
    replicas: 1
    labels:
      - "traefik.enable=true"
      - "traefik.http.services.beszel-agent1.loadbalancer.server.port=45876"
    placement:
      constraints:
        - node.hostname == swarmpi1  # Only deploy on node 'swarmpi1'

beszel-agent2:
  image: henrygd/beszel-agent:latest
  restart: unless-stopped
  network_mode: host
  depends_on:
    - beszel_beszel
  volumes:
    - /var/run/docker.sock:/var/run/docker.sock:ro
  ports:
    - 45877:45877
  environment:
    PORT: 45877
    KEY: 'YOUR_PUBLIC_KEY_FROM_HUB'
  deploy:
    mode: replicated
    replicas: 1
    labels:
      - "traefik.enable=true"
      - "traefik.http.services.beszel-agent2.loadbalancer.server.port=45877"
    placement:
      constraints:
        - node.hostname == swarmpi2  # Only deploy on node 'swarmpi2'

beszel-agent3:
  image: henrygd/beszel-agent:latest
  restart: unless-stopped
  network_mode: host
  depends_on:
    - beszel_beszel
  volumes:
    - /var/run/docker.sock:/var/run/docker.sock:ro
  ports:
    - 45878:45878
  environment:
    PORT: 45878
    KEY: 'YOUR_PUBLIC_KEY_FROM_HUB'
  deploy:
    mode: replicated
    replicas: 1
    labels:
      - "traefik.enable=true"
      - "traefik.http.services.beszel-agent2.loadbalancer.server.port=45878"
    placement:
      constraints:
        - node.hostname == swarmpi3  # Only deploy on node 'swarmpi3'
Each agent service can then monitor the node on which it is running, allowing you to collect and consolidate metrics across your entire cluster.
Troubbleshooting
If you have Problems with this Quicksetup Guide or its just not running, go visit my Troubbleshooting-Section.
Advanced Configurations
Enviroment Variables
Beszel Environment Variables
Below is a comprehensive list of environment variables for both the Beszel Hub and the Agent. These variables control functionality such as content security policies, OAuth/OIDC behavior, filesystem monitoring, and more. For additional details, refer to the official Beszel Environment Variables Guide.
Hub
| Name | Default | Description |
|---|---|---|
CSP |
unset | Adds a Content-Security-Policy header with this value. |
DISABLE_PASSWORD_AUTH |
false | Disables password authentication. |
USER_CREATION |
false | Enables automatic user creation for OAuth2 / OIDC. |
Agent
| Name | Default | Description |
|---|---|---|
DOCKER_HOST |
unset | Overrides the docker host (docker.sock) if using a proxy. Relevant when using linuxserver/docker-socket-proxy or similar. |
EXTRA_FILESYSTEMS |
unset | Monitor extra disks if using the binary agent. See Additional Disks . |
FILESYSTEM |
unset | Device, partition, or mount point to use for root disk stats. |
KEY |
unset | Public SSH key to use for authentication (provided by the Hub). |
LOG_LEVEL |
info | Logging level. Valid values:
|
GPU Monitoring
GPU Monitoring
Beszel can monitor GPU usage, temperature, and power draw for select devices. This feature is currently only available in the binary agent, not in the Docker agent.
Binary Agent Only
The Docker agent does not support GPU monitoring. You must use the binary agent if you need GPU metrics. For installation and usage details, refer to the official Beszel documentation on installing the binary agent.
AMD GPUs
Beszel uses rocm-smi to monitor AMD GPUs. Ensure rocm-smi is installed on the system running the agent.
- Installation Path: On Arch and Debian systems, installing
rocm-smi-libtypically places the binary in/opt/rocm/bin. - Symlink to /usr/local/bin: If
/opt/rocm/binisn't in the user'sPATH, create a symlink:sudo ln -s /opt/rocm/bin/rocm-smi /usr/local/bin/rocm-smi
Nvidia GPUs
Beszel uses nvidia-smi to monitor Nvidia GPUs. This must be installed on the system.
- Nvidia Jetson Devices: Jetson boards are not compatible with
nvidia-smiand are not currently supported. It may be possible to usetegrastatsto track some metrics, but full support is not yet implemented.
Intel GPUs
Intel GPUs are not currently supported due to:
- No test hardware is available to the developer.
- There is no straightforward utility akin to
nvidia-smifor real-time Intel GPU metrics (utilization, memory usage).
Please see issue #262 for more information or to track progress on Intel GPU support.
User Accounts
User Accounts
This section covers the various user roles in Beszel, their permissions, and how to reset or change passwords. Note that Beszel user roles operate on top of a PocketBase back-end, and some features (like superuser creation) are handled through PocketBase directly.
User Roles
Beszel defines three main user roles:
- Admin: Has access to additional features and settings such as backups, SMTP configurations, and other administrative options within the Beszel Hub. The first user created is automatically granted Admin privileges (and also becomes a PocketBase superuser with the same credentials).
- User: Can create and manage their own systems and alerts but does not have access to the full PocketBase or advanced Beszel administrative settings.
- Read Only: Can view systems shared by an admin and create alerts, but cannot create new systems or make system-level changes.
Important: PocketBase superusers are separate from Beszel user roles. Promoting a Beszel user to Admin role does not create a PocketBase superuser account. If you want them to have access to the PocketBase admin panel (/_/#/ in the browser), you must create a new superuser for them manually via the PocketBase CLI or the Beszel superuser command.
Reset Password
To reset your password, you can use the built-in superuser command in Beszel. The upsert subcommand will reset the password if a superuser already exists for the specified email, or it will create a new superuser if one does not exist.
Once you have a PocketBase superuser account, you can change any user's password via the PocketBase admin interface under the users table.
Docker
docker exec beszel /beszel superuser upsert name@example.com passwordThis command will reset (or create) a PocketBase superuser with the specified email (name@example.com) and password (password).
To see all superuser options:
docker exec beszel /beszel superuser --helpBinary
./beszel superuser upsert name@example.com passwordAnd to list all superuser options:
./beszel superuser --helpTroubbleshooting
Most common Problems
Beszel Troubleshooting Guide
Below are common issues that you may encounter when setting up or running Beszel, along with suggested steps to diagnose and resolve them. Refer to the official Common Issues guide on the Beszel website for additional details.
First of all set your Agent/s to LogMode "debug" if you havent already.
Agent is not connecting
First, check the logs page in PocketBase at /_/#/logs to see if there's an identifiable error. The most common cause is a firewall blocking the connection request. You have two options to resolve this:
- Add a firewall rule: Create an inbound rule on your agent system’s firewall(s) to allow TCP connections on the specified port. This includes checking iptables or any cloud provider firewall settings you may be using.
- Use a tunneling or VPN solution: Software like WireGuard, Tailscale (video instructions), or Cloudflare Tunnel (instructions) can securely bypass firewall restrictions.
Another possibility is that you forgot to expose the container ports in your Docker configuration. Make sure the port is mapped and accessible.
To test connectivity, run:
telnet <agent-ip> <port>If the connection is refused or times out, it indicates a networking or firewall problem.
Connecting hub and agent on the same system using Docker
If the hub runs in a normal bridged network mode, but the agent is using host network mode, add the system using host.docker.internal as the hostname, which resolves to the special IP used by the host system. (See the Getting Started guide for a complete docker-compose.yml example.)
- Host mode for both hub and agent: You can use
localhostas the hostname if both containers share host networking. - Bridge mode for both: Use the agent’s
container_nameif both are on the same Docker network, e.g.beszel-agent.
Finding the correct filesystem
By default, the agent tries to detect and monitor the root filesystem for disk stats. In a container, this may not work reliably, so it’s recommended to specify the filesystem via the FILESYSTEM environment variable. To locate the correct filesystem:
- lsblk: Check under “NAME.”
- df -h: Check under “Filesystem.”
- sudo fdisk -l: Check under “Device.”
Docker container charts are empty or missing
If the container charts in Beszel are empty or don’t appear, you may need to enable cgroup memory accounting. To verify this, run docker stats. If you see zero memory usage, follow the guide here:
Enabling memory stats in Docker
This issue is common on certain Raspberry Pi or other ARM-based systems, but can also affect other environments where cgroup memory accounting is disabled by default.
Docker containers are not populating reliably
Upgrade to the latest Docker version if possible. There is a known bug in Docker 24 (and possibly earlier versions) that affects container stats. Although the agent includes a workaround, it may not completely resolve the issue.
Month / week records are not populating reliably
Beszel aggregates longer time periods (week/month) from shorter interval data. The agent must run uninterrupted for the entire interval to properly generate these records. If you pause/unpause the agent for more than a minute, you’ll lose continuity for that interval, causing incomplete data.