This page shows **one** example use case of [OpenID Connect (OIDC)](https://openid.net/connect/), using Traefik as a reverse proxy, [Authelia](https://www.authelia.com/) as an identity provider (OIDC Provider), and Linkwarden (the “Relying Party”). Please note that OIDC supports **many** different use cases and flow types—this walkthrough is just to demonstrate **one** approach.
--- [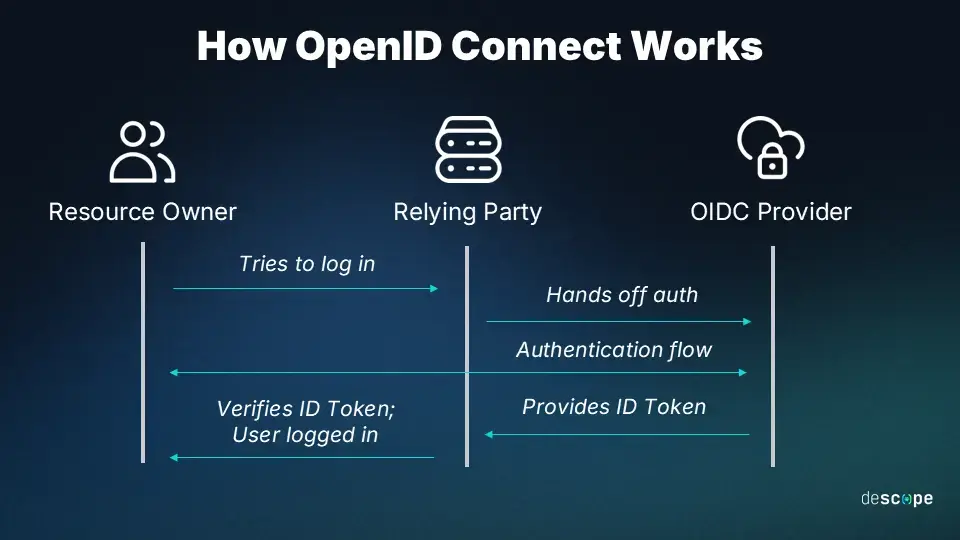](https://wiki.aeoneros.com/uploads/images/gallery/2025-02/50tpl4yni8gVn6KC-how-oidc-works.webp) ## Example OIDC Flow 1. **User goes to the Relying Party (Linkwarden).** The user attempts to access Linkwarden, which is behind Traefik. Because Linkwarden requires authentication, the user must log in. 2. **User chooses to log in with the OIDC Provider (Authelia).** When the user selects a “Login with Authelia” option, Linkwarden (through Traefik) redirects the user to Authelia. 3. **User gets redirected to the OIDC Provider (Authelia).** The browser is sent to Authelia’s login page. 4. **User logs in with the OIDC Provider (Authelia).** Authelia verifies the user’s credentials (for example, via LDAP, a local user database, or some other method). 5. **OIDC Provider (Authelia) generates an ID Token (JWT).** - This ID Token contains “claims” (such as username, groups, and email) based on the **scopes** defined in Authelia’s configuration. - Authelia signs the ID Token (it is a JWT) before sending it back to Linkwarden (the Relying Party). Here’s a simple table of possible scopes and example claim data:| **Scope** | **Claim** |
|---|---|
| **Profile** | Name |
| **Groups** | Groupa, Groupb, Groupc |
| **Email** | test @gmail.com |
**RFC Internet Standard:** RFC (Request for Comments) documents define internet standards, protocols, and best practices. For example, *RFC7519* outlines how JSON Web Tokens should be structured and validated, ensuring a standard approach to token-based authentication.
#### KeyID This is completely optional unless there’s a collision between automatically generated key IDs. If provided, it must be a unique string with fewer than 100 characters, matching the regular expression `^[a-zA-Z0-9](([a-zA-Z0-9._~-]*)([a-zA-Z0-9]))?$`. The default if this value is omitted is the first 7 characters of the public key SHA256 thumbprint in hex, followed by a hyphen, then the lowercase algorithm value. ```bash docker run --rm authelia/authelia:latest authelia crypto rand --length 15 --charset alphanumeric ``` For example: `"F2H5xqbYsa3AssEZTU"` --- #### Use The key usage. Defaults to `sig`, which is currently the only available option. --- #### Algorithm The algorithm for this key. Typically optional, as it can be automatically detected based on the type of key. At least one `RS256` key must be provided. --- #### Key You can generate an RSA keypair using the **Authelia** Docker container: ```bash docker run --rm -u "$(id -u):$(id -g)" -v "$(pwd)":/keys authelia/authelia:latest authelia crypto pair rsa generate --directory /keys ``` Assuming your working directory is `/mnt/glustermount/data/authelia_data/`, you’ll end up with `private.pem` and `public.pem`. Then, place `private.pem` somewhere like: `/mnt/glustermount/data/authelia_data/secrets/rsa_2048_private.txt` Create folders if necessary: ```bash mkdir /mnt/glustermount/data/authelia_data/config/secrets ``` Open `private.pem`, copy the content: ``` -----BEGIN RSA PRIVATE KEY----- ... -----END RSA PRIVATE KEY----- ``` And paste it into a new file: ```bash nano /mnt/glustermount/data/authelia_data/config/secrets/rsa_2048_private.txt ``` Save with CTRL+O and exit with CTRL+X.If you use different Paths like mentioned in [Step 2](https://wiki.aeoneros.com/link/171#bkmrk-step-2), please adjust the Configs.
--- ## Step 4 Add Clients/Services to OIDC. Here is an example on how to add Linkwarden: [Setup OIDC for Linkwarden](https://wiki.aeoneros.com/books/authelia/page/setup-oidc-for-linkwarden). --- ## Conclusion With the above configuration, Authelia can function as an OIDC provider, signing JWT tokens for your clients or services (like Linkwarden). Make sure to correctly configure your OIDC clients with the same settings (client IDs, secrets, scopes) to ensure smooth authentication. Once you’ve confirmed it’s working with a test service, you can reuse these steps for additional applications that support OIDC. # Add OIDC-Integration for Linkwarden ## [  ](https://wiki.aeoneros.com/uploads/images/gallery/2025-01/zI77hnYjCvFDCQ3H-authelia.png "https://www.authelia.com/") [  ](https://wiki.aeoneros.com/uploads/images/gallery/2025-01/814rhr5FohzOPEav-github-logo.png "https://github.com/authelia/authelia") [  ](https://wiki.aeoneros.com/uploads/images/gallery/2024-09/3zh7ZTM0tufMvk6C-logo-1.png "https://hub.docker.com/r/authelia/authelia") ## ## ## ## Overview This page will show you how to add Linkwarden as a client (integration) for Authelia using OpenID Connect (OIDC). We’ll walk through configuring the `clients` section in Authelia’s `configuration.yml`, updating your access control rules, and finally setting up Linkwarden with the correct environment variables. --- ## Step 1: Authelia Configuration for the New Client In the OIDC setup guide, you’ve already configured the basic OIDC parameters (hmac\_secret, jwks, etc.). Now, we need to add the `clients` block to your OIDC configuration to allow Linkwarden to authenticate via Authelia. Open your Authelia configuration file: ```bash nano /mnt/glustermount/data/authelia_data/config/configuration.yml ``` Within the `identity_providers` > `oidc` section, add or edit the clients block as follows: ```yaml identity_providers: oidc: hmac_secret: 'this_is_a_secret_abc123abc123abc' jwks: - key_id: 'F2H5xqbYsa3AssEZTU' algorithm: 'RS256' use: 'sig' key: {{ secret "/secrets/rsa_2048_private.txt" | mindent 10 "|" | msquote }} lifespans: access_token: '1 hour' authorize_code: '1 minute' id_token: '1 hour' refresh_token: '90 minutes' enable_client_debug_messages: false clients: - client_id: 'linkwarden' client_name: 'Linkwarden' client_secret: '$pbkdf2-sha512$310000$c8p78n7pUMln0jzvd4aK4Q$JNRBzwAo0ek5qKn50cFzzvE9RXV88h1wJn5KGiHrD0YKtZaR/nCb2CJPOsKaPK0hjf.9yHxzQGZziziccp6Yng' #insecure_secret public: false authorization_policy: 'two_factor' redirect_uris: - 'https://linkwarden.YOURDOMAIN.com/api/v1/auth/callback/authelia' scopes: - 'openid' - 'groups' - 'email' - 'profile' userinfo_signed_response_alg: 'none' token_endpoint_auth_method: 'client_secret_basic' ``` ### Step 1.1: `client_id` This references the unique identifier for the client (RFC: [RFC3986, Section 2.3](https://datatracker.ietf.org/doc/html/rfc3986#section-2.3)). In this example, it’s set to `linkwarden`. You could instead use a random string to avoid collisions or for security best practices. Tools like [it-tools token generator](https://it-tools.tech/token-generator) can be used to generate a random client ID. ### Step 1.2: `client_name` This is a human-readable name for your application. Here, we’re calling it `Linkwarden`. You can name it anything that will help you identify this application in the future. ### Step 1.3: `client_secret` This is the secret used by the client to authenticate to Authelia (RFC: [RFC3986, Section 2.3](https://datatracker.ietf.org/doc/html/rfc3986#section-2.3)). In the example above, we’re using a hashed secret labeled `insecure_secret` for testing. You can generate a more secure secret by running: ```bash docker exec -it authelia authelia crypto hash generate pbkdf2 --variant sha512 --random --random.length 72 --random.charset rfc3986 ``` When using Docker-Swarm Change the Containername by adding your Stackname infront or using the ContainerID: ``` docker exec -it traefik_authelia authelia crypto hash generate pbkdf2 --variant sha512 --random --random.length 72 --random.charset rfc3986 docker exec -it 337adb14377e authelia crypto hash generate pbkdf2 --variant sha512 --random --random.length 72 --random.charset rfc3986 ``` Example output: ``` Random Password: Xh.nVAMt3P5m~fUTBj4issbKc38Xx5E47nUN7YvTzSntJv0DK2_EKdURzZFYhhs4LE4oKf~c Digest: $pbkdf2-sha512$310000$fK3lAD7WgJ147IBgnUdC9g$F1QMc0kpTwVIUNldTaAGG8uD0EoQRxham7nN8HUXHVhNNUh2ubPu/wgo.YxXYC5ewNL.j3WPqnFLCB/mwfWSgA ``` You’d then place the `Digest` portion into the `client_secret` field in Authelia and use the corresponding “Random Password” value (or the “insecure\_secret” equivalent) in the Linkwarden environment variable. ### Step 1.4: `redirect_uris` and `authorization_policy` Make sure the redirect URI matches `https://linkwarden.YOURDOMAIN.com/api/v1/auth/callback/authelia` (or whichever endpoint Linkwarden expects). Adjust your `authorization_policy` (such as `one_factor` or `two_factor`) depending on your security needs. --- ## ## Step 2: Add Domain to Authelia Access Control Next, you’ll want to allow access for `linkwarden.YOURDOMAIN.com` in your Authelia rules. Typically, this is done in the `access_control` section: ```yaml access_control: default_policy: 'deny' rules: - domain: 'whoami-secure.YOURDOMAIN.com' policy: 'two_factor' - domain: 'links.YOURDOMAIN.com' policy: 'two_factor' ``` Replace `links.YOURDOMAIN.com` or add another rule for the domain or subdomain where Linkwarden resides (`linkwarden.YOURDOMAIN.com`). --- ## Step 3: Add OIDC Settings to Linkwarden If using a Docker Compose setup, you can add the following environment variables in your `docker-compose.yaml` (or the equivalent setup in Portainer): ```yaml services: linkwarden: image: ghcr.io/linkwarden/linkwarden:v2.9.3 environment: # SSO - Authelia - NEXT_PUBLIC_AUTHELIA_ENABLED=true - AUTHELIA_WELLKNOWN_URL=https://auth.YOURDOMAIN.com/.well-known/openid-configuration - AUTHELIA_CLIENT_ID=${AUTHELIA_CLIENT_ID} - AUTHELIA_CLIENT_SECRET=${AUTHELIA_CLIENT_SECRET} # SSO - Accounts - DISABLE_NEW_SSO_USERS=false ``` **Important:** Make sure `DISABLE_NEW_SSO_USERS` is set to `false` or new users will be blocked from logging in via SSO. ### Environment Variables Table| Environment Variable | Default | Description |
|---|---|---|
| NEXT\_PUBLIC\_AUTHELIA\_ENABLED | - | If set to true, Authelia will be enabled and you'll need to define the variables below. |
| AUTHELIA\_WELLKNOWN\_URL | - | https://{{authelia.domain.com}}/.well-known/openid-configuration |
| AUTHELIA\_CLIENT\_ID | - | Client ID |
| AUTHELIA\_CLIENT\_SECRET | - | Client Secret. (Random Password from command below) |